
Adenium Squishy Caudex After Watering: Causes and Fixes
Why an Adenium caudex may soften after watering, how to compare dehydration, cold stress, root loss, and rot, and how to respond without relying on unsupported timing or dosing rules.
Nathan Brooks · 2026-05-28 · 24 min read
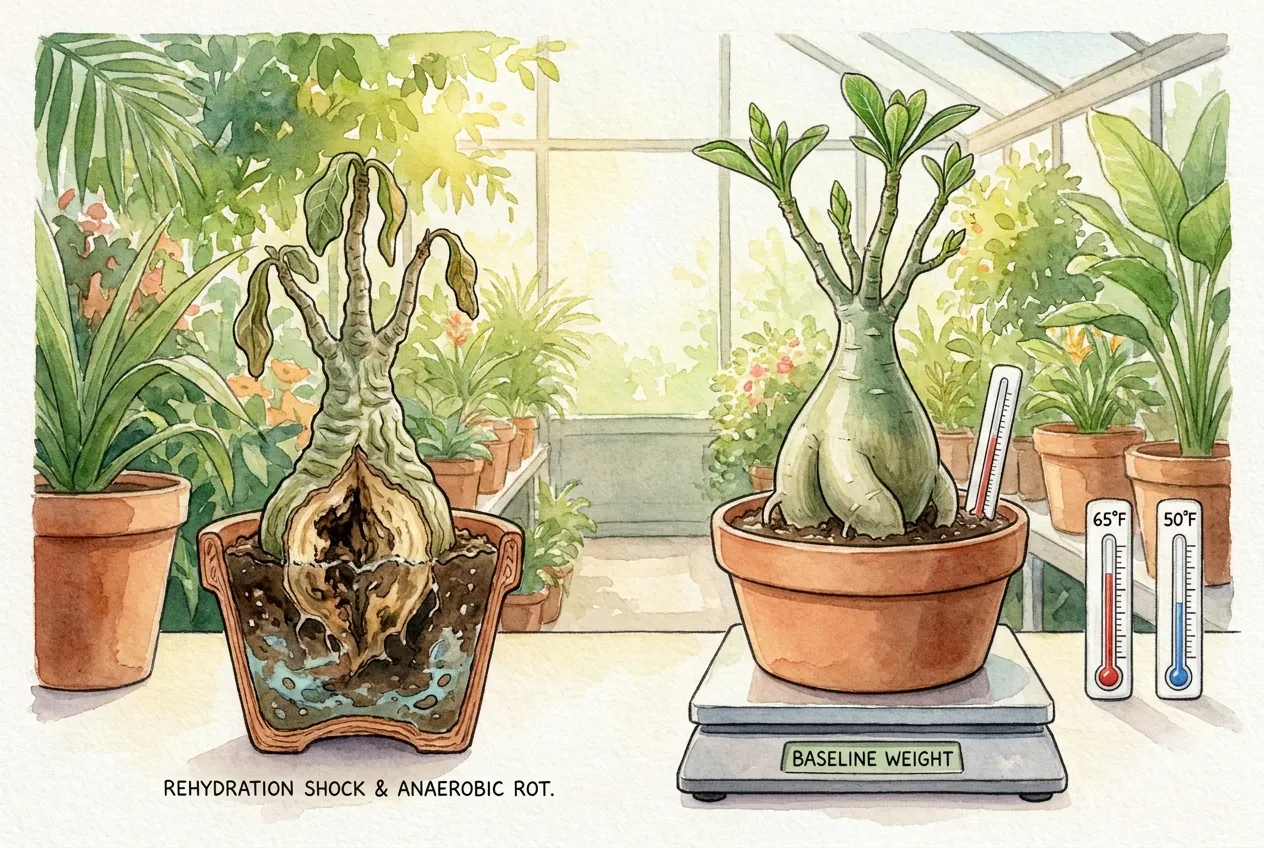
Key Takeaways
- A caudex that softens after watering can mean rehydration, cold injury, root loss, or rot, so diagnose before you water again. Compare baseline firmness, root condition, temperature, pot dry-down, discoloration, odor, and whether the tissue springs back.
- Ease a dormant Adenium back into watering only when warmth, new growth, and a drying root zone all point to renewed activity. Do not drench a cold or barely rooted plant.
- If a soft, discolored pocket appears, isolate the plant and inspect it promptly. When cutting is justified, use a clean disinfected blade with gloves and eye protection, then let the wound dry before repotting.
- A coarse, mostly mineral mix in a right-sized pot keeps the caudex out of saturated, airless soil. Build watering volume only as the actual pot proves it can dry between checks.
A softening caudex after watering is alarming, but timing alone does not identify the cause. Compare the plant's baseline firmness, the root zone, temperature, pot dry-down, discoloration, odor, and whether the tissue springs back. The same observation can accompany dehydration recovery, cold stress, root loss, non-infectious damage, or rot.
Sometimes the roots look fine when you pull the plant and the softness seems to be in the trunk itself. Growers sometimes call this top-down or inside-out softening, but that is a description of a reported pattern, not a formally established disease.
Softening after watering can come from overwatering and rot in a cold, saturated pot, cold injury, lost roots that can no longer support the trunk, or (if the tissue springs back without discoloration) simple dehydration. A cold, wet, poorly aerated pot can starve roots and lower trunk tissue of oxygen, while very fast, heavy watering onto long-dormant tissue may exceed what the plant is ready to handle. The exact cellular mechanism has not been measured in Adenium, so treat these explanations as reasonable physiology rather than proven fact.
Why does a squishy caudex appear after watering?
Separate rehydration from disease
Softness after a deep soak can reflect rehydration, a saturated root zone, tissue damage, or disease. There is no Adenium study showing that a particular 48-hour window proves rehydration shock plus interior necrosis.
Succulent cell walls can fold and recover during drought, but the detailed mechanism varies by tissue and species. Use the Portulacaria study as context for recovery from drought, not as proof of a rapid-water rupture pathway in Adenium.
Wet media can reduce root-zone gas exchange and increase disease pressure, yet a saturated pot does not prove that the caudex interior is starved of oxygen or infected. Inspect the whole system before cutting.
Before the first transitional watering, I choose an ordinary reference area and its opposite point at the same measured distance above the substrate line. A duplicate photograph fixes both points to the pot-rim orientation. I avoid ink on the caudex and never use a thumbnail to test it.
For each check, I film one light pad-of-the-finger press on the reference side and one on the area of concern. The same hand position and a single comparison reduce the chance of creating a bruise through repeated probing. My notes distinguish initial yield, rebound, and whether the soft boundary is localized or equally present on both sides.
The paired clip serves only as a within-session comparison because finger force is not calibrated. Before any repeat, I hold the plant in bright shade for 30 minutes, test immediately before watering, and record hours since irrigation. I repeat only when the same infrared thermometer, distance, and angle put both surfaces within 2°C of baseline, using that limit for repeatability rather than tissue safety.
I stop the comparison and inspect instead if the pocket grows, a dent persists, color changes, odor appears, or the root zone remains wet. Those signs outweigh an uncalibrated finger test because they can indicate progressing damage.
What actually happens to a parenchyma cell during drought and rewatering?
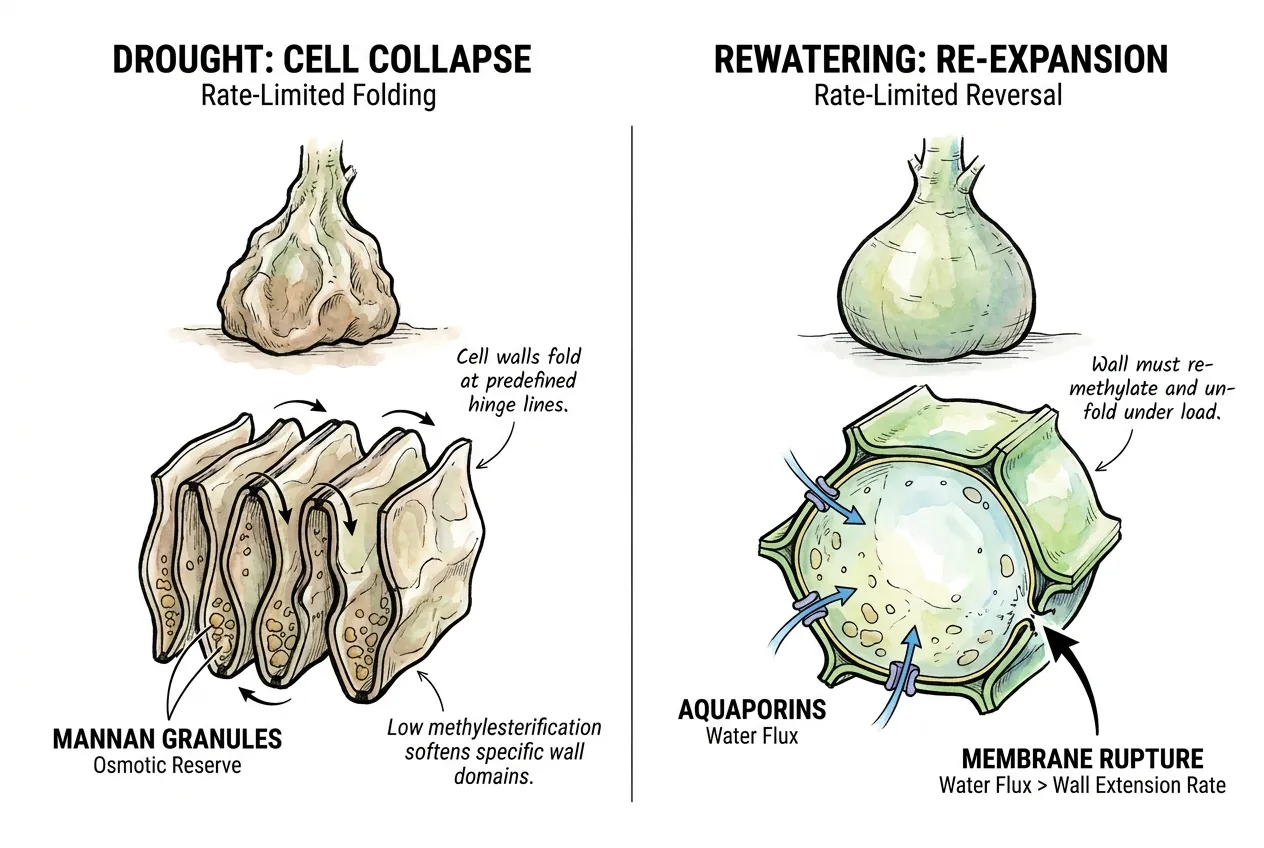
Succulent water-storage cells (hydrenchyma) survive drought by folding their walls inward rather than stretching them. Studies of stem succulents describe thin, pectin-rich walls that buckle at hinge regions as the tissue dries, though the detailed sequence varies by species and tissue.
When water returns, the cell's transport and wall repair have to recover together. A rapid influx may be stressful if the tissue cannot accommodate it, but the exact rupture mechanism has not been demonstrated for Adenium.
The Portulacaria afra rewatering study is the strongest published model for this process. After 145 days of imposed drought, the plants recovered internal water pressure within 24 hours and rebuilt full photosynthesis over the next several days, with leaf pigments taking about 27 days.
The plants stayed structurally intact, and the study does not prove that small stepped waterings are required.
It does show that a stem succulent can recover from extreme drought over days, which supports patience during spring wake-up. Adenium-specific rehydration kinetics have not been published, so the Portulacaria model does not establish a required stepped-watering protocol for Adenium.
Why does the caudex interior lose oxygen so fast in a wet pot?
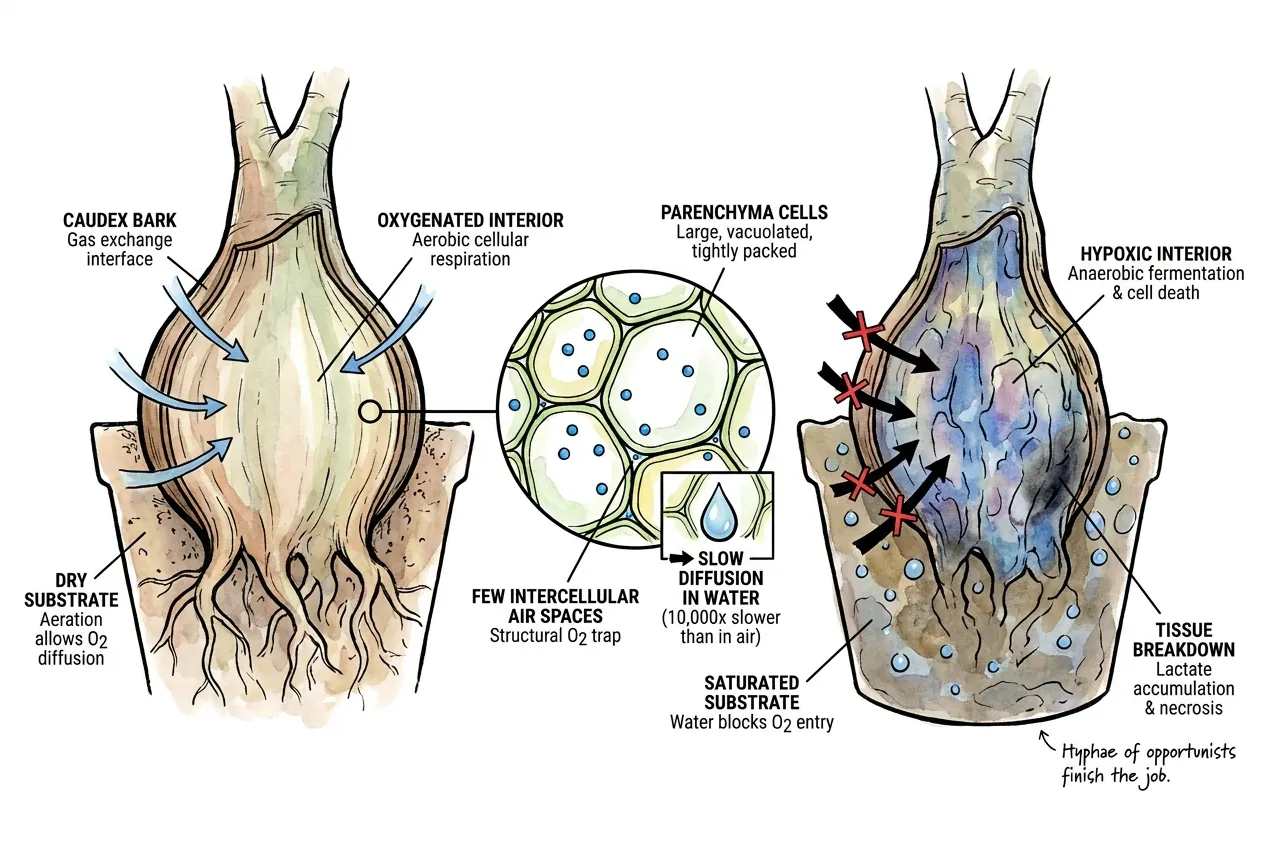
Saturated media reduce gas exchange around roots, and wet conditions can increase the risk of water-mold or fungal disease. The rate at which a particular pot or caudex loses oxygen depends on tissue, substrate, temperature, airflow, and water content.
No measurement here supports a universal 24-to-48-hour internal-oxygen threshold. Softening without odor can still have several causes, so treat inside-out or reverse-order rot as a hobby description rather than a confirmed diagnostic category.
Pythium and Phytophthora are common oomycete examples associated with saturated conditions, but their relevance depends on the plant, substrate, and local disease pressure. UC IPM notes that soil moisture at 70% or higher of available water capacity can favor Pythium infection and that motile zoospores are released when soil is flooded or saturated. These pathogens can exploit stressed, poorly aerated roots, yet a wet pot alone is not a diagnosis.
Adenium-specific reports have identified Neocosmospora ipomoeae and later N. keratoplastica in wilt or basal stem rot cases, while older literature grouped related findings under Fusarium. Those studies do not establish a fixed drought-to-flood sequence or a universal entry path for every soft caudex.
What does ‘reverse-order rot’ actually look like compared to bottom-up root rot?
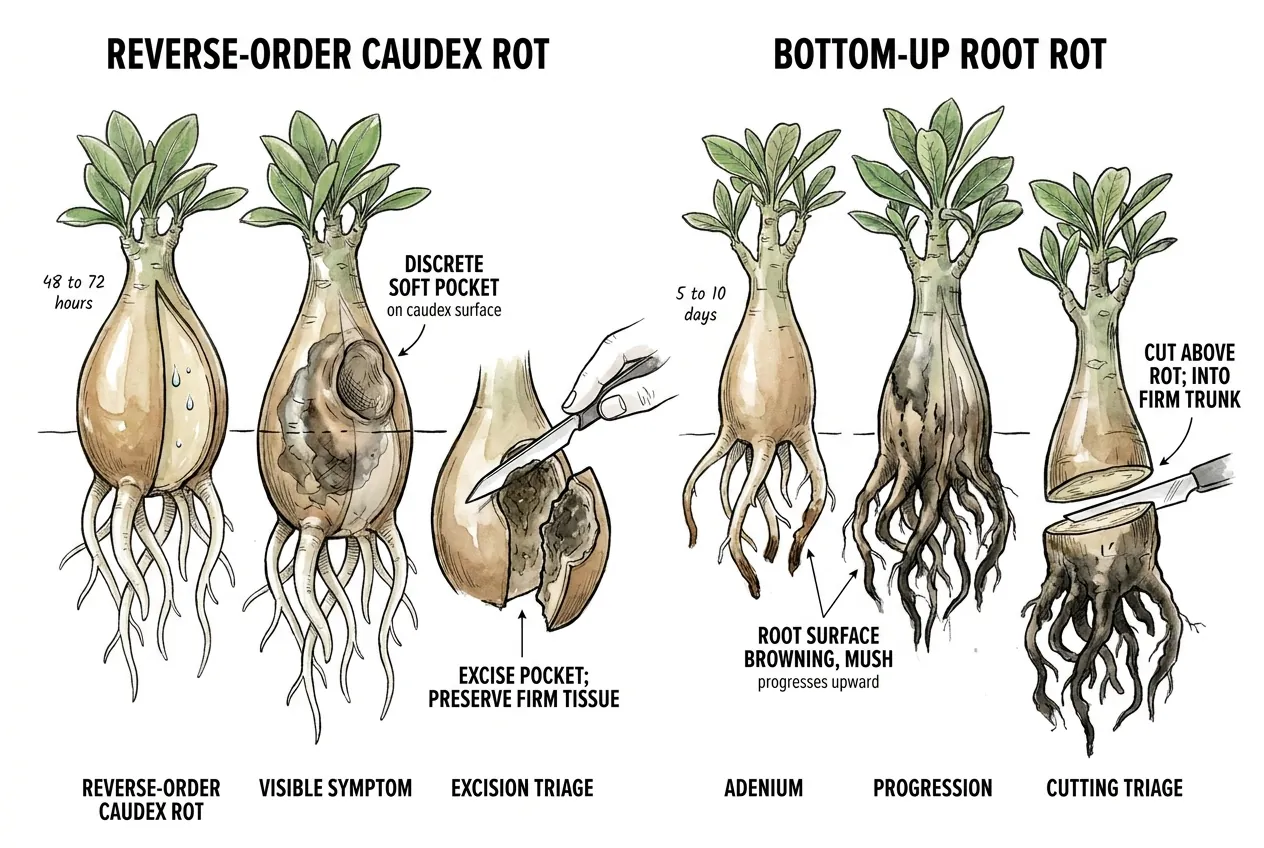
Some growers describe a pattern in which a caudex softens while surface roots still look firm and white. This is a reported pattern, not a validated disease category. Root-associated rot can progress from feeder roots toward the collar, but visible order and timing vary with tissue, pathogen, and environment. Do not use symptom location alone to establish an opposite sequence.
| Feature | Bottom-up root rot | Reverse-order caudex rot |
|---|---|---|
| First visible symptom | Root surface browning, then black mush | Possible localized softening. Location alone is not diagnostic |
| Root condition when caudex shows softness | Roots already discolored or mushy | Roots may still look firm. This does not exclude internal damage |
| Time from cause to first symptom | Variable | No validated timeline |
| Primary mechanism | Pathogen colonization of feeder roots | Possible tissue damage, wet-media stress, or pathogen involvement |
| Where to cut for triage | Above the rotted root mass, into firm trunk | Confirm the cause before cutting. Preserve sound tissue |
Growers do report a dry spell followed by a deep soak and a soft caudex pocket a few days later while the leaves remain firm. Such anecdotes justify careful diagnosis, but they do not prove a specific mechanism or timeline.
When is it safe to water an Adenium coming out of dormancy?
Use several cues together. The plant should be actively growing, the root zone should no longer be cold, the previous watering should have drained, the mix should have dried to the depth appropriate for the pot, and there should be no sign of rot.
Warm nights and new leaves are useful context, not a universal gate. New leaf growth can run briefly on stored water, so pair it with the pot's drying trend and root condition.
If the plant is soft, foul-smelling, or sitting in a wet, cold mix, diagnose before adding more water.
Why can late spring be a higher-risk window?
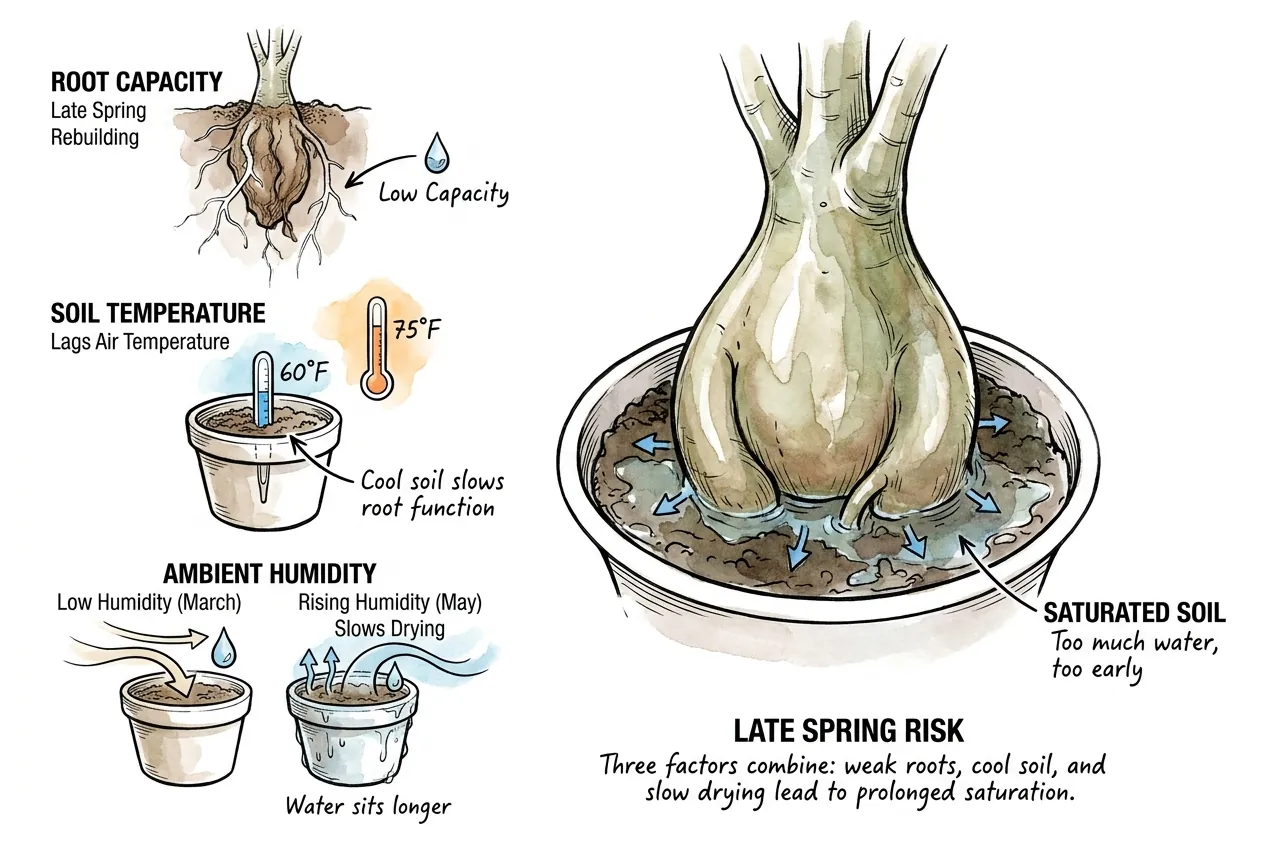
Late spring can combine changing temperatures, recovering roots, and a pot that dries more slowly than it will in summer. The size of that wet window depends on the container, mix, airflow, humidity, and light, so measure the actual pot rather than using a regional percentage or day count.
The University of Arizona Cooperative Extension describes Adenium as warmth-loving and cold-sensitive, with sparse watering appropriate once spring nights are warm and new leaves appear. That regional guidance does not establish a universal optimum band. The Tucson Cactus and Succulent Society also warns that root rot often strikes in spring after too much water too early, especially in overpotted plants.
New leaves are one useful sign of activity, not a stand-alone hydraulic-readiness signal. Leaves can run on stored caudex water while roots remain inactive, so pair leaf growth with root-zone warmth, drainage, and firmness. A soil thermometer pushed 2 to 3 inches into the pot turns that guess into a measurement.
How fast does container thermal mass actually lag?
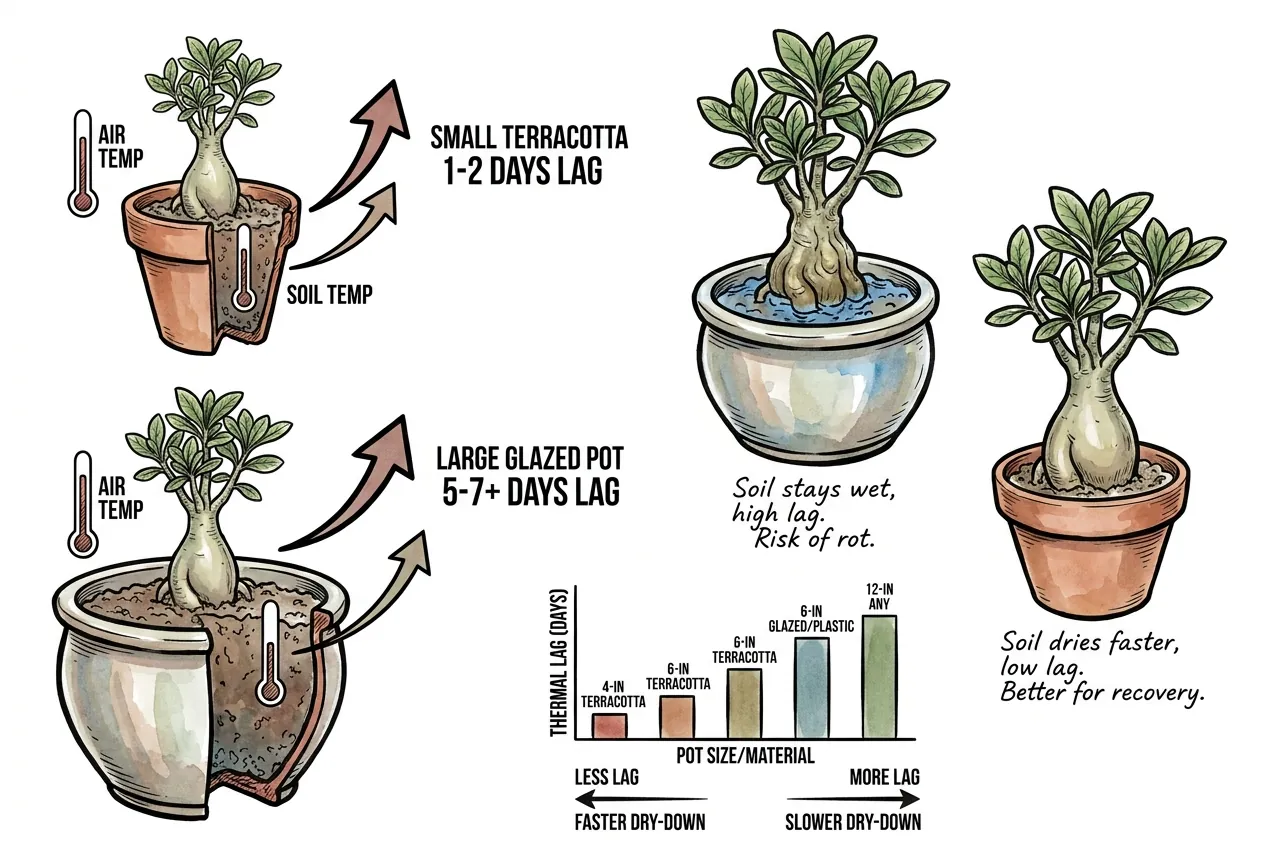
A container can lag air temperature, but the direction and duration depend on pot mass, material, color, moisture, radiation, airflow, and placement.
A thermometer at root-zone depth is more useful than a fixed lag table.
| Pot type and size | Approximate soil-temp lag behind air | Relative dry-down rate |
|---|---|---|
| 4-inch terracotta | Measure in the actual setup | Often dries faster, but not guaranteed |
| 6-inch terracotta | Measure in the actual setup | Depends on mix and airflow |
| 6-inch glazed ceramic | Measure in the actual setup | Depends on mix and airflow |
| 6-inch plastic | Measure in the actual setup | May dry slowly, but not a fixed ratio |
| 12-inch any material | Measure in the actual setup | Container depth and environment dominate |
For a plant prone to rot or currently recovering, choose a pot and mix whose dry-down you can observe and control.
Terracotta may dry faster in some conditions, but material alone does not determine rot risk.
What is a cautious stepped rehydration approach?
A cautious approach after a long dry period is to re-wet enough of the root zone to observe drainage, then wait for the actual pot to dry before increasing the next watering.
The amount depends on pot size, mix, roots, and environment. No Adenium trial validates a universal milliliter schedule.
Use the same discipline regardless of volume. Check the whole plant before each drink, avoid a cold saturated pot, and stop to diagnose if new softness, discoloration, odor, or prolonged wetness appears.
What volume should the first water actually be?
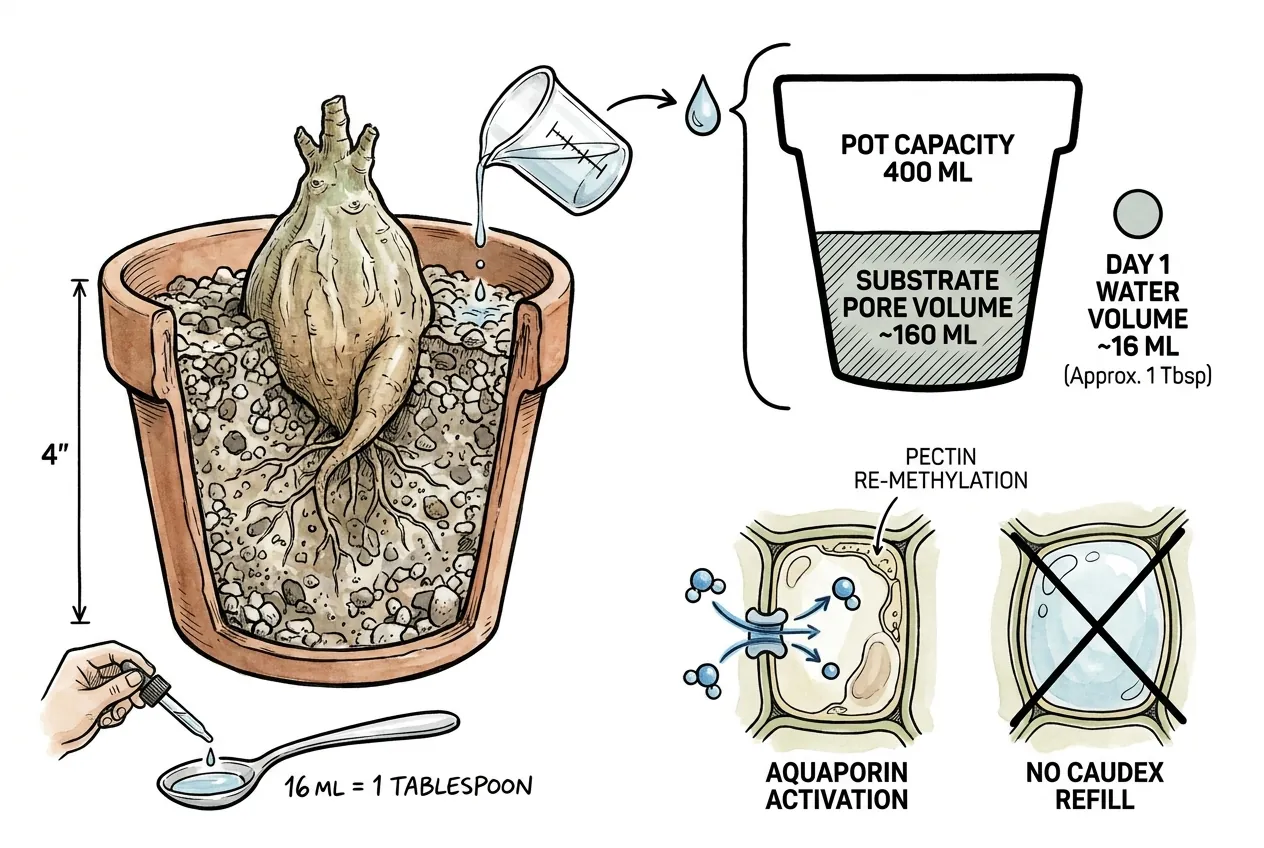
Start with a measured amount that wets the root zone without leaving the pot saturated, then record drainage and dry-down.
A scale or moisture check can reveal whether the same pot is ready for more, but the reading is a trend, not a universal threshold.
How do you know when to do the next step?
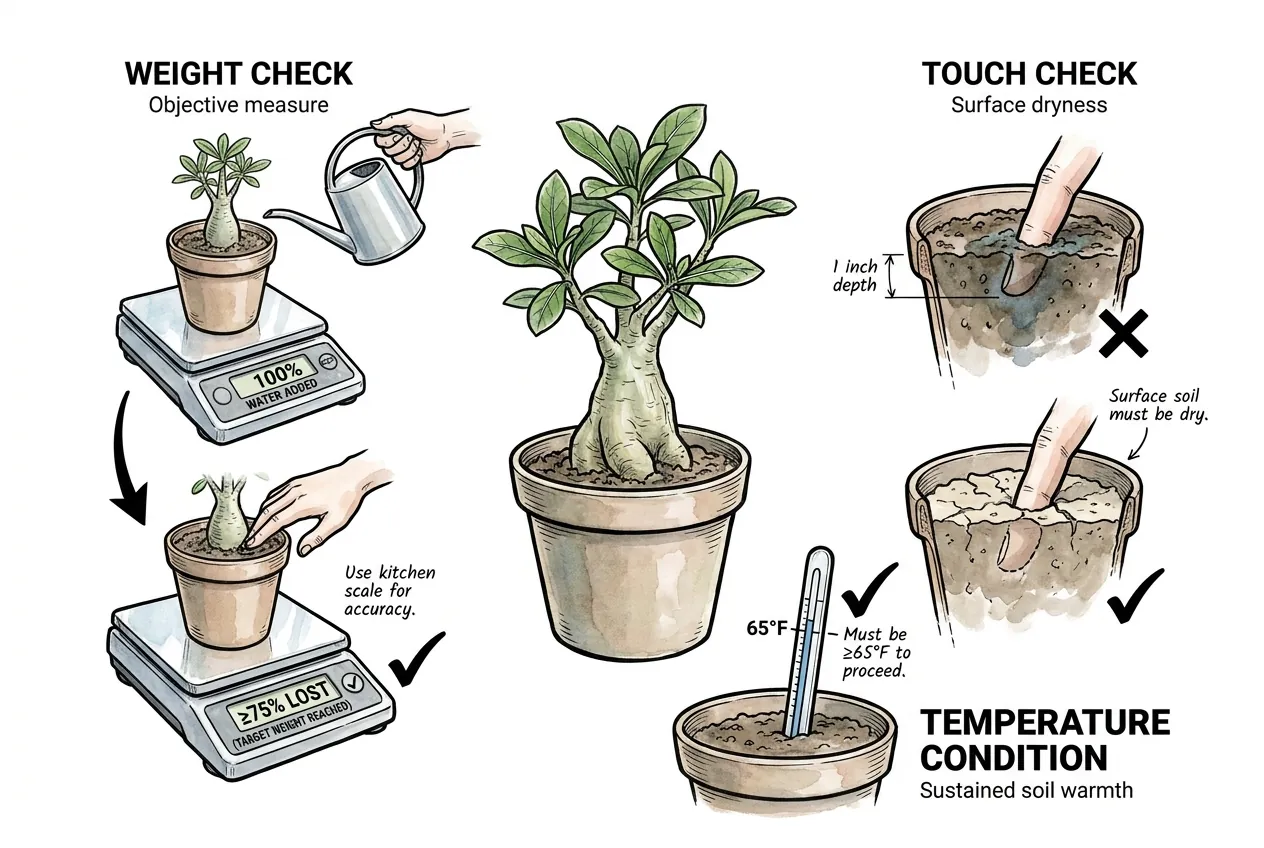
Repeat only after the pot has drained and dried to the depth appropriate for its roots and environment.
A kitchen scale can make the same-pot trend visible, while a surface check alone may miss a wet lower zone.
There is no validated day-by-day volume table for Adenium. Increase gradually only when the plant and pot show that the previous amount was used without softening.
Keep the root zone protected from cold spells and use measured temperature as context, not a fixed gate.
If new softness, foul odor, discoloration, or a pot that remains wet appears, stop adding water and inspect the roots and base.
What signals should trigger an immediate abort?
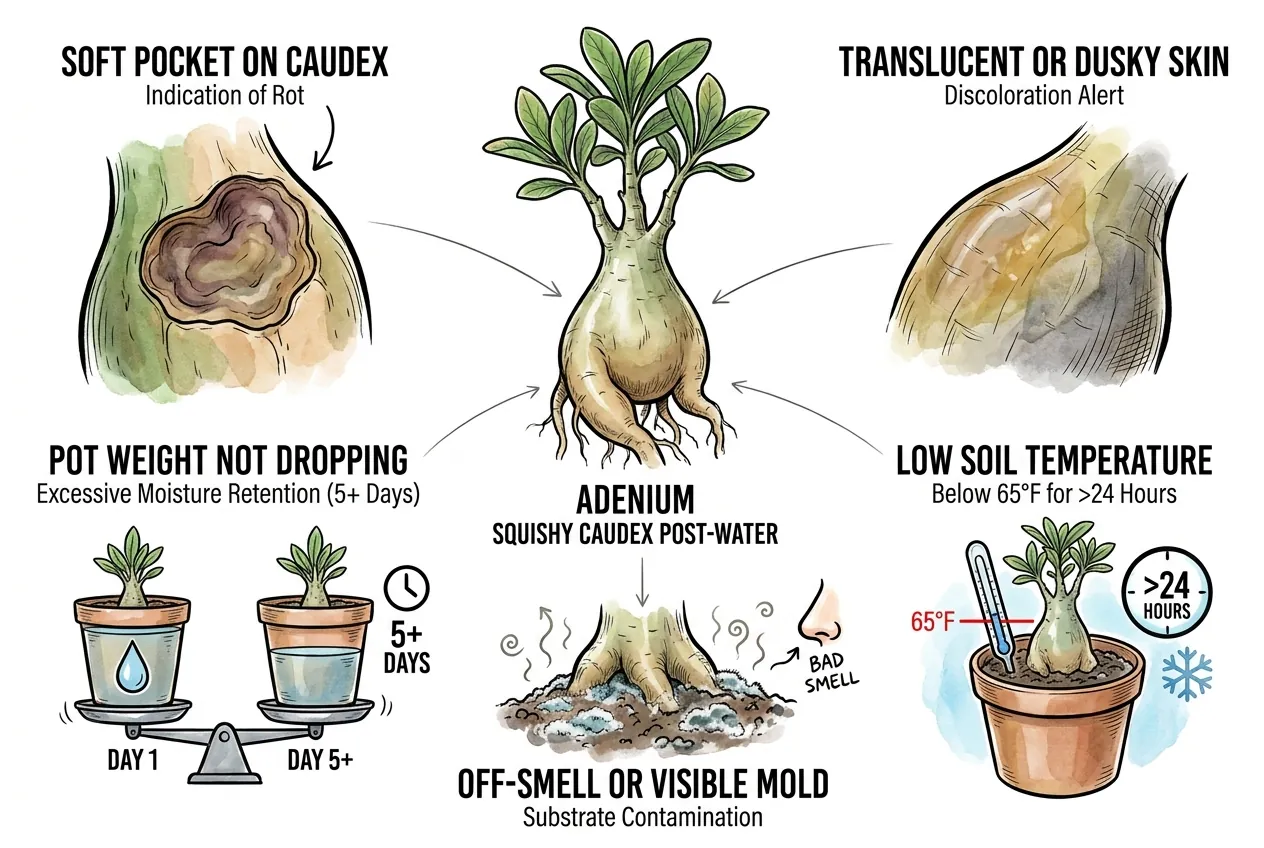
Warning signs that should pause watering and trigger diagnosis include the following.
- Soft pocket appears anywhere on the caudex
- Caudex surface becomes translucent or dusky in color
- The pot remains wet much longer than its established dry-down pattern
- A cold spell or root-zone temperature change coincides with declining tissue
- Off-smell from the substrate or root zone, or visible mold on substrate surface
Use observed signals rather than a calendar, and seek a plant diagnostic opinion when the cause is unclear.
How do you save a caudex that’s already squishy?
A soft caudex may be salvageable, but appearance alone cannot predict the outcome.
Before cutting, isolate the plant, document the progression, check roots and odor, and consider a plant diagnostic service if the cause is uncertain.
If surgery is chosen, remove only tissue that is clearly soft, discolored, or foul, keep the cut as small as practical, and use clean tools and full PPE.
Let the wound and new substrate follow a monitored drying and rooting process.
No universal callusing duration, pumice-only rule, bottom-heat setting, or no-water interval is established for Adenium.
When do you spot-excise versus cut and reroot?
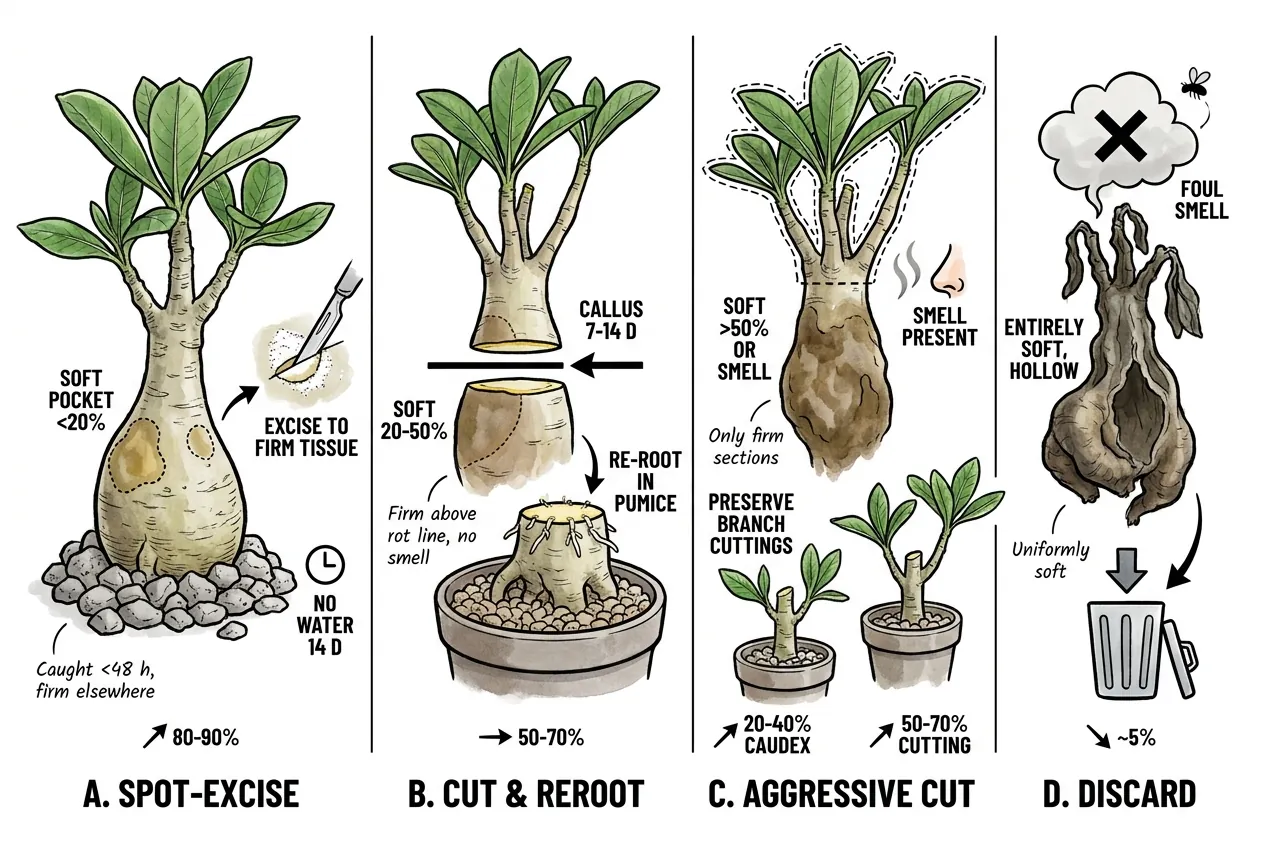
Spot-excision is only a consideration when the affected area is clearly localized and firm tissue surrounds it.
If softening is extensive, advancing, foul-smelling, or close to the root collar, cutting may not preserve the plant and professional advice may be warranted.
Do not convert a visual estimate into a percentage threshold. Firm tissue is not proof of pathogen-free tissue, and repeated cutting can enlarge wounds or spread contamination.
| Branch | Condition | Action | Approximate survival |
|---|---|---|---|
| A | Clearly localized softening with firm surrounding tissue | Consider limited removal only with PPE and clean tools. Monitor before rewatering | No validated percentage |
| B | Extensive softening but some firm tissue remains | Seek expert guidance before a major cut. Outcome is uncertain | No validated percentage |
| C | Advancing softening, odor, or root-collar involvement | Isolate and seek diagnosis. Preserve sound cuttings only if safe | No validated percentage |
| D | Entirely soft, hollow, and foul-smelling | Quarantine and dispose of material safely if no firm tissue remains | No validated percentage |
What is the correct tool sterilization protocol?
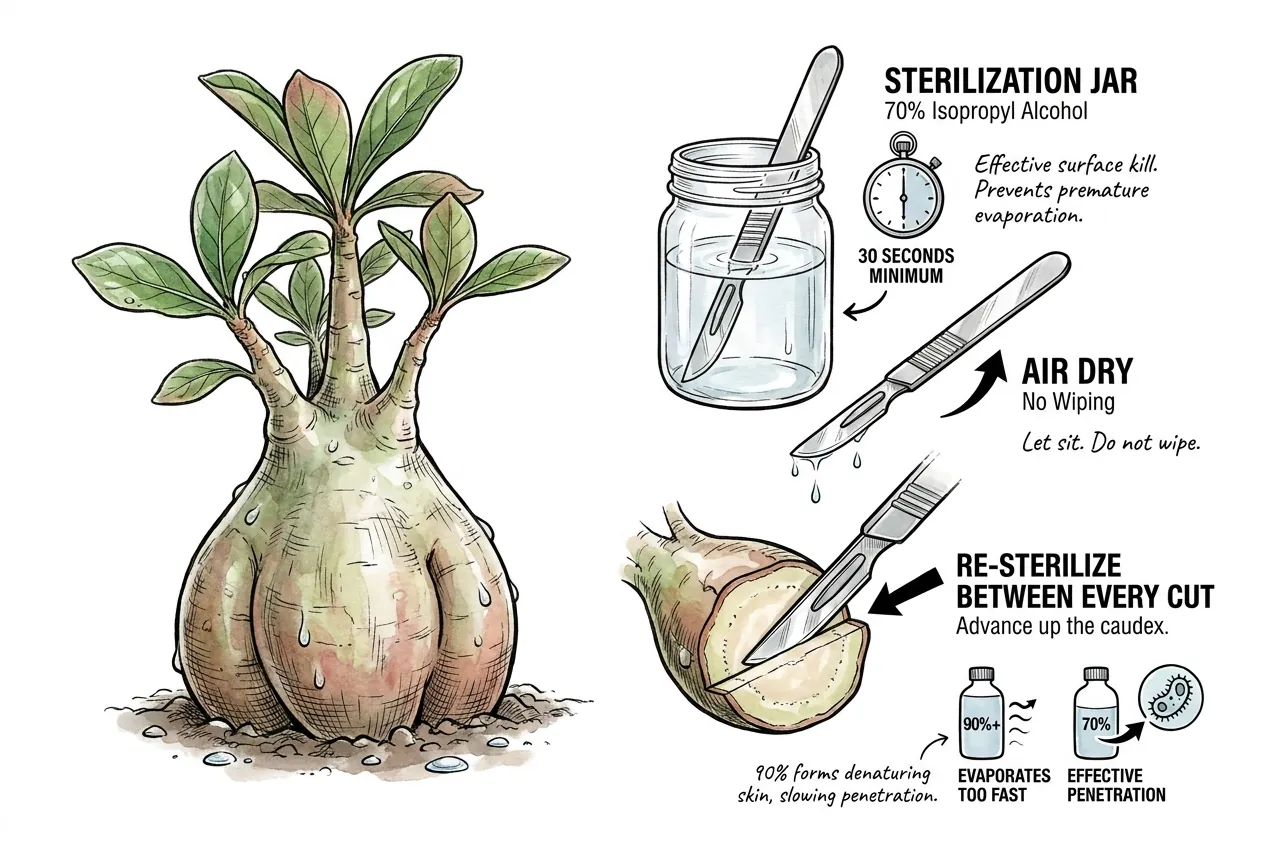
Wear chemical-resistant gloves and eye protection, remove visible debris, and use a current tool-disinfection protocol between cuts.
Alcohol is one option for routine work, but it is not a universal sterilizer and its efficacy depends on pathogen and contact conditions.
Keep any alcohol capped, ventilated, and separated from flames, heat, sparks, children, pets, and food.
If a higher-risk pathogen is suspected, use a validated bleach or other labeled method with correct preparation, rinse, and drying.
A labeled 70% rubbing-alcohol product is one routine option. If you already keep a suitable disinfectant on hand, you do not need a dedicated bottle. Follow its label and pathogen-specific guidance.
How long does the cut need to dry before re-potting?
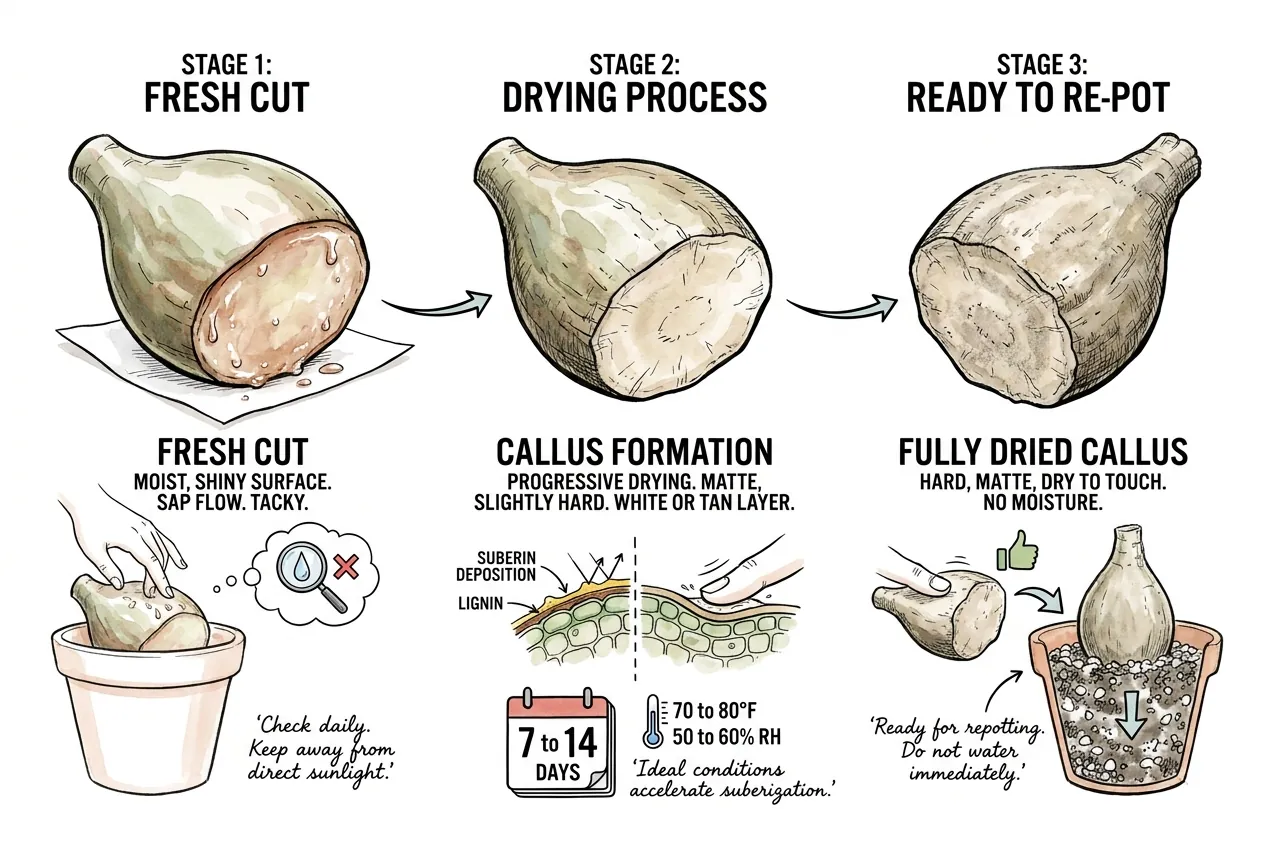
Callus formation depends on cut size, tissue condition, humidity, airflow, and temperature.
Use a dry, matte surface and the absence of fresh sap as observations, not a fixed day range.
Place the cut caudex on a clean, stable surface in bright indirect light with airflow, and protect it from children, pets, and contamination.
Do not rely on touch alone if the tissue is discolored, foul, or continuing to soften.
Suberization is the deposition of suberin (a wax-like polymer) and lignin at the wound surface, creating a hydrophobic barrier.
The process is temperature- and humidity-dependent. Warm and dry conditions accelerate it, while cool and humid conditions delay it.
A larger or more humid cut may take longer, while a small clean wound may dry sooner.
Let the tissue condition, not an inherited day count, determine whether repotting is appropriate.
What substrate and conditions does the re-root need?
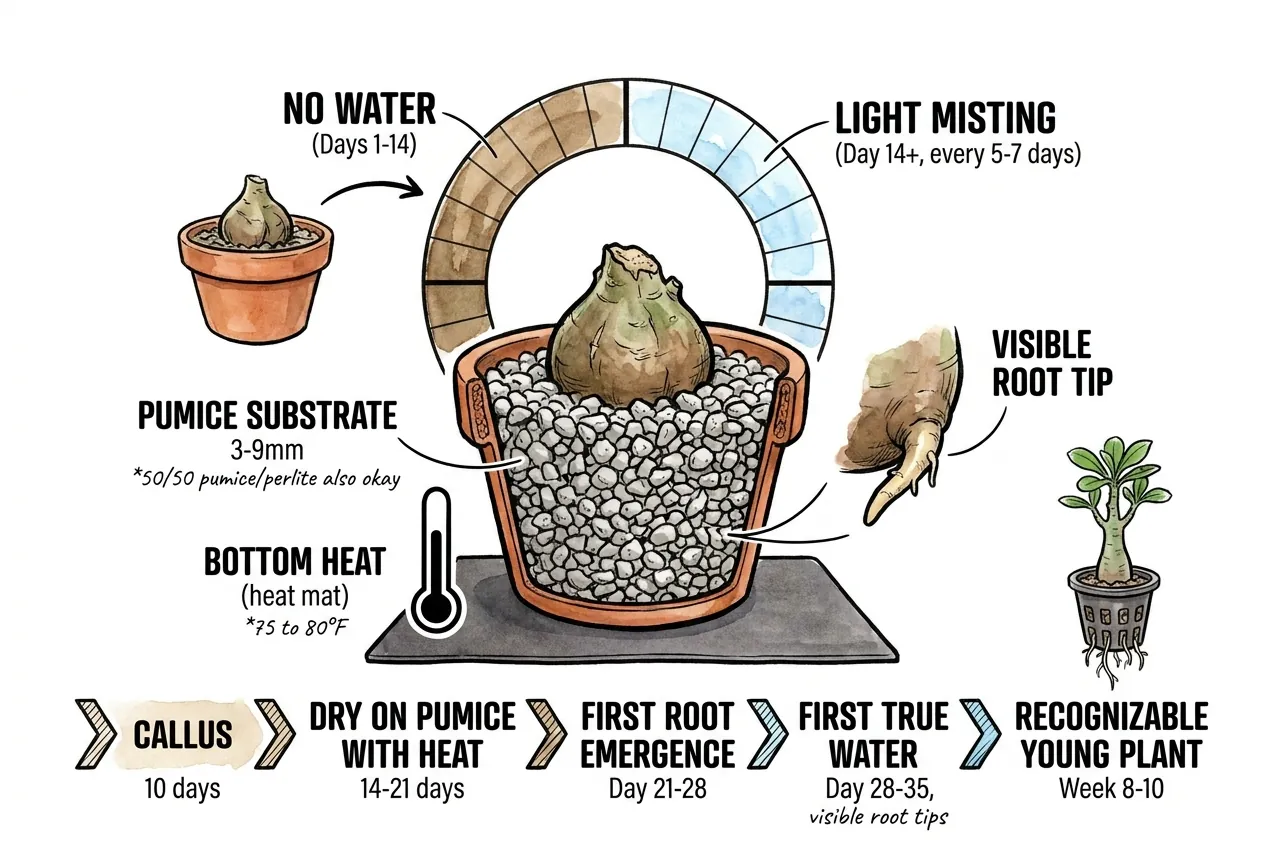
Use a clean, open, fast-draining medium whose particle size suits the rootless cutting and pot.
Pumice or a pumice blend is one option. Organic components are not automatically forbidden, but a mix that stays wet against a wound is risky.
Bottom heat is optional and should be used only with an independent thermometer and safe placement.
Rewater only when the wound, substrate, and root response support it. No fixed 14-day, misting, volume, or week-4 schedule is validated for Adenium.
Set up
Use a stable, appropriately sized pot, set the cut at the medium surface without burying the wound, and keep it in bright indirect light with good airflow. Adjust moisture and warmth to observed rooting rather than a calendar.
How do you build a substrate that reduces rot risk?
A useful substrate is open enough to drain and hold air after watering, yet still retains enough moisture for the roots.
Air-filled porosity, mineral fraction, particle size, and fines must be measured in the actual mix and container. No single recipe guarantees against rot.
Pumice is one stable mineral component. Perlite, lava, bark, or other materials can also work when their grading and dry-down fit the plant.
What air-filled porosity actually means for your pot
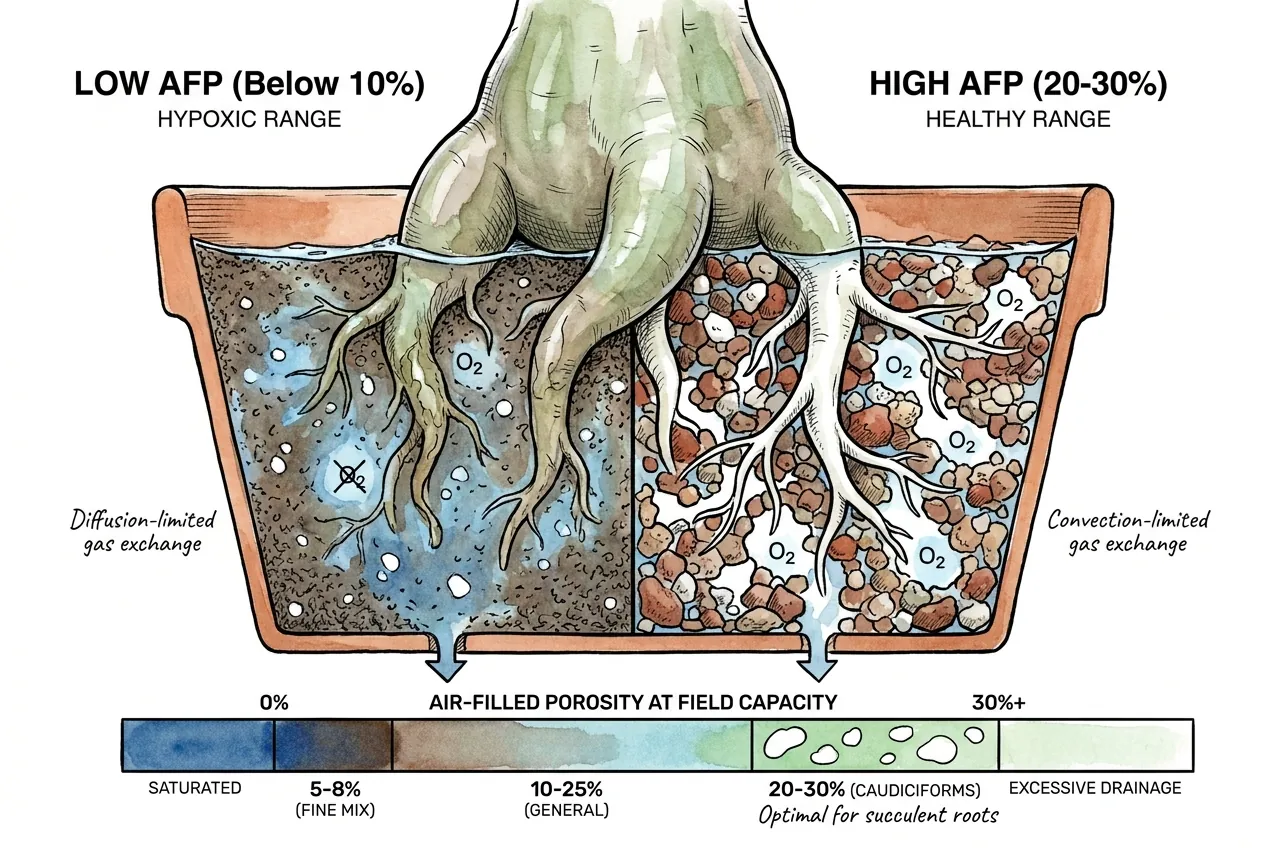
Air-filled porosity (AFP) is the fraction of substrate volume occupied by air at field capacity (immediately after watering and drainage).
Very low air-filled porosity can limit gas exchange, but the critical value and time course depend on the mix, roots, temperature, and water status.
Do not treat a single AFP percentage or within hours claim as an Adenium diagnostic.
Container-substrate guidance explains how air and water porosity interact, but the values measured in one mix do not transfer automatically to another.
If a mix stays wet, change the mix, pot, airflow, or watering pattern based on the actual dry-down rather than quoting an AFP threshold.
Pumice vs perlite: which one and why
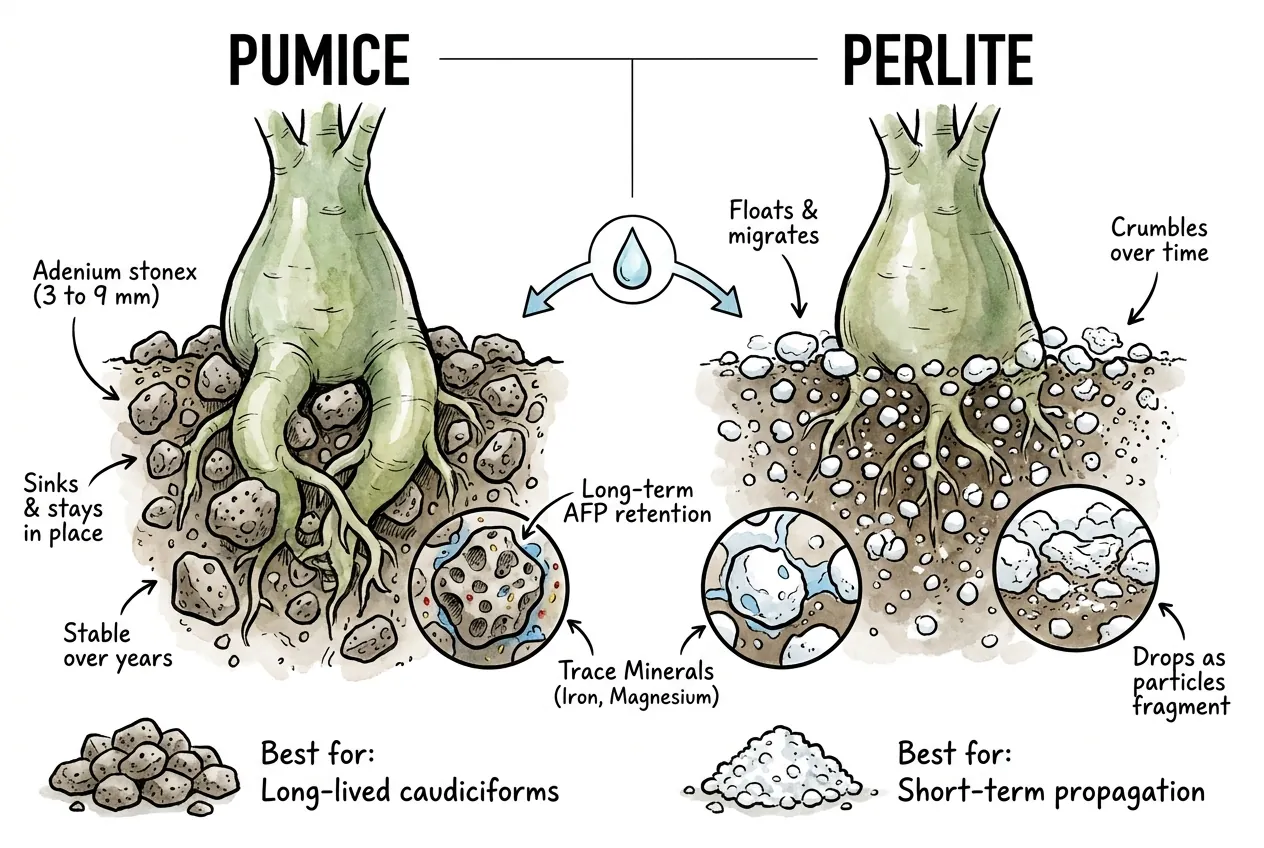
Pumice and perlite have different density, grading, water retention, and handling properties.
Select the material that remains stable enough for the pot and gives the observed dry-down you need. Do not assume one mineral is universally superior.
| Property | Pumice | Perlite |
|---|---|---|
| Total porosity | High | Slightly higher |
| Density | Higher (sinks) | Low (floats) |
| Particle stability | Depends on grade and handling | Depends on grade and handling |
| Long-term AFP retention | Measure or observe over time | Measure or observe over time |
| Use when | When the grade fits the pot | When the grade fits the pot |
What to look for when buying
Look for a horticultural grade whose particle-size distribution fits the root system and pot, and remove excess dust when appropriate.
Avoid pumice sold for cosmetic or exfoliant use (too fine).
The product specification that matters is particle-size distribution and current availability, not brand name. A bagged horticultural pumice sold at a consistent, root-appropriate grade is one option.
Check the current label, size, dust content, and shipping cost before comparing it with local nursery pumice.
Cheaper alternative
A local horticultural pumice can be a lower-cost alternative when its grade is suitable.
Sieve only as needed and keep dust out of the root zone.
Established plants in hot, dry conditions may use a more moisture-retentive mix than a rootless recovery, but choose the ratio from observed dry-down rather than a fixed mineral percentage.
Substrate recipe by use case
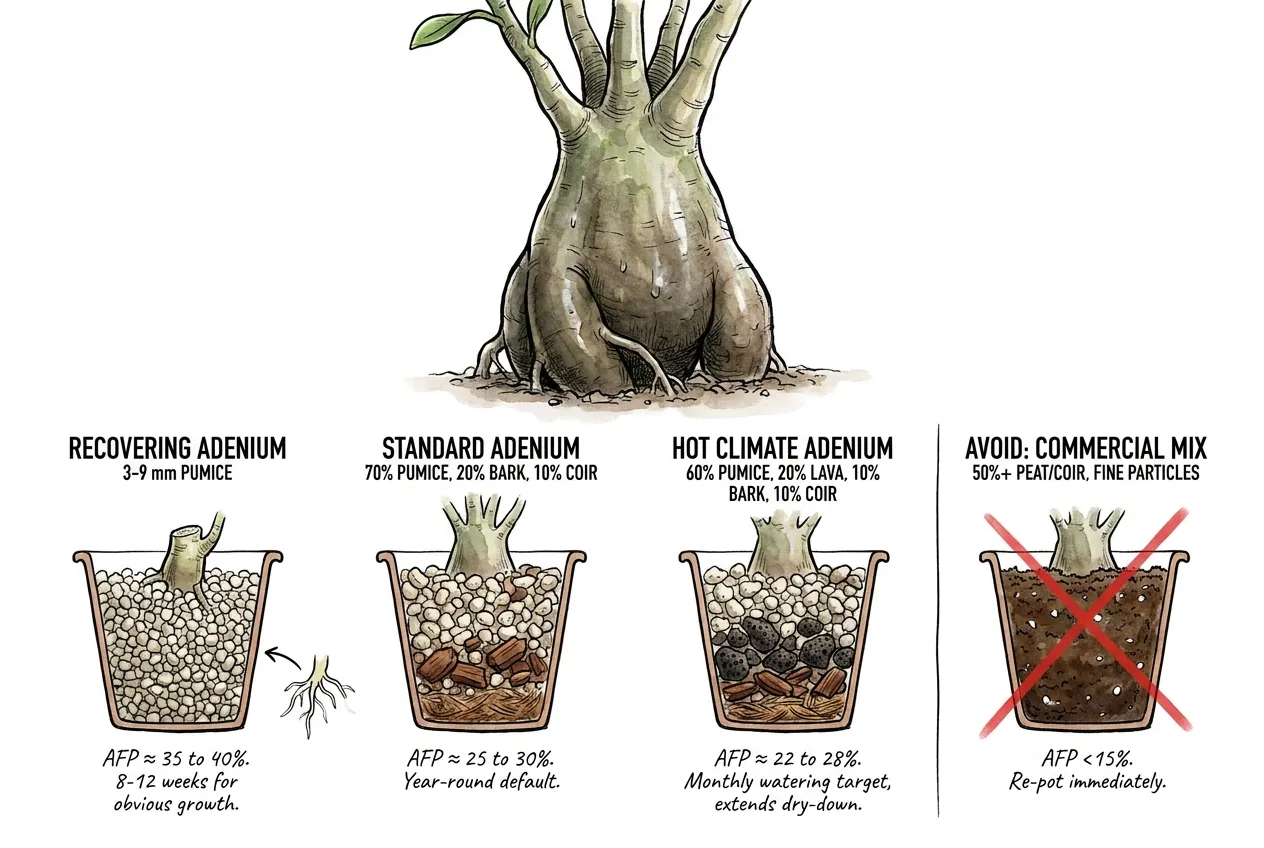
Recipe A. Recovering Adenium (re-root or post-spot-excise)
An open, mostly mineral recovery mix can reduce the time a fresh wound stays wet.
Adjust particle size and components to the pot and observe rooting. No fixed AFP or 8-to-12-week duration is established.
Recipe B. Established Adenium (standard year-round)
An established plant may use a blend of mineral and organic components if the mix drains and dries predictably. There is no universal default percentage.
Recipe C. Hot-Climate Established Adenium (monthly watering target)
In a hot, dry room, a modestly more retentive blend may reduce excessive drying, but confirm it with the actual pot and roots rather than assuming a climate recipe.
Recipe to avoid
A fine commercial mix that stays wet for the plant's conditions is a poor fit.
Test its dry-down before repotting, and change it when the root zone cannot provide the drainage and air the plant needs.
Container choice: terracotta, glazed, or plastic?
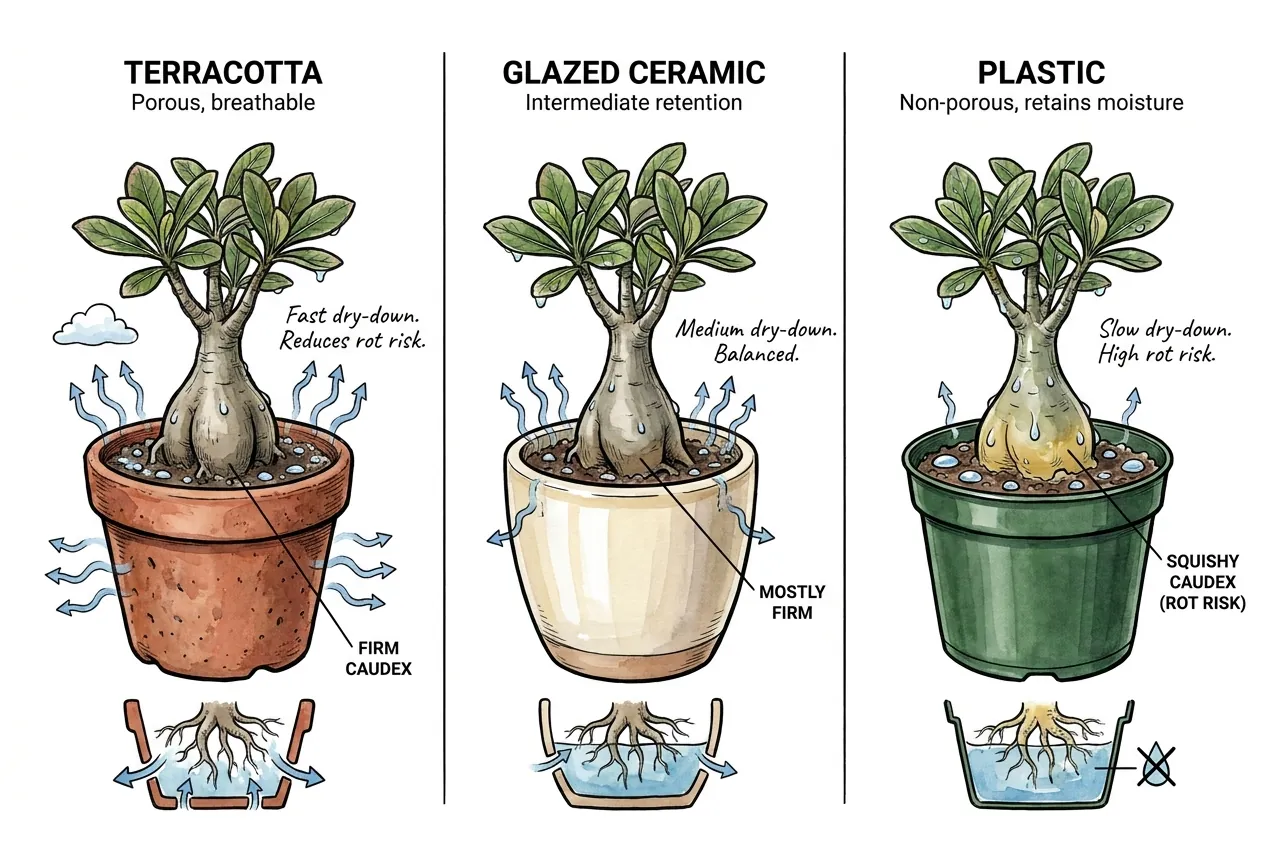
Terracotta, glazed ceramic, and plastic can all work when the pot size, mix, airflow, and watering pattern are matched.
Terracotta may dry faster in some settings, while nonporous pots may retain moisture longer.
Measure the actual wet window rather than assigning rot risk to the material alone.
Choose the container that makes the plant's root-zone moisture predictable and manageable in your room.
What does the signal-driven spring watering calendar look like?
A signal-driven plan replaces dates with observations. Track active growth, root-zone warmth, drainage, and the plant's tissue condition.
Use local weather and the actual pot rather than a fixed number of weeks.
What are the four signals and what is the hierarchy?
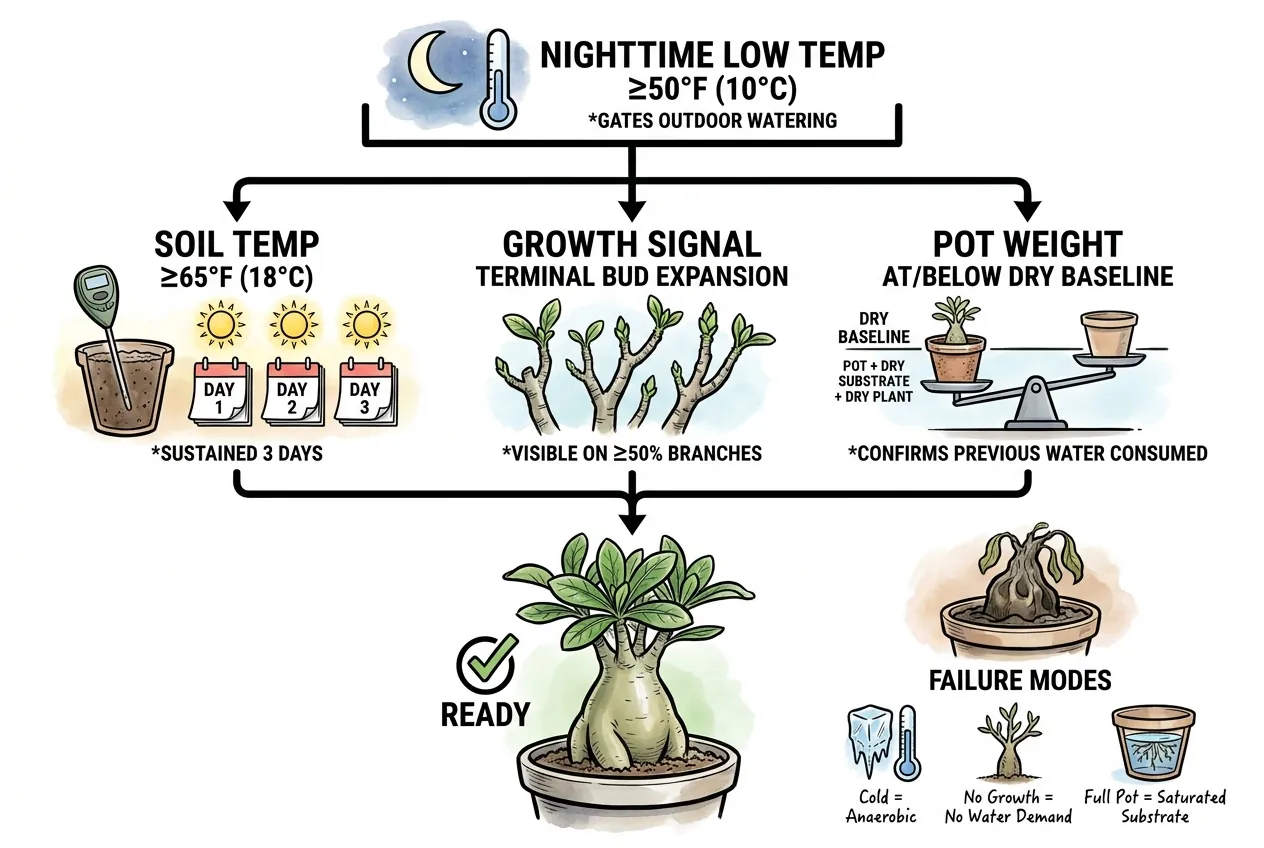
Useful observations include nighttime conditions, root-zone temperature, plant growth, pot weight trend, and signs of rot. They are cues to combine, not gates.
- Nighttime and root-zone temperatures are stable enough for active growth
- New leaves or buds are sustained rather than a brief reserve-driven flush
- The pot has drained and its dry-down trend matches the root system
- No progressive softening, odor, discoloration, or pest damage is present
Each signal is only partial evidence. A conflicting signal is a reason to wait and inspect, not proof of a single failure mode.
How do you use pot weight as a measurement?
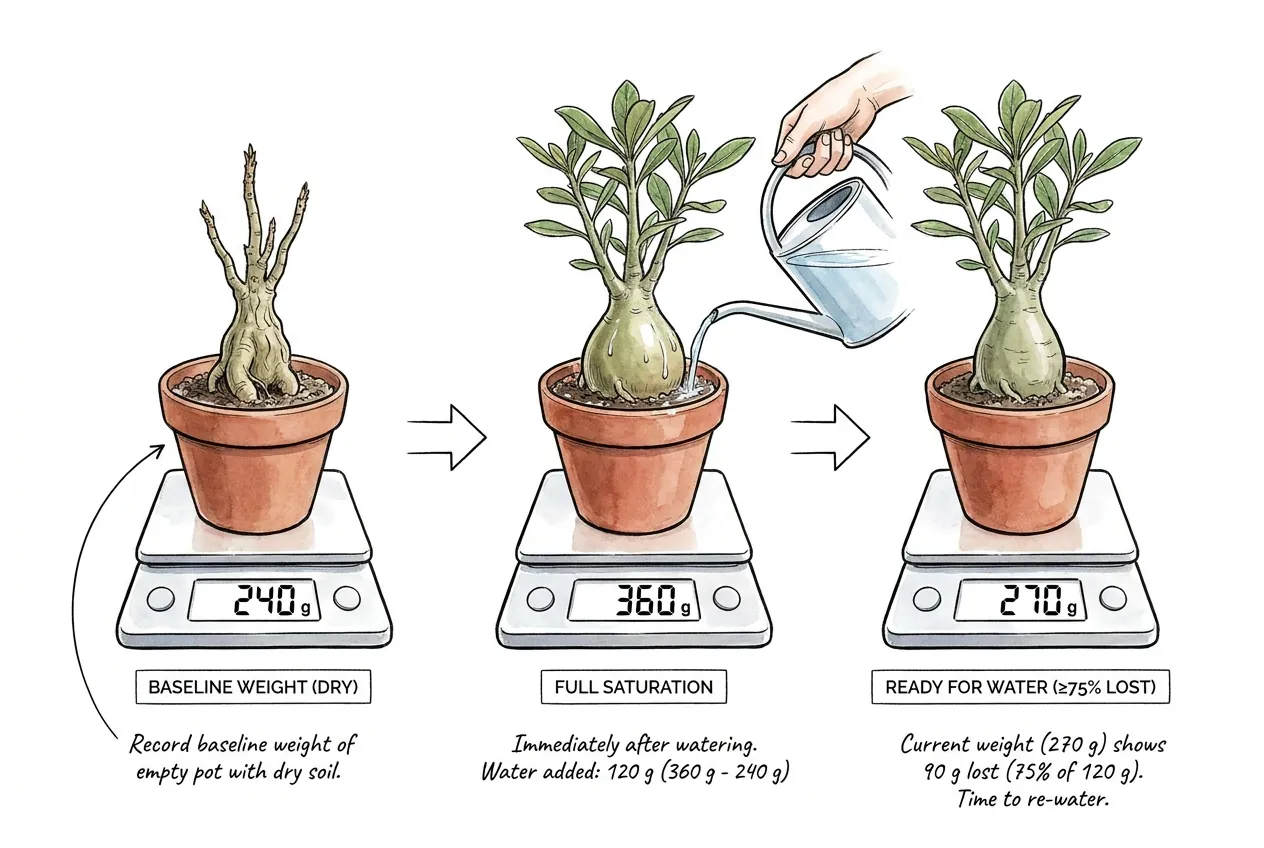
A digital kitchen scale can help.
Weigh the same pot at comparable points before and after watering and record the trend.
A scale reflects evaporation, transpiration, drainage, plant growth, and substrate loss together.
It is a pot-specific proxy, not an exact water-mass or consumption meter.
Use the trend alongside a root-zone moisture check and tissue observations, and recalibrate after repotting or major growth.
What is the cold-snap pause protocol?
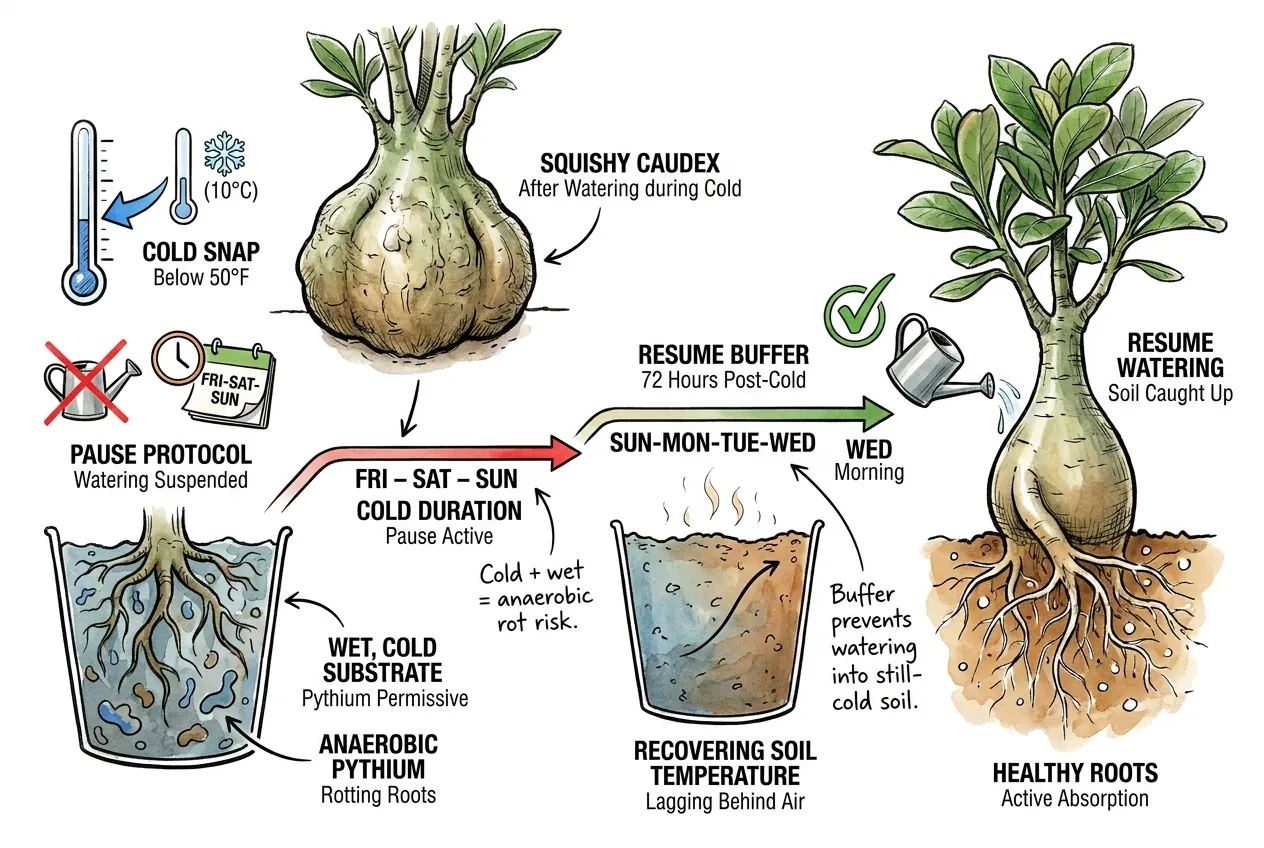
During a cold snap, avoid adding water to a pot that is already wet or whose roots are inactive.
Resume ordinary watering only after the root zone and plant response have stabilized.
The length of that pause depends on the actual container and weather.
What myths about Adenium care should you ignore?
Several recurring Adenium claims turn a context-dependent observation into a fixed watering or treatment rule.
Each has a grain of truth that has been generalized into a wrong action.
‘They are desert plants, they can take anything’
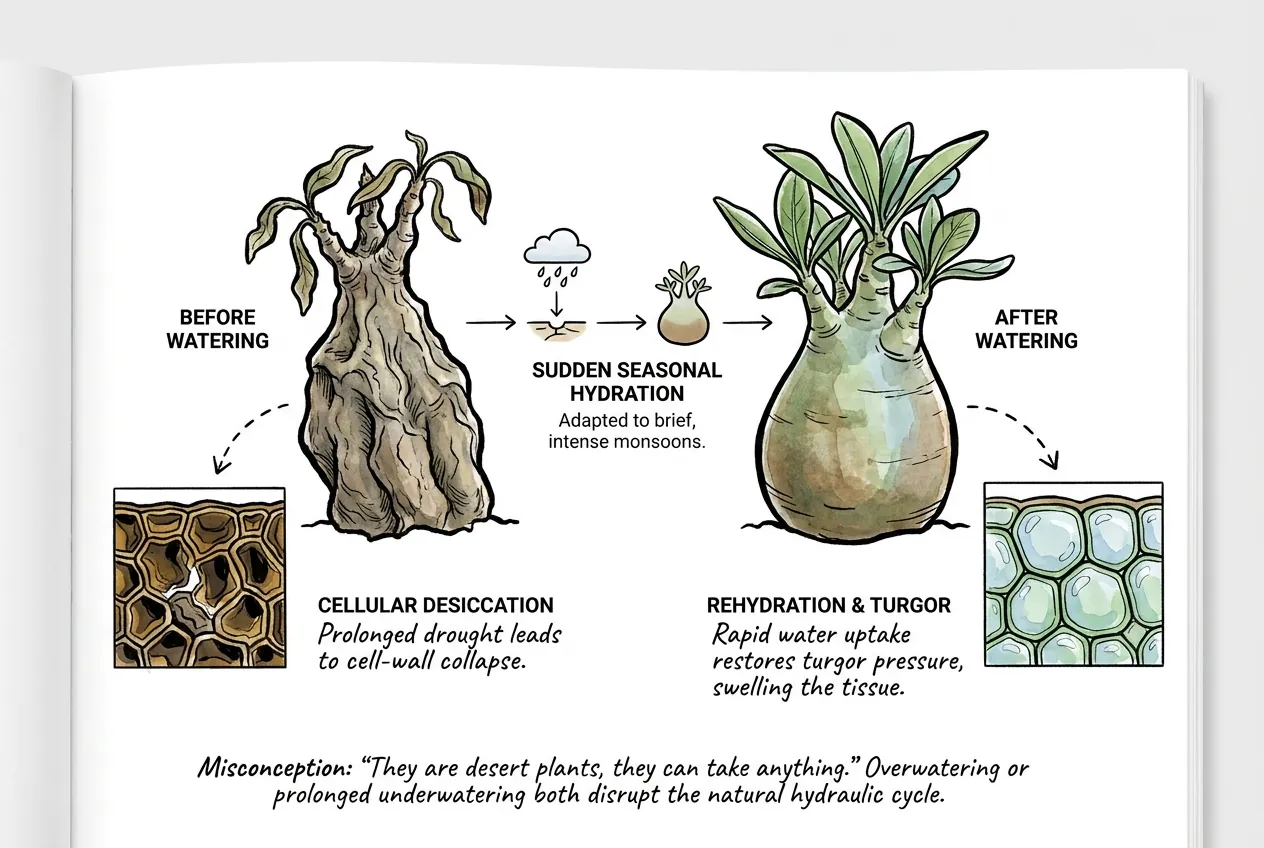
Adenium obesum is native to seasonally arid African and Arabian environments, not perpetually dry ones.
Wikipedia’s geographic distribution confirms native range across Eastern and Northeastern Africa (Senegal, Sudan, Kenya, Tanzania), the Arabian Peninsula (Yemen, Saudi Arabia), and Socotra.
Socotra receives 150 to 250 mm/year of rainfall concentrated in two short wet seasons.
The plant is adapted to ‘dry most of the year + sudden brief monsoon’, not to ‘perpetually dry’ and not to ‘any watering pattern.’
The hydraulic system, CAM photosynthesis, and root phenology all evolved for a specific seasonal hydration pattern.
Watering well outside that pattern, or refusing to water at all, can be equally mismatched.
Refusing water during active, hot growth can be as mismatched as watering on a fixed two-day schedule. Both ignore the plant's seasonal state and actual dry-down.
‘Soak and dry is the way for all succulents’
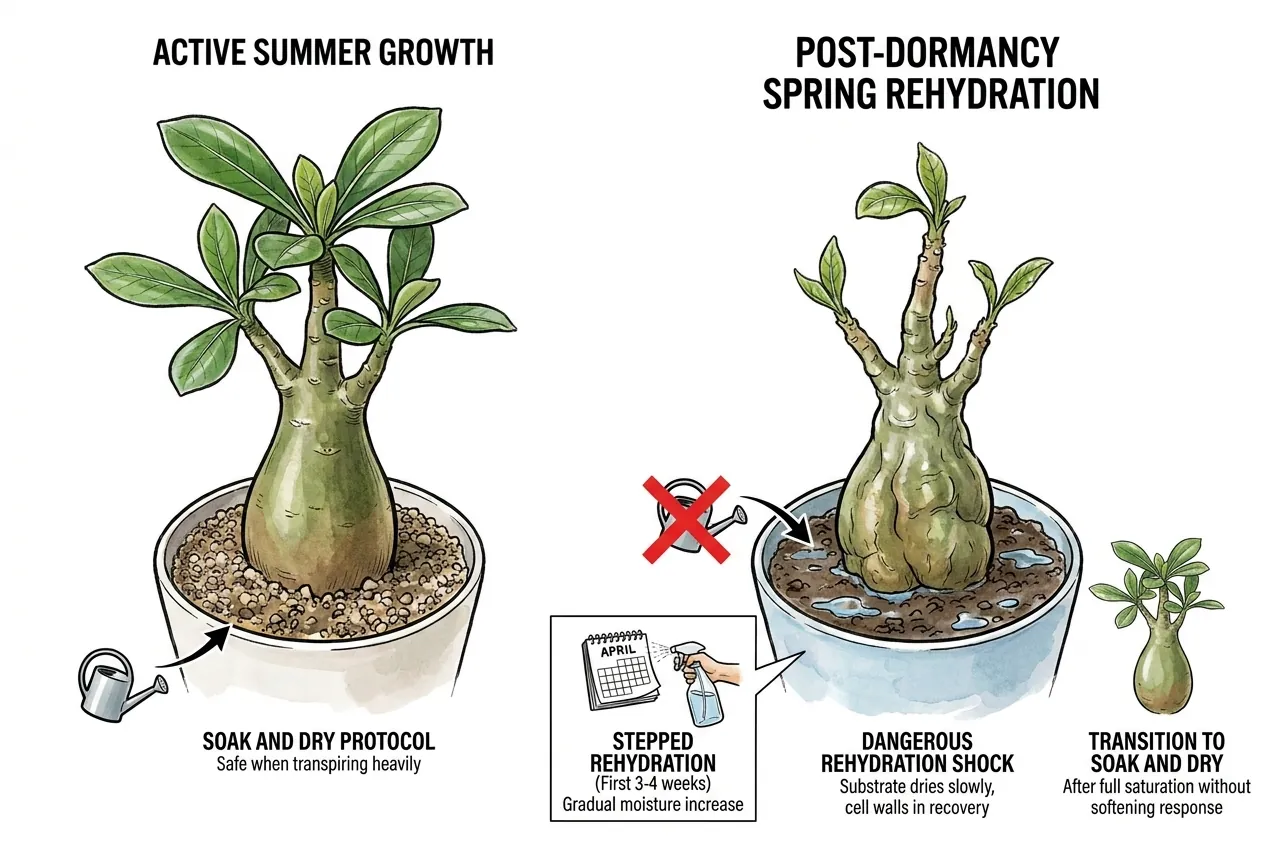
Soak-and-dry may fit active summer growth when the plant is transpiring and the substrate dries predictably, but the same schedule can be unsafe in a cool, slow-drying setup.
It can become a failure pattern in late spring when transpiration is low, the substrate dries slowly, and the first soak arrives before roots are active.
The same schedule can be suitable in one physiological state and risky in another.
Use smaller, observed waterings during the transition out of dormancy, then adjust toward soak-and-dry only after the plant and pot show sustained active growth and predictable dry-down. No fixed number of weeks or saturation events is validated.
A grower who used soak-and-dry successfully for 3 summers tries it on the first April watering after a cool winter. The summer schedule was the wrong schedule for the spring physiology.
‘Hydrogen peroxide will kill the rot if you flush’
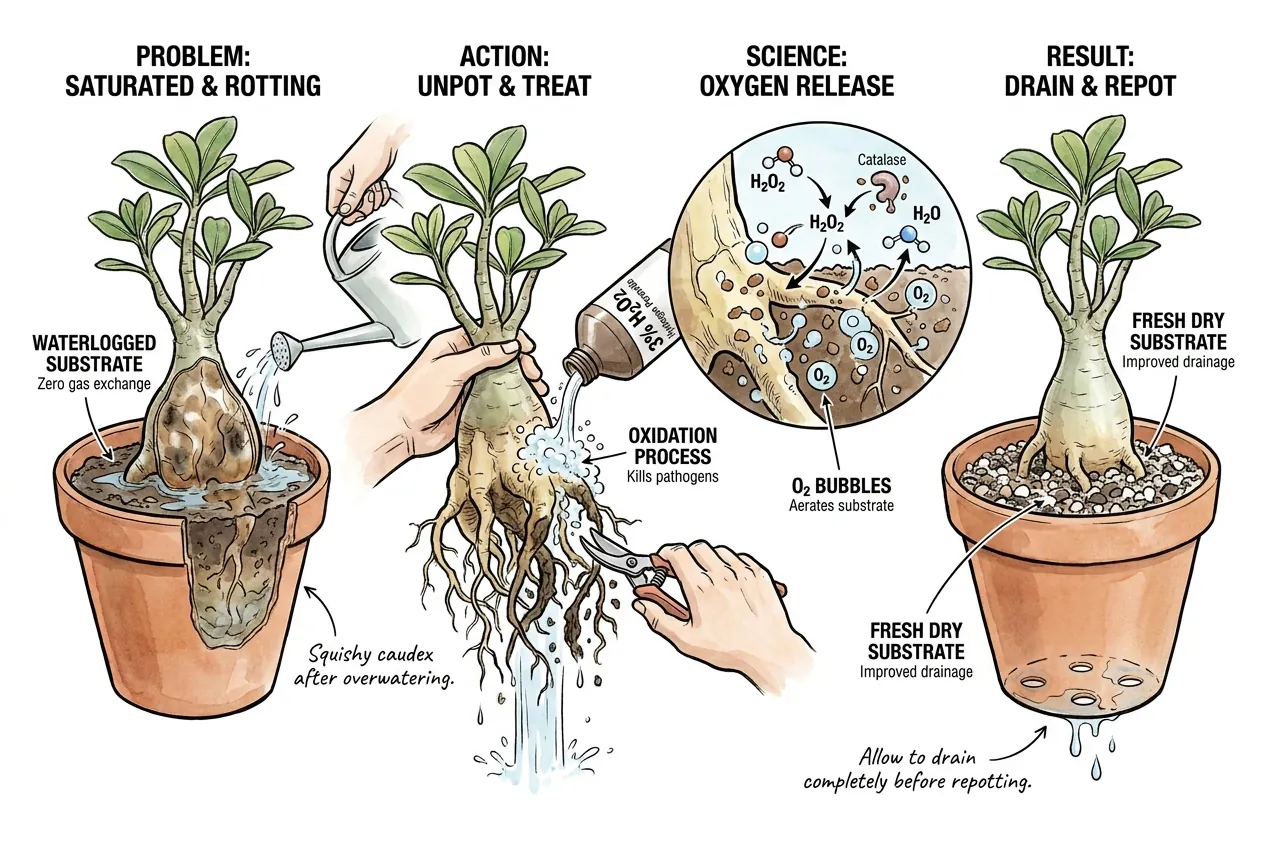
Hydrogen peroxide is not a general rot cure for Adenium. Laboratory or flood-management studies in other systems do not establish a safe root drench, pathogen dose, or oxygenation protocol for a soft caudex.
Concentrated peroxide can injure roots and soil organisms, while a peroxide flush adds more water to an already wet pot.
Prioritize drainage, removal of clearly diseased tissue, sanitation, and a plant-disease diagnosis.
The correct sequence
If a current product label or plant diagnostic specifically supports peroxide for the situation, follow that label and protect skin and eyes.
Otherwise do not improvise a dilution or pour peroxide onto a saturated pot. The more dependable steps are drainage, sanitation, and cause-specific treatment.
Practical guidance from Alliance Chemical treats hydrogen peroxide as a reactive measure for a specific problem, not a routine drench. It also warns that repeated use can reduce beneficial soil life.
‘Just let it sit dry another month and it’ll come back’
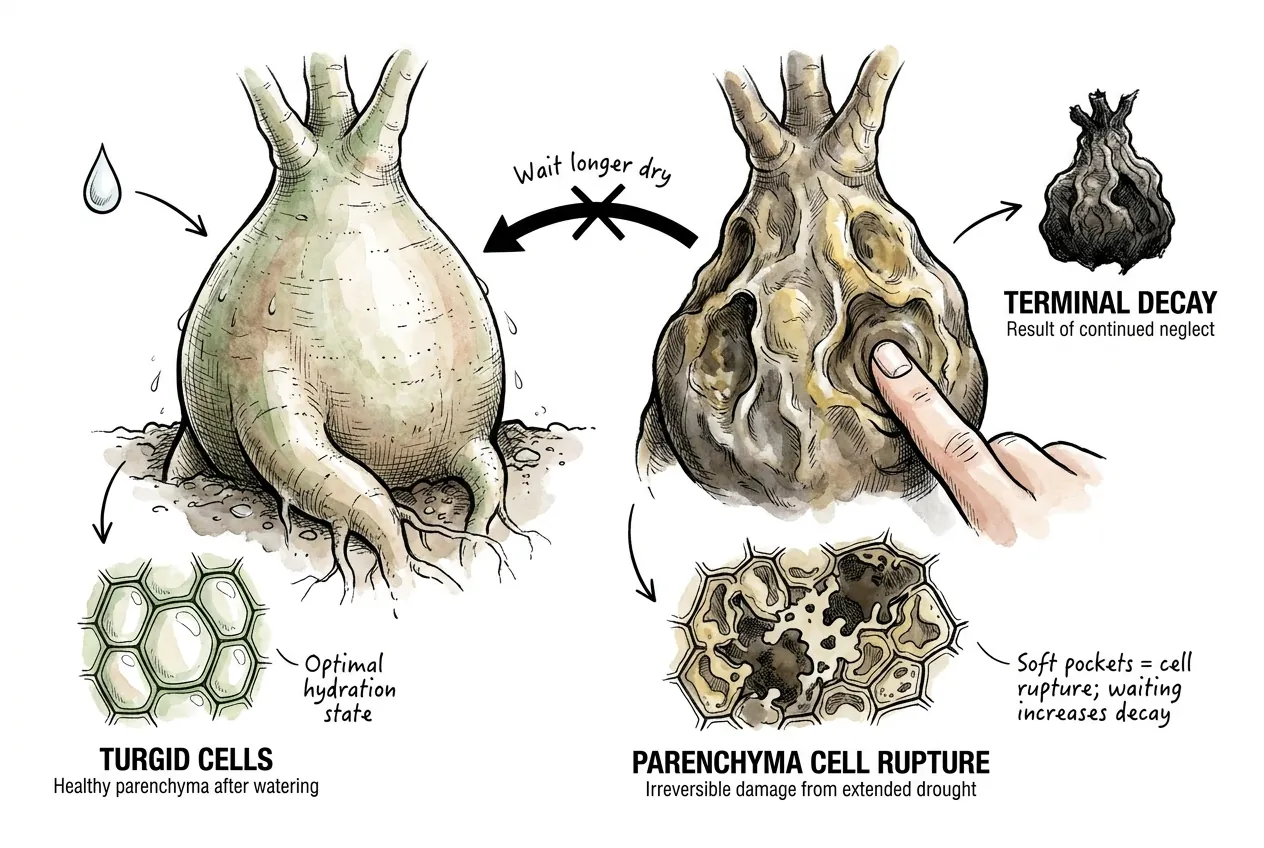
Severe or prolonged stress can leave tissue unable to recover fully, but the threshold is not established for Adenium.
The Portulacaria afra rewatering study showed recovery from 145 days of drought, but P. afra is not Adenium, and the experiment was conducted on healthy plants in controlled conditions.
A soft pocket may reflect tissue damage or rot. Extending the dry period does not identify or reverse that cause and can further stress sound tissue.
Recovery appears to require intact cells and reversible wall remodeling when water returns. The threshold for Adenium tissue is not established.
Once a soft pocket appears, inspect the plant and root zone rather than assuming that more drying will cure it.
Surgery is one possible response when clearly affected tissue is localized. Extensive or uncertain cases need diagnosis.
Does cinnamon on the cut work as a natural fungicide?
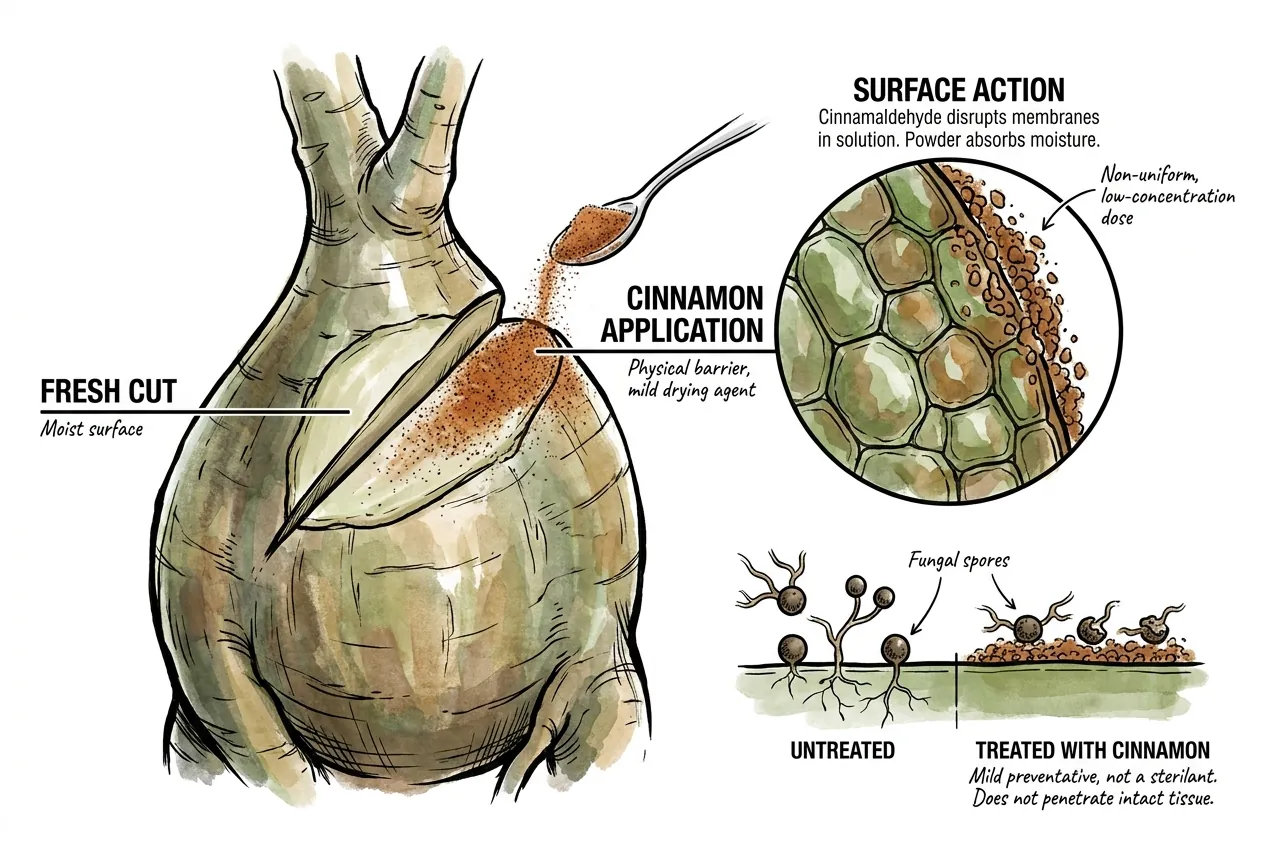
Cinnamon contains cinnamaldehyde, which has measurable antifungal activity in controlled laboratory conditions.
Peer-reviewed cinnamon-extract reviews document in-vitro inhibition of Fusarium oxysporum and Aspergillus niger.
In-vitro cinnamon activity does not establish that kitchen powder sterilizes a fresh Adenium wound or treats established tissue infection. Formulation, dose, phytotoxicity, and application all matter.
Do not use cinnamon as a substitute for clean tools, PPE, sanitation, or a diagnosis.
If a product is applied to a wound, follow its label and observe the tissue rather than treating a fixed contact time as universal.
Troubleshooting common spring failures
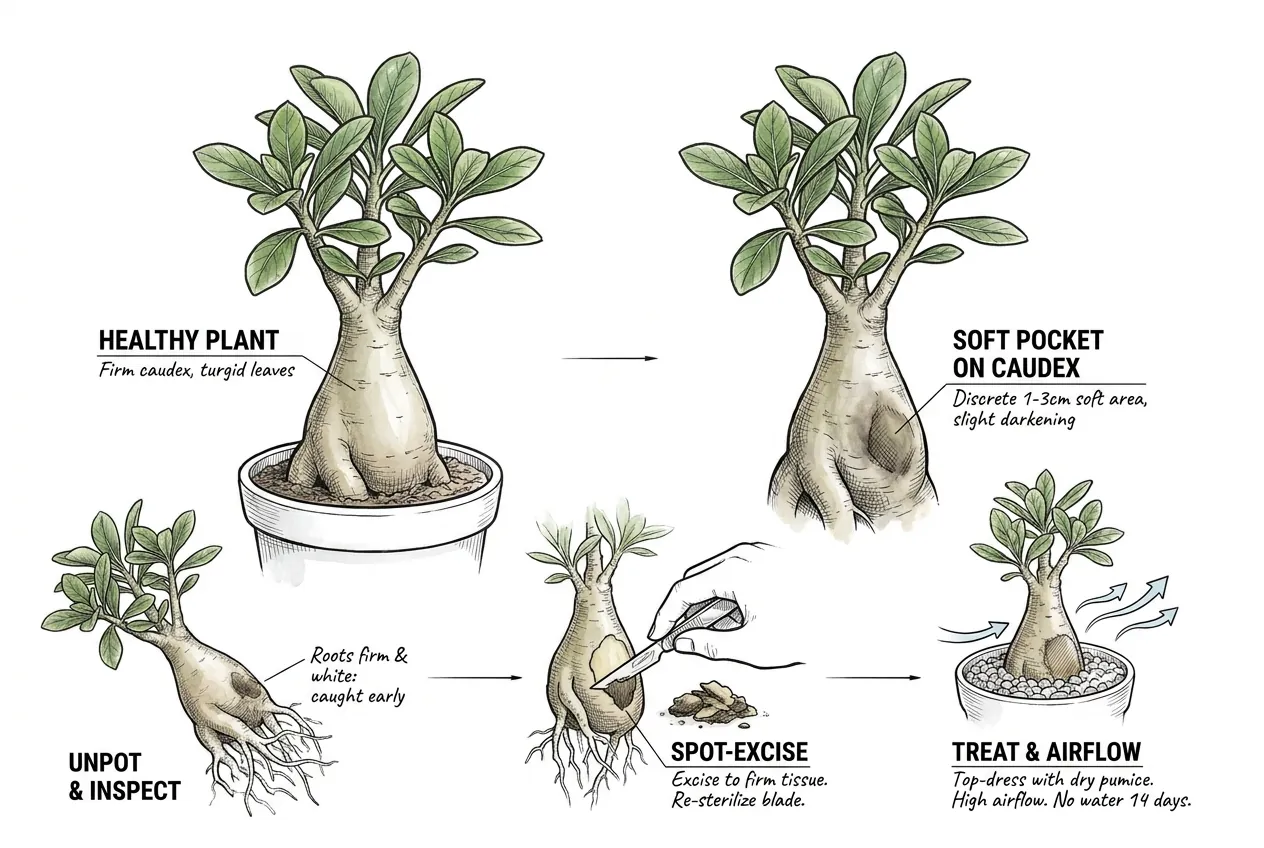
Soft pocket on caudex but leaves still firm
What to look for
Localized softening, discoloration, odor, root condition, and whether the area is changing over time. Firm white roots do not exclude internal damage.
How to respond
Isolate the plant and avoid repeated watering while you assess it. If cutting is chosen, wear chemical-resistant gloves and eye protection, use clean tools, remove only clearly affected tissue, and keep contaminated material away from other plants.
Allow the wound, substrate, and root system to dry according to their condition.
There is no validated 14- or 30-day schedule. Seek expert help if the lesion advances or the diagnosis is uncertain.
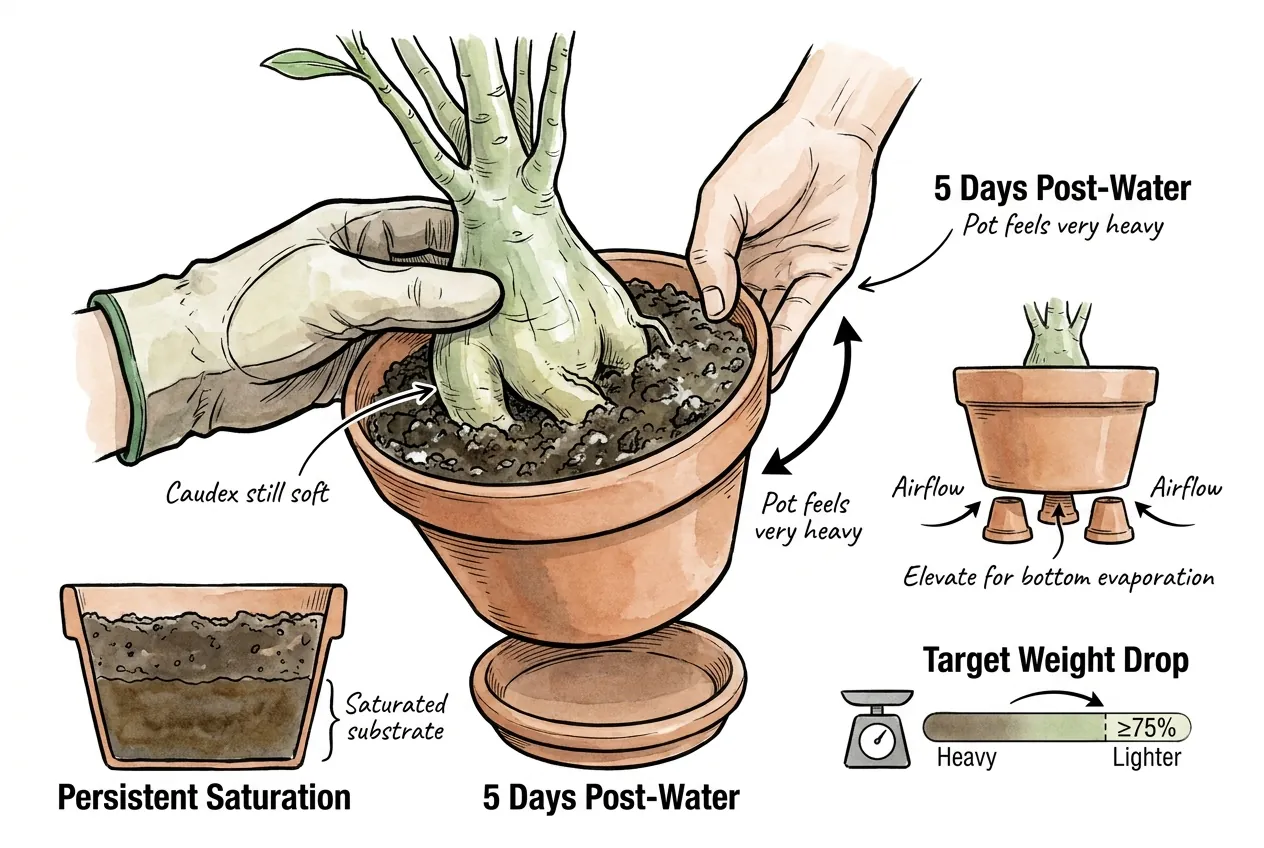
Pot still feels heavy 5 days after the ‘wake-up’ water
What to look for
Substrate remains visibly wet well beyond its established dry-down pattern, the pot stays heavy, or the root zone smells sour or stagnant.
How to fix
Do not water again. Move the pot to higher airflow and slightly raise it with pot feet or a wire rack to allow bottom evaporation.
Wait for the mix to drain and dry to the depth appropriate for the roots, and change the substrate only when you can identify a structural problem rather than by a fixed recipe.
Why it works
Persistent saturation reduces root-zone gas exchange and can increase disease pressure. Improving drainage and airflow lowers that risk without proving a specific internal mechanism.
Caudex feels rubbery, not mushy, after long dormancy
What to look for
Caudex yields slightly to thumb pressure but springs back. Surface wrinkles may be present, with no soft pockets, color change, or smell.
How to respond
A spring-back can be consistent with dehydration, but it is not proof.
Rehydrate cautiously only after checking the base and roots, then watch firmness, odor, and dry-down before repeating.
Why it works
Succulent tissues can recover from drought, but the detailed cell-wall and aquaporin mechanism is not a validated Adenium diagnostic. Use observed response, not a fixed dose or interval.
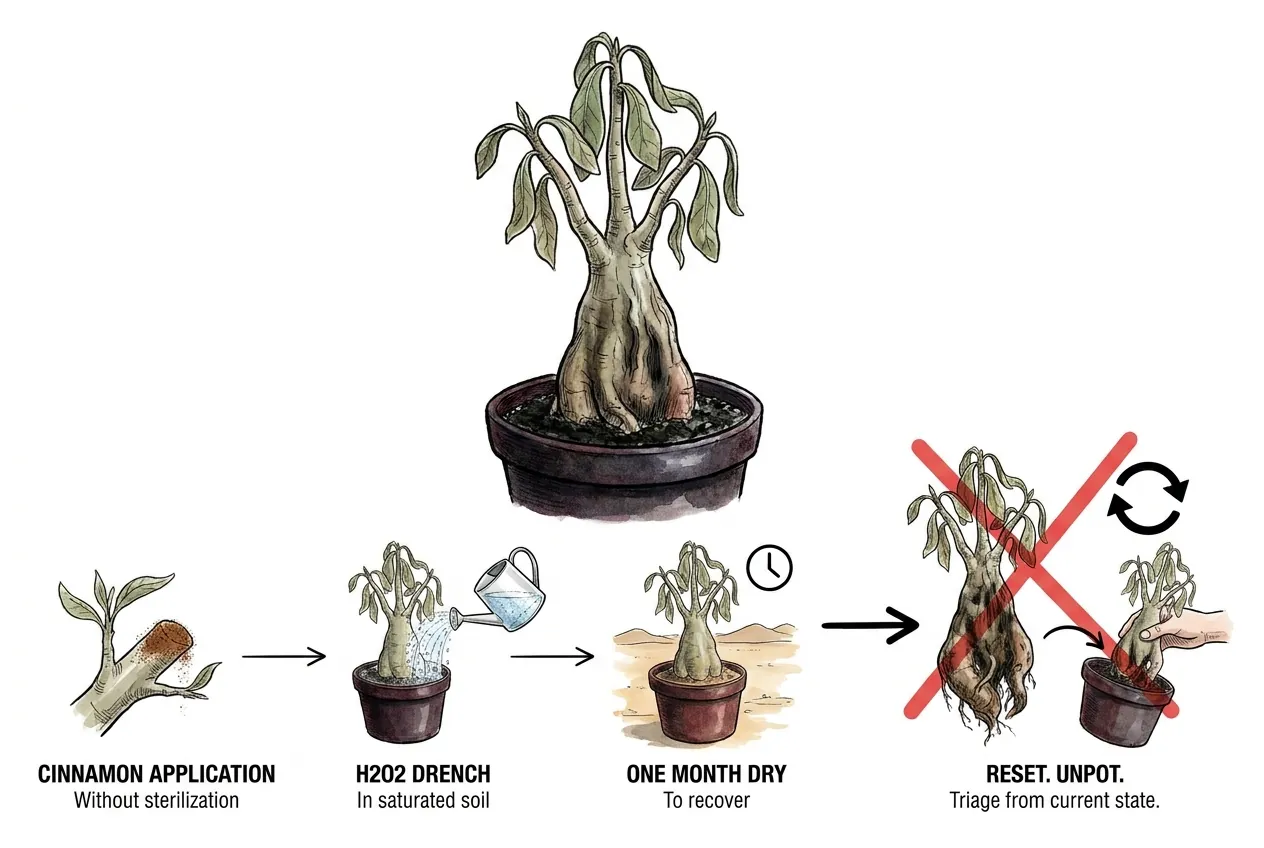
Grower applied multiple myth-based fixes sequentially
What to look for
The cut was treated with cinnamon without isopropyl, then drenched with H2O2 in a saturated pot, and then left dry for a month in an attempt to recover. The plant is worse than before any intervention.
How to fix
Reset the process. Unpot the plant and triage it as Branch B or C from the decision tree.
Layering incompatible fixes can obscure the cause and add stress. Reset from the current plant condition, document what changed, and address the most supported cause before adding another intervention.
Why it works
A cause-first sequence makes it easier to tell whether drainage, sanitation, tissue removal, or a different treatment is helping. No single reset protocol fits every soft caudex.
Practical conclusion
The drought-then-flood pattern is risky because a cold, saturated pot can starve roots of oxygen while long-dormant tissue is not ready for a heavy soak.
When softness appears, compare the roots, tissue, smell, temperature, and dry-down before choosing water, surgery, or a wait. Use a labeled disinfectant method between cuts and accept that extensive rot may not be salvageable.
Keep the root zone airy and the pot appropriately sized. Let observed warmth, new growth, and repeatable dry-down guide the next watering instead of a fixed volume or calendar.