
Fockea edulis Stem Cracks: Cork Cambium Repair
Fockea edulis stem cracking? How the cork cambium seals a wound, how to tell healing from rot, the first-aid protocol, excision, recovery substrate, and prevention.
Derek Kim · 2026-06-02 · Updated 2026-06-08 · 22 min read
Key Takeaways
- A clean turgor or sun-scald split may corkify on its own under warm, airy conditions. For a dry, firm, odorless crack, observation is often safer than adding a treatment.
- Tell healing from rot using several signs together: wetness, softness, smell, and whether the lesion is spreading. Wet, soft, dark, foul, or spreading tissue warrants a rot-focused inspection, while dry, firm, odorless tissue supports observation.
- If you must cut out rot, disinfect the blade between cuts and remove only into firm healthy tissue. Wear gloves and eye protection, and do not seal a wet wound with wax or glue.
- Recover on a fast-draining mineral mix in a breathable pot, kept warm with gentle airflow and no standing wetness. Aim for moderate, not extreme, humidity.
- Prevent cracks by rehydrating gradually after a dry rest, avoiding heavy nitrogen, and overwintering the plant cool, largely dry, and above freezing. Ramp water and feeding to the plant's activity, not a calendar.
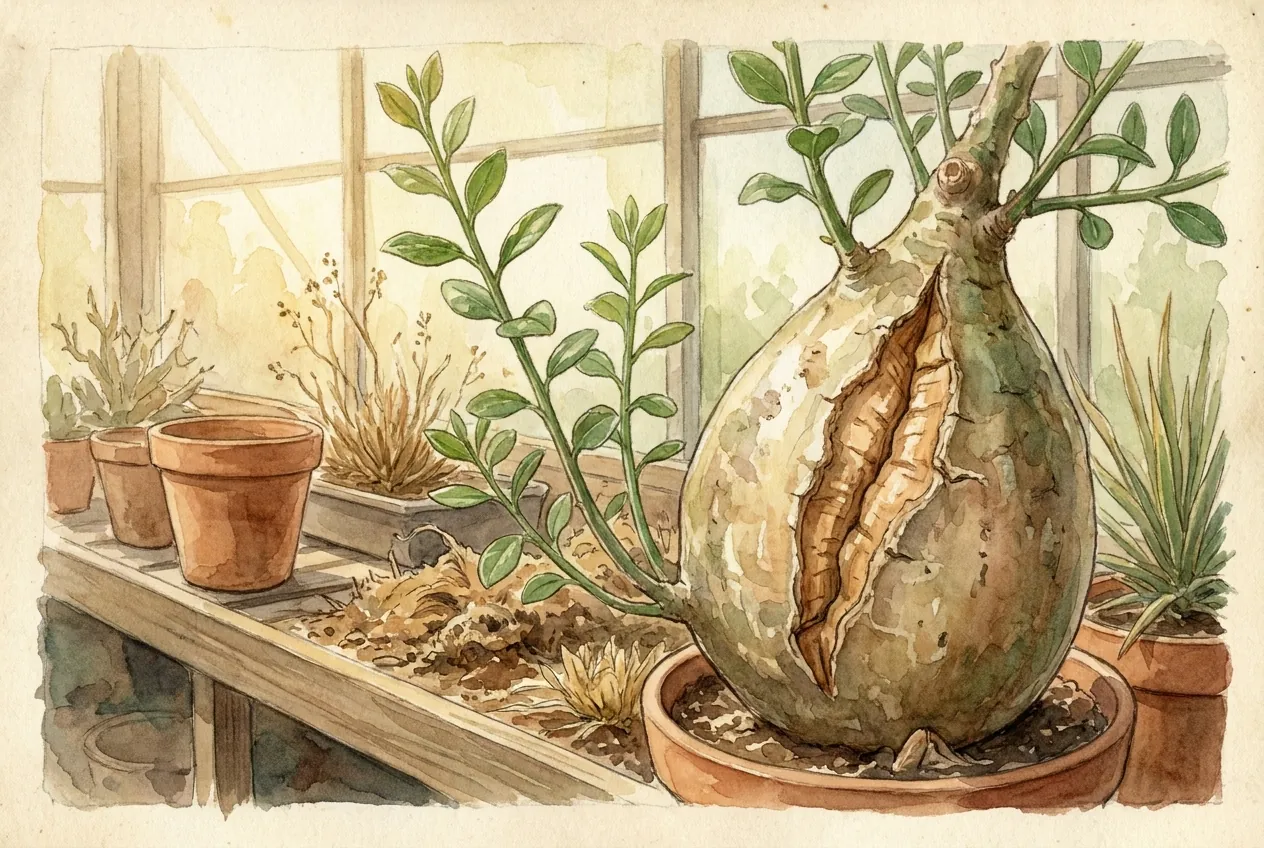
Read the crack's history, firmness, smell, moisture, and rate of change together before deciding whether to observe or excise. Wear gloves and eye protection around latex, and keep a wound open while it dries.
Why does Fockea edulis stem crack in the first place?
Fockea edulis is a caudiciform in the Apocynaceae with a tuberous water-storage organ. Anatomical work on young plants describes a bundle-type vascular arrangement in its thickened base, unlike the more continuous conducting ring seen in immature Adenium obesum.
A plausible consequence is that vertical splits open between vascular bundles through the parenchyma-rich cortex rather than across a continuous wood cylinder. The anatomical study did not test cracking itself, so treat this as an inference rather than a measured cause.
Which causes are plausible?
Commonly proposed contexts include a turgor spike after the first heavy watering at the end of dormancy, sun-scald on a thin exposed periderm, and freeze damage during hard frost. No incidence survey ranks these causes.
What does a typical Fockea split look like?
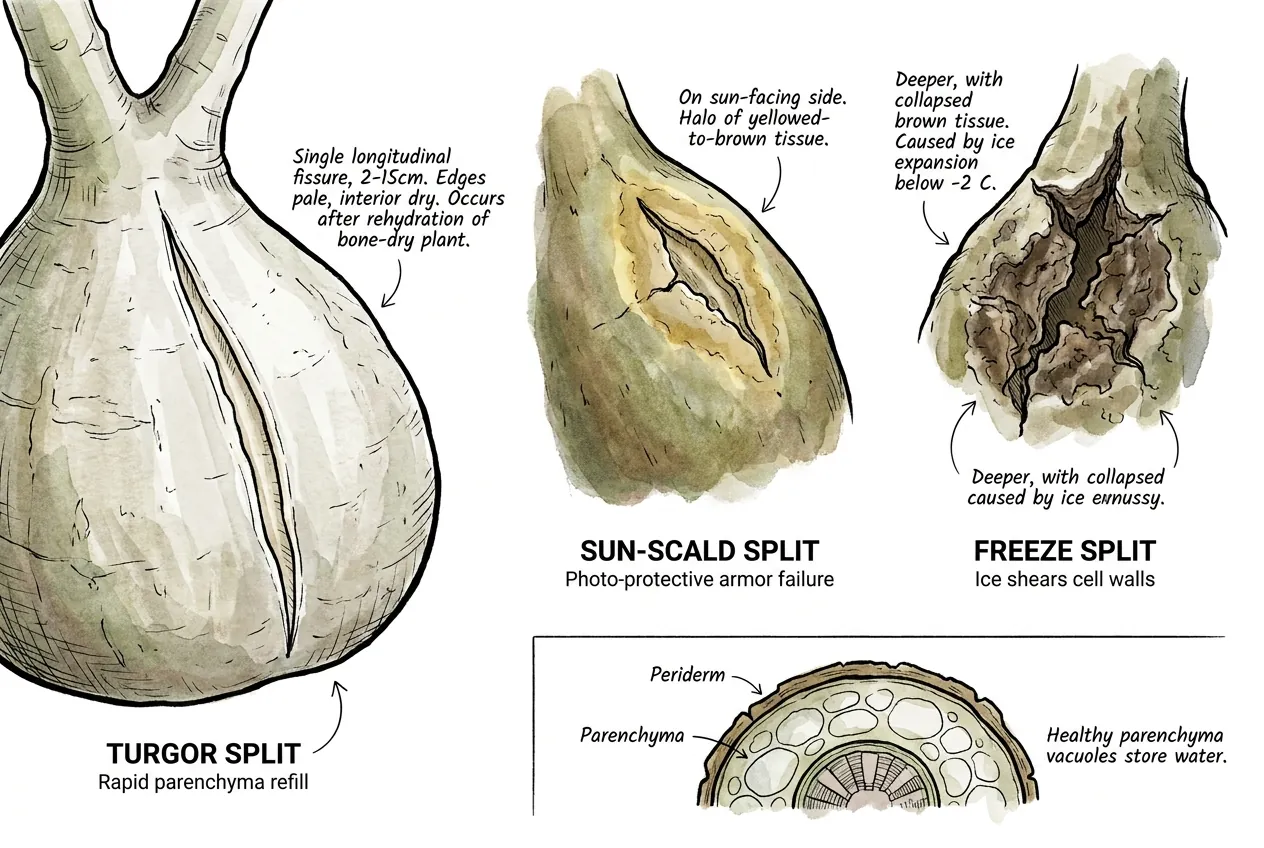
A turgor split may be a longitudinal fissure with pale edges and a dry, odorless interior. Recent drought followed by rapid rehydration is one plausible context, but not a diagnostic requirement or validated schedule.
Sun-scald splits appear on the sun-facing side of an exposed caudex with a halo of yellowed-to-brown tissue. Freeze injury can produce deeper splits and collapsed brown tissue, and the response depends on hydration, exposure, and plant condition rather than one species-wide temperature threshold.
What is cork cambium and how does it actually seal a wound?
Cork cambium, or phellogen, is a secondary meristem that produces phellem outward and phelloderm inward. At a fresh wound the first response is local deposition of suberin and lignin on dead and dying cells, while visible callus or a mature corky periderm takes longer and varies with tissue, temperature, moisture, and wound size.
What is a safe default for a clean crack?
For a clean, dry crack, leave it alone and let it seal rather than dousing it in liquids. The claim that wet treatment dilutes the suberin precursor pool is not supported by wound-healing literature. Studies of wound periderm, largely in potato, often use high humidity because it reduces water loss and can aid healing.
Keep the surface free of persistent wetness
The goal is not bone-dry air. It is avoiding surface wetness that persists long enough to favor rot organisms.
What is suberin chemically?
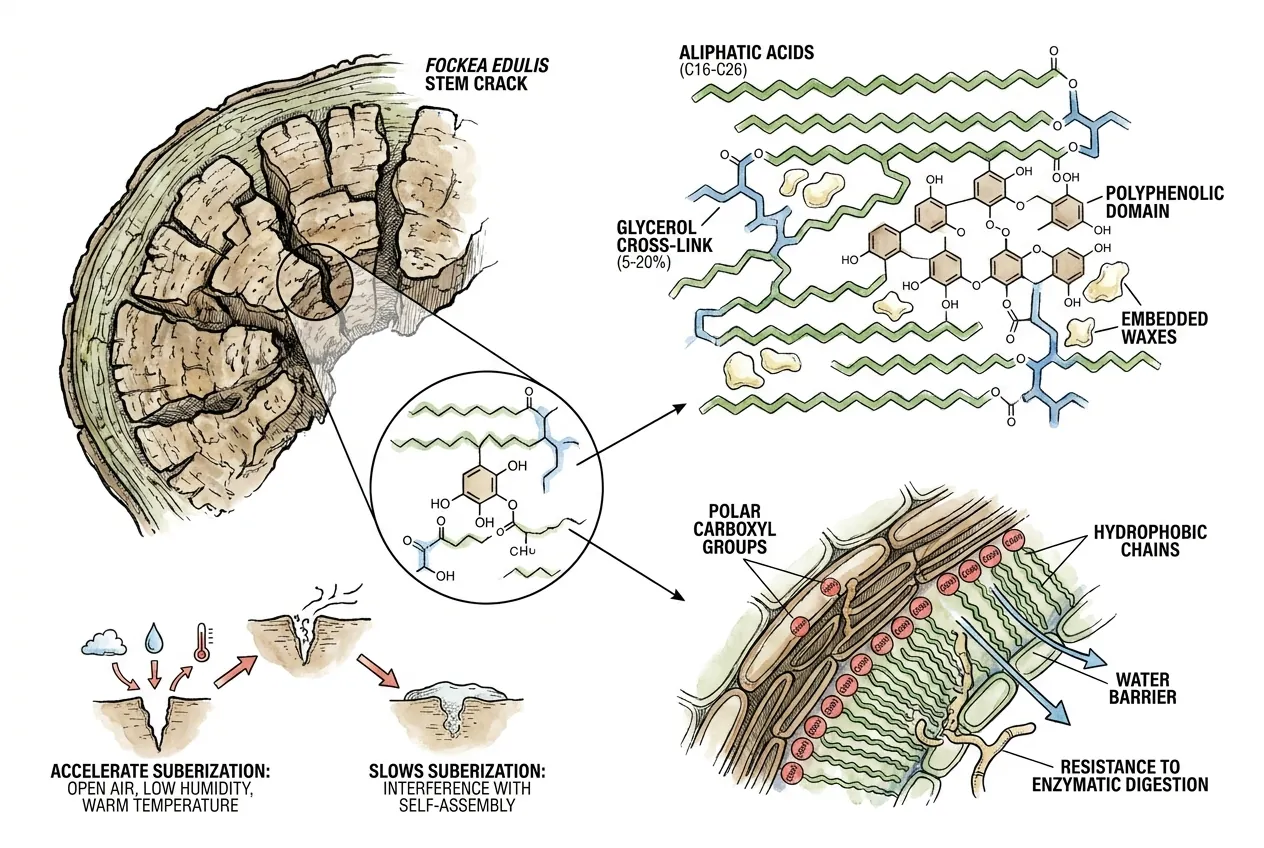
Suberin is a polyester built largely from long-chain aliphatic acids, glycerol, aromatic compounds, and embedded waxes. Its hydrocarbon chains organize into a barrier that limits water movement, while the resulting chemistry helps explain why a wound can seal itself.
Do not smother or repeatedly disturb a forming seal. Warmth and air exchange can help, but very low humidity is not clearly required and detailed regulation remains a working model rather than settled Fockea-specific fact.
How long does each phase take?
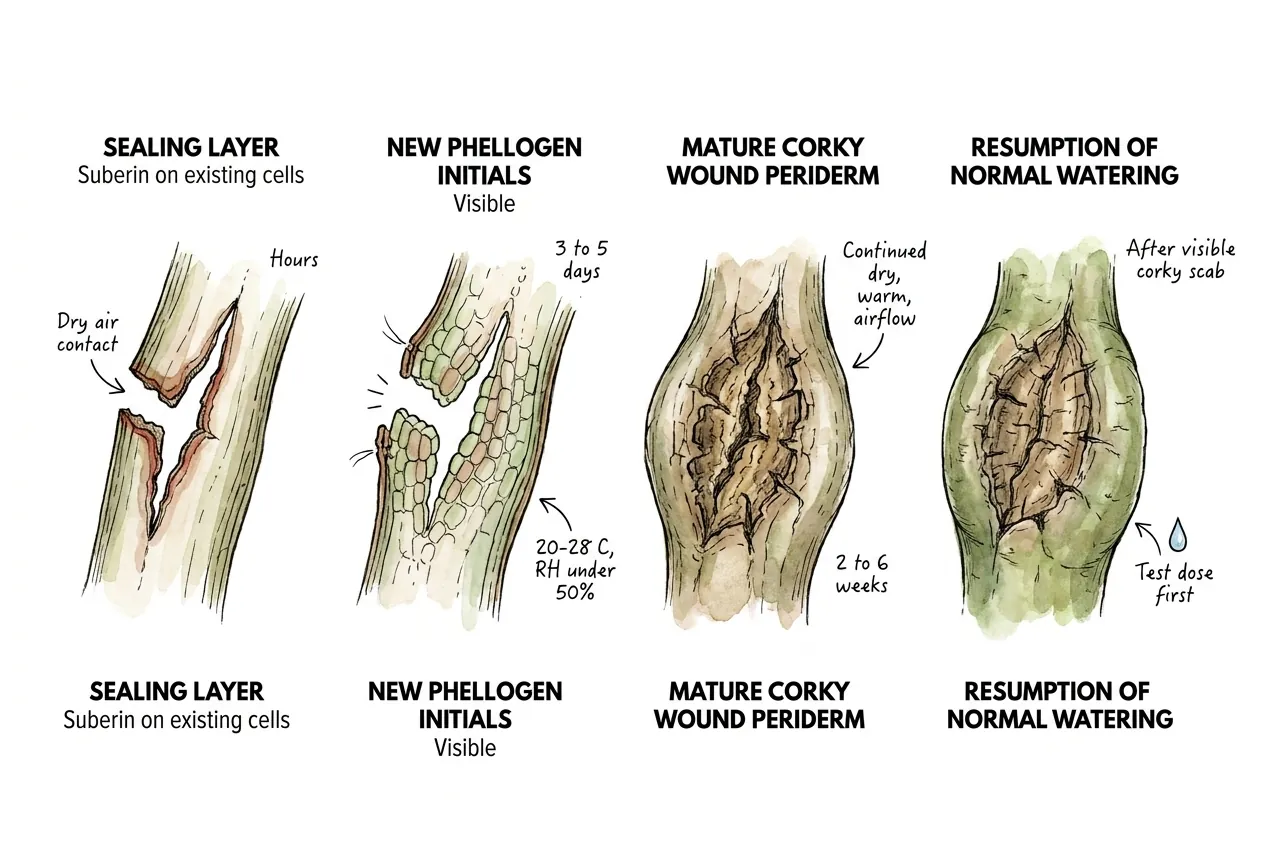
Moderate warmth and airflow generally support wound activity, while cold slows growth and excessive heat or persistent wetness can favor pathogens. No Fockea-specific temperature band establishes a safe or optimal threshold. Wound sealing and pathogen activity can respond differently, so avoid keeping a crack warm and persistently wet while it heals.
| Phase | Timing | Required conditions |
|---|---|---|
| Sealing layer (suberin on existing cells) | Can begin quickly | Clean surface with suitable airflow |
| New phellogen initials visible | Variable | Moderate conditions, airflow, no persistent surface wetness |
| Mature corky wound periderm | Variable | Continued warmth, airflow, surface not kept wet |
| Resumption of normal watering | When the surface is stable and the plant is taking up water | Test cautiously and reassess |
Which hormones drive corkification?
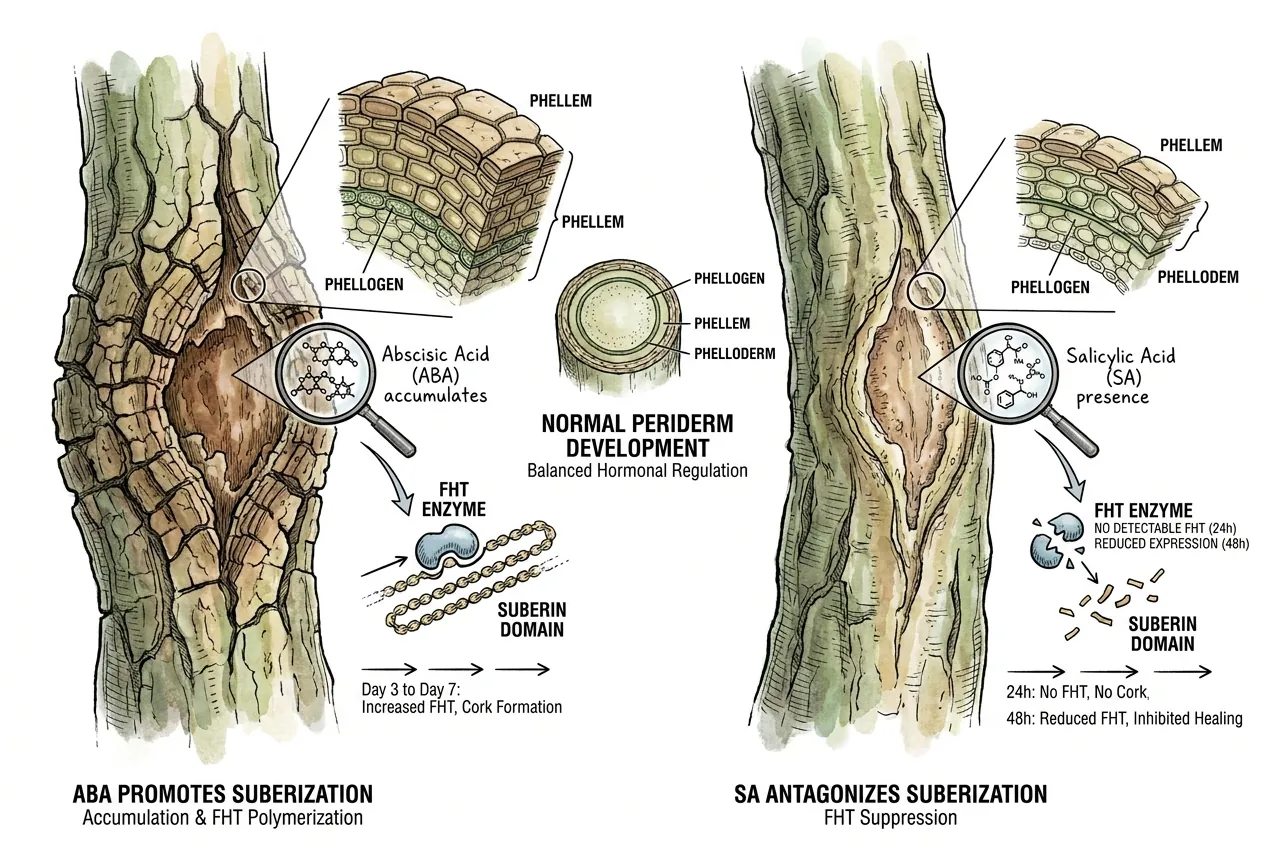
Studies in other plants link ABA and salicylic-acid signaling with wound suberization, but the timing and direction are not established for Fockea caudex tissue.
Do not apply growth regulators or disease-control products to a wound unless the label and species-specific guidance support that use. Avoid treating molecular hypotheses as a home-care rule.
How do I tell a healing crack from active rot?
Combine visual and tactile clues. A healing crack may be dry, pale-margined, odorless, and firm under thumbnail pressure, while an active soft-rot wound can be wet, dark-margined, sour to fishy in smell, and soft. No single pattern identifies the cause.
Which three clues should be combined?
Smell, texture under the thumbnail, and rate of advance are most useful when read together. No single clue identifies the cause.
What does the thumbnail-pressure test reveal?
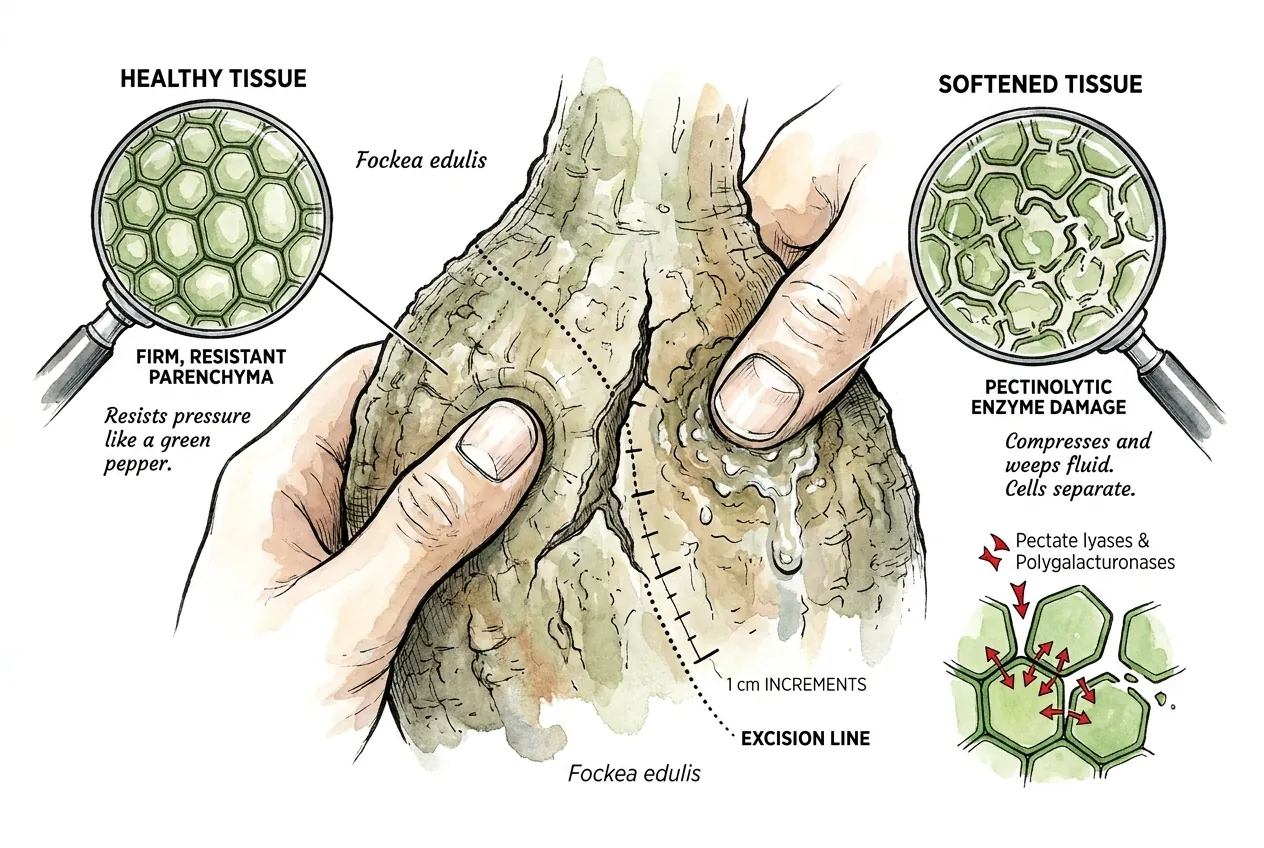
Gently testing firmness near the crack is a useful clue. Healthy water-storage parenchyma resists like a firm pepper, while softened tissue compresses and can weep fluid. Do this sparingly and cleanly because a bare thumbnail adds wounds, exposes you to sap, and can carry pathogens into healthy tissue. Wear a clean glove, press lightly, and do not repeatedly prod a healthy margin. Pectinolytic enzymes dissolve the pectin that holds cells together, so firmness estimates where soft tissue ends without providing a precise safety margin or identifying the organism.
What does each pathogen smell like?
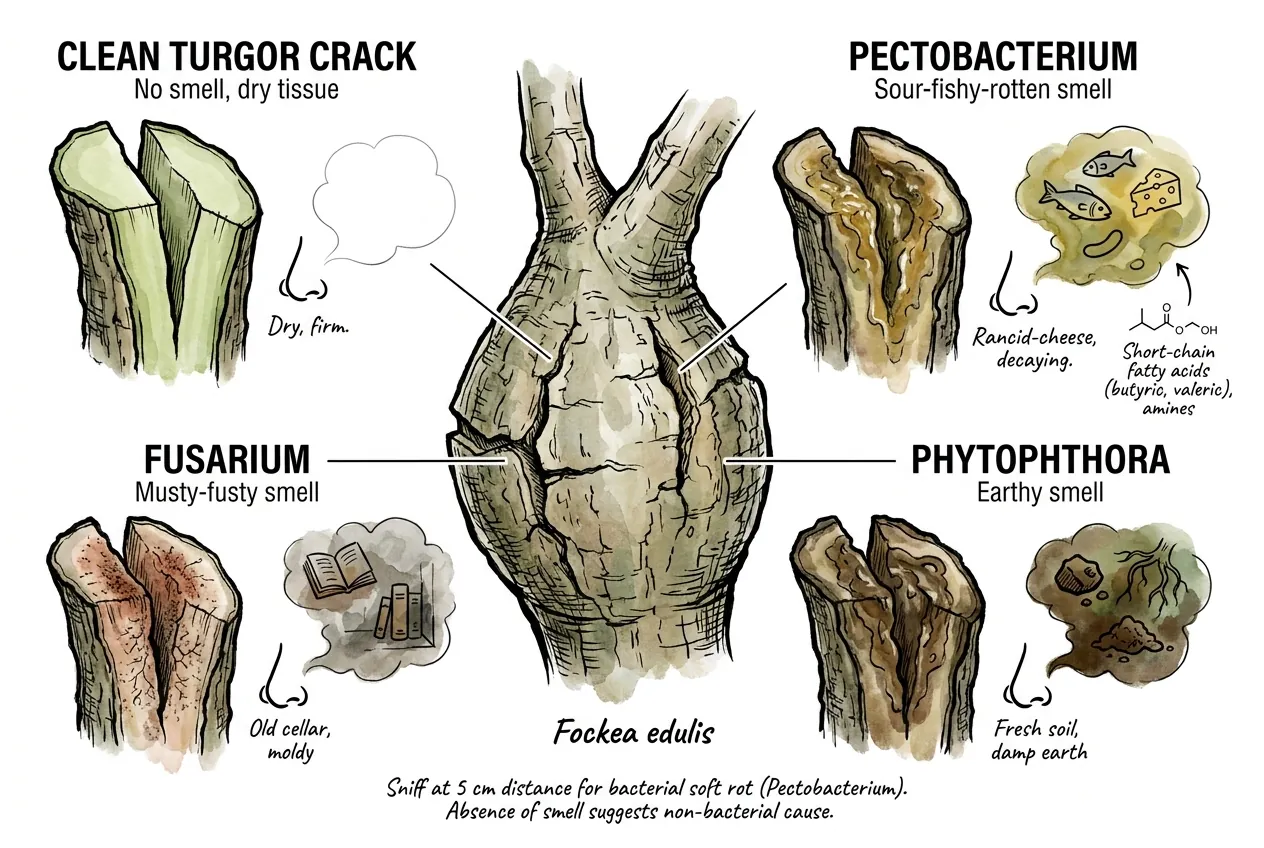
Smell is a rough clue, not an identification. A foul, sour-fishy odor can support concern for bacterial soft rot, while a clean turgor crack usually has little odor. Infections can still be odorless, especially in dry, early, or mixed cases, and confirming the organism requires laboratory testing. Use smell alongside wetness, softness, and lesion spread. A bad smell supports prompt rot-focused inspection, but its absence does not prove the plant is uninfected.
How fast does soft rot advance?
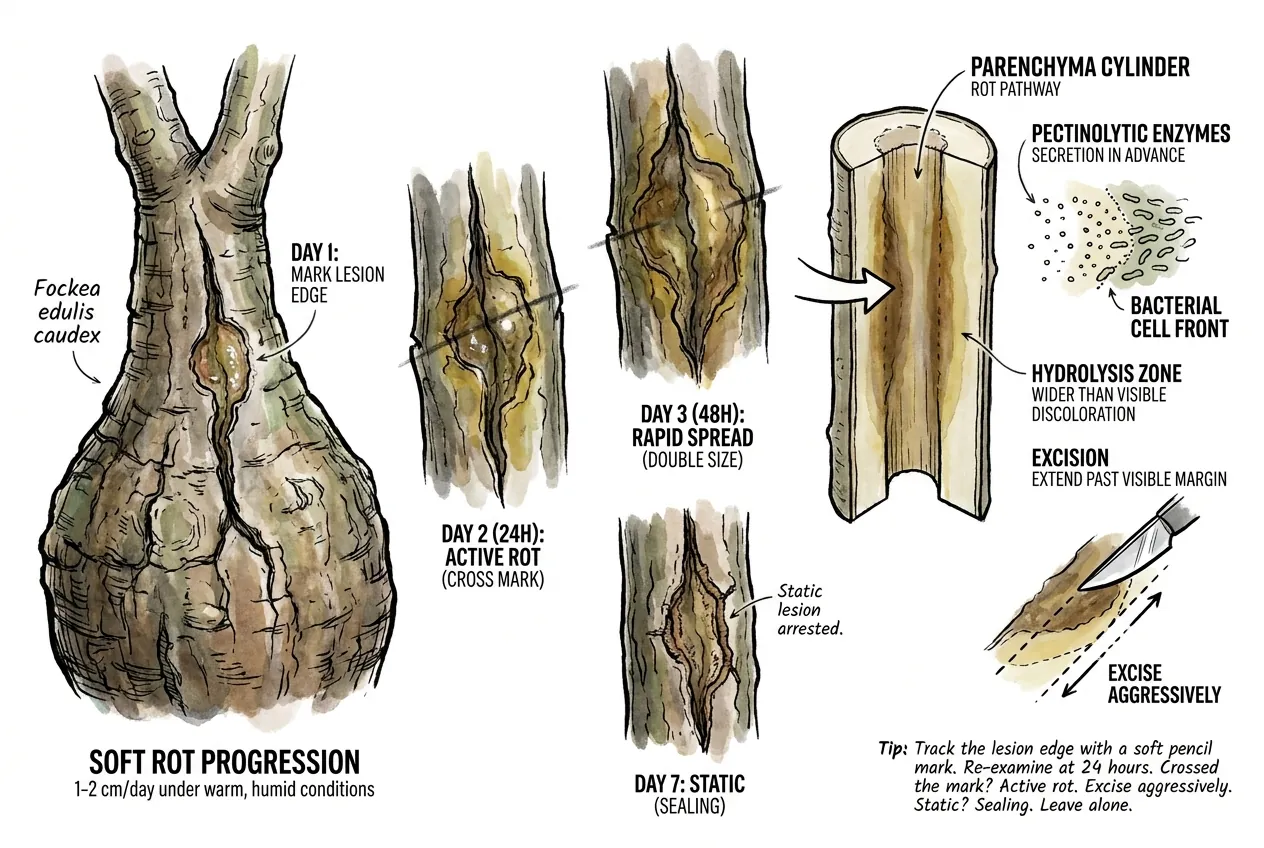
Soft rot can advance quickly under warm, wet conditions, but the rate varies by organism, tissue, and environment. Track the lesion edge rather than applying a universal daily distance or deadline. Pectinolytic enzymes can move ahead of the bacterial cell front, making the hydrolysis zone wider than visible discoloration. Excision may therefore need to extend past the visible margin, with firmness guiding how far.
How should I track a possible soft-rot edge?
I inspect the lesion before watering at the same local hour after 20 minutes under one fixed diffuse lamp. This keeps hydration, surface temperature, and glare from moving the apparent edge. Spreading soft tissue, odor, or wetness raises concern for active rot, while a dry, firm, unchanged margin supports observation.
No outline goes on the caudex itself. I use one pot-rim orientation mark and hold a narrow paper scale beside the lesion without touching it.
The crack is photographed square-on with the paper scale filling the same part of the frame each time. That scale and the rim mark make my framing repeatable without adding ink or another wound to the tissue.
An untouched original stays in my archive while the visible edge is traced only on a duplicate. I compare its endpoints, widest point, and one nearby skin landmark across dates. A changed camera angle or light makes any apparent width change uncertain rather than proof of spread.
I do not wait for a perfect overlay when the tissue becomes wet, soft, odorous, or visibly collapses. The photograph is for distinguishing a stable dry fissure from gradual change, not for delaying a rot-focused inspection when stronger warning signs appear.
Is brown discoloration always bad?
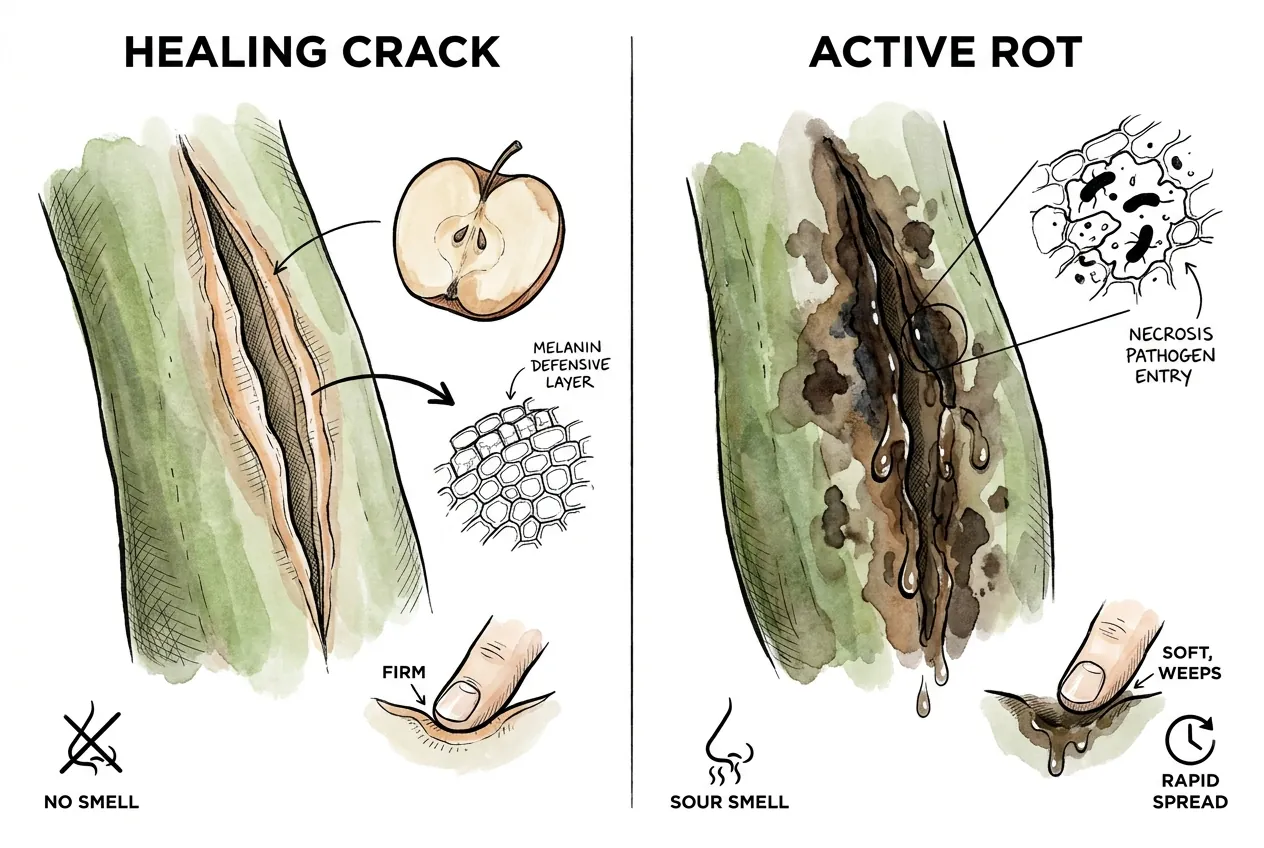
Not all browning is bad. A pale, dry brown rim around a firm, odorless crack is often oxidized wound tissue caused by the same enzymatic browning that darkens a cut apple. Damaged cells release polyphenols that polymerize in air.
That kind of dry, firm browning is part of normal sealing and shouldn't be cut away.
How should color be interpreted?
Color alone is not proof of health. Read it together with texture, smell, wetness, and whether the lesion is spreading.
Dry, firm, and odorless points to healing. Wet, soft, dark, spreading, or foul-smelling tissue points to rot.
Do not excise dry, firm, pale-brown corkifying tissue, but do not assume any brown area is safe without checking the other signs.
| Sign | Healing crack | Active rot |
|---|---|---|
| Surface | Dry | Wet, weeping |
| Margin color | Pale brown (melanin) | Dark brown to black |
| Odor at close inspection | None | Sour, fishy, rotten |
| Thumbnail test | Firm, resists | Soft, weeps fluid |
| Change over repeated checks | Static | Spreading versus stable |
What is the post-crack first-aid protocol?
What is the evidence limit for first aid?
The chemical steps below are common hobbyist practice, but none are label-directed uses for dressing an open caudex wound, and none have been tested specifically on Fockea.
For many clean cracks, keeping the plant dry and airy while it seals itself is often the lower-risk first aid.
Treat the products below as optional, use-at-your-own-risk measures for wounds you judge to be contaminated or rotting. Always follow each product's own label, wear appropriate protection, and when in doubt, do less rather than more.
What is the basic order if you intervene?
If you do intervene, use this order. Clean, then dry, then monitor. In broad terms, 3% hydrogen peroxide is a surface oxidizer. Cinnamon powder has some antifungal activity. Elemental sulfur is a fungicide. Copper products have some activity against bacteria. Each is discussed below with its limits.
How do I use hydrogen peroxide correctly?
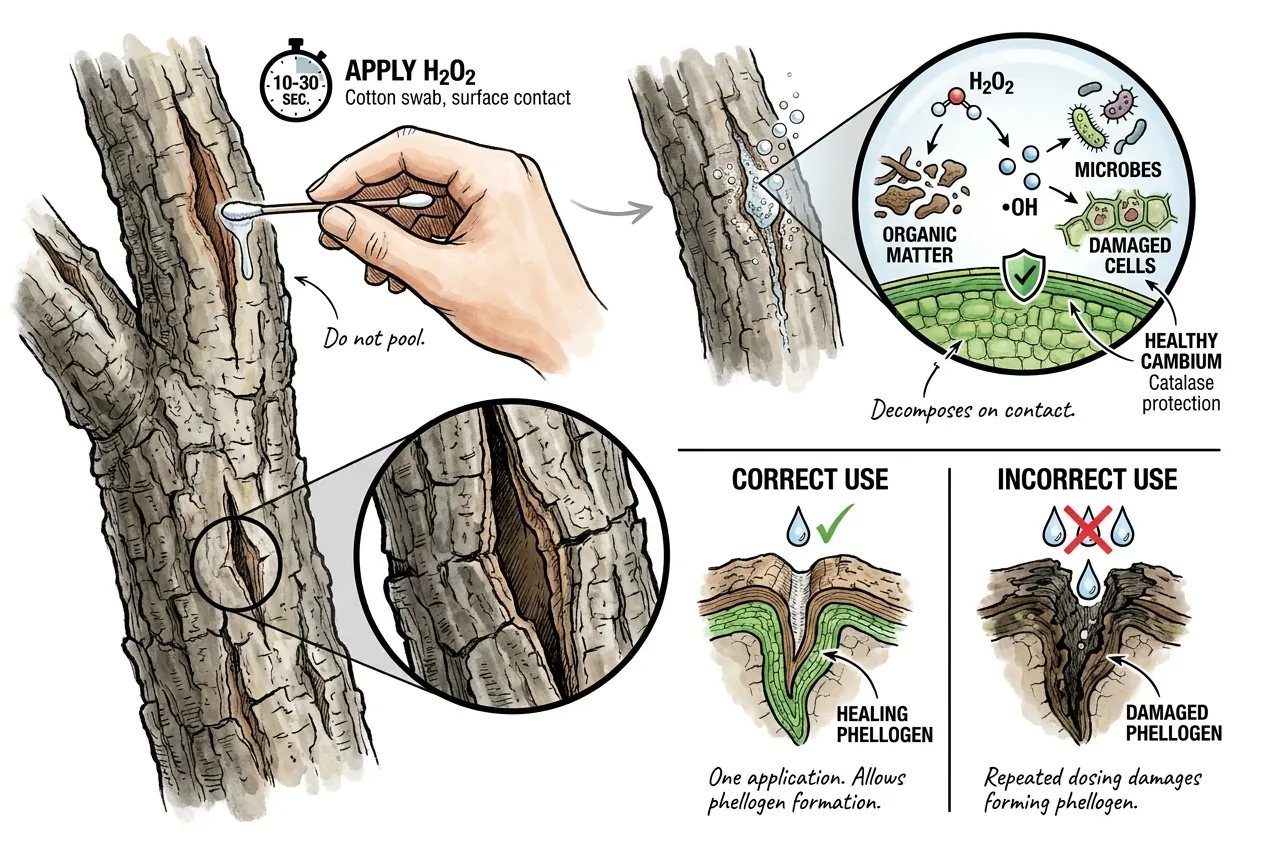
Hydrogen peroxide is not a validated Fockea wound treatment. It can oxidize microbes and plant cells alike, so avoid soaking, repeated use, or any concentration not specified by a current label.
For a clean crack, hygiene, airflow, and observation are safer defaults.
When do I dust with cinnamon versus sulfur?
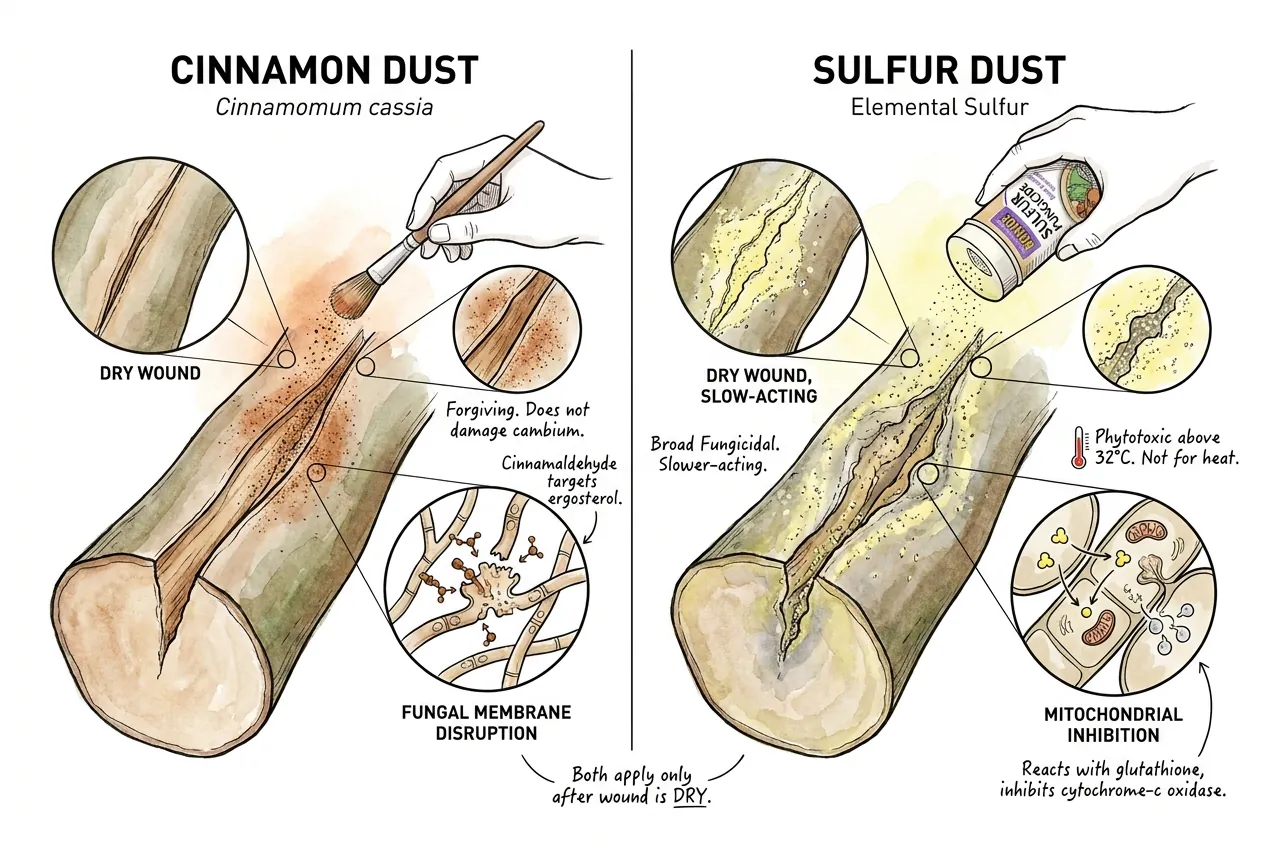
Both are dry-applied dusts. Common kitchen cinnamon is usually cassia, or Cinnamomum cassia. The spice often marketed as true cinnamon is a different species called Cinnamomum verum.
Cinnamon contains cinnamaldehyde, which has antifungal activity in laboratory studies. Those studies test isolated compounds against culture organisms, not cinnamon powder sprinkled on a Fockea wound, so its real-world benefit here is unproven.
It may seem mild, but safety cannot be assumed at every dose.
Treat products as label-bound tools
Elemental sulfur is a registered fungicide for listed uses, not a validated dressing for an open Fockea wound.
Heat, formulation, and tissue sensitivity affect risk. Bonide sulfur is an example to compare. Follow its current label and do not assume an off-label wound application is safe.
When do I use copper?
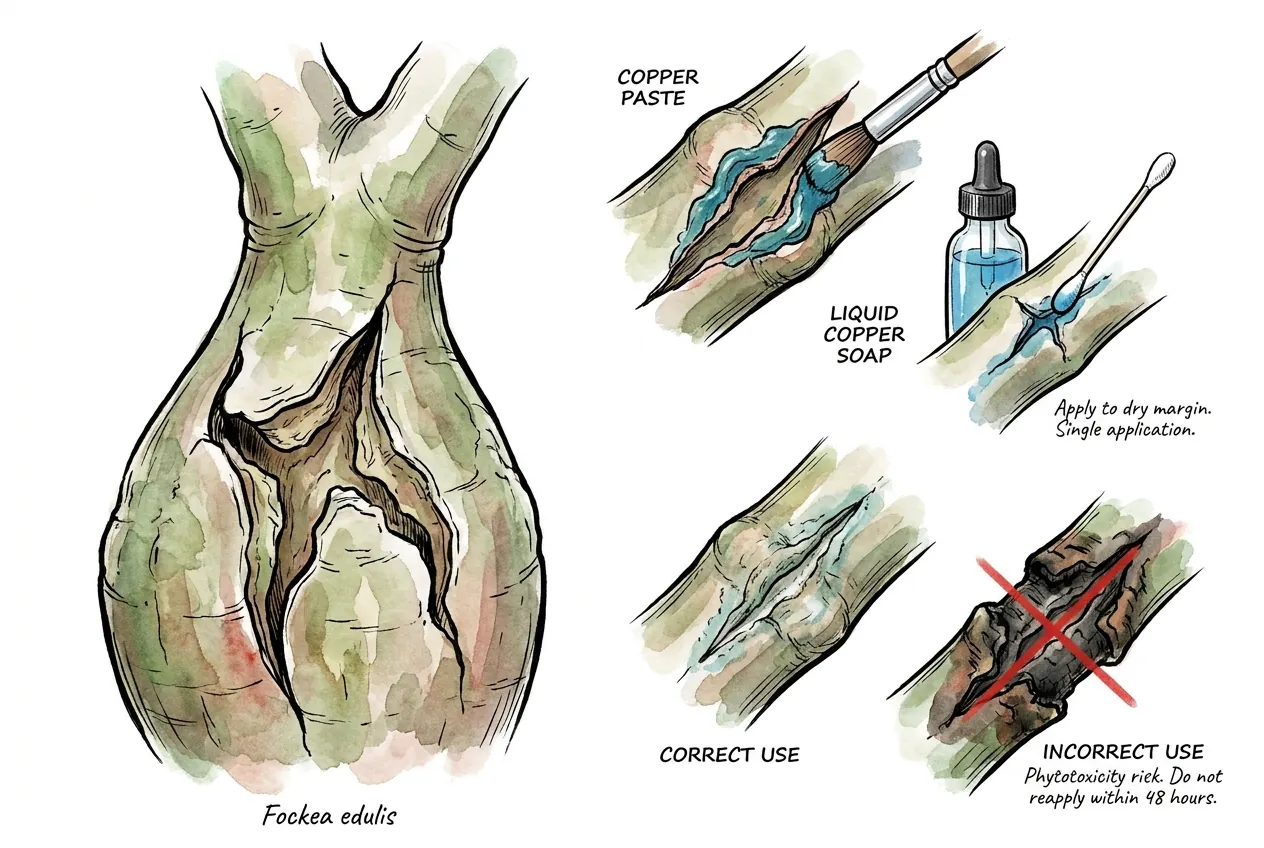
Copper products can be phytotoxic, and their disease activity depends on formulation and label use.
Bonide copper is a liquid copper soap, not a wound paste. Its current label does not establish open-wound use. Do not apply it experimentally without professional guidance.
What ambient conditions matter?
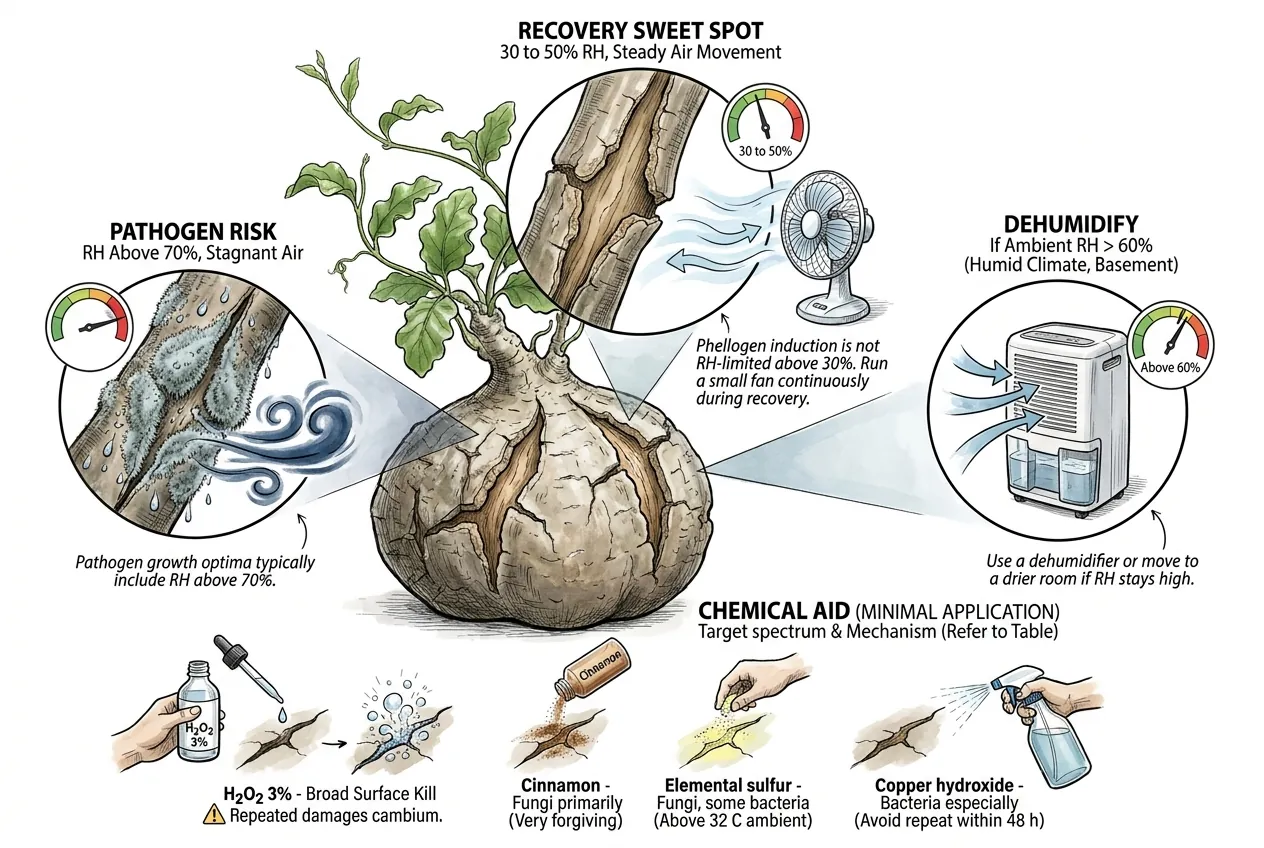
During recovery, aim for airflow and a wound surface that is not persistently wet, while avoiding desiccating drafts.
There is no proven Fockea humidity range. Adjust from tissue and root condition.
Gentle, intermittent airflow is usually enough. A small fan on low can help in a stuffy room.
If your air is genuinely humid and stagnant, improving ventilation or moving the plant to a drier, airier spot is more to the point than chasing a specific humidity reading.
Do not leave a continuous strong draft on a recovering plant for weeks.
| Chemical | Mechanism | Target spectrum | Phytotoxicity ceiling |
|---|---|---|---|
| Hydrogen peroxide | Hydroxyl radical oxidation | Broad surface kill | Can damage tissue. No validated wound use |
| Cinnamon | Fungal membrane disruption | Fungi primarily | Benefit on wounds unproven |
| Elemental sulfur | Mitochondrial inhibition | Fungi, some bacteria | Heat and formulation dependent |
| Copper hydroxide | Ion bactericide | Bacteria especially | Use only for labeled applications |
What is the right recovery substrate?
An open, stable mineral component such as pumice can help a wounded Fockea re-aerate between waterings.
Particle size, porosity, and the final mix depend on the pot and root mass. No fixed percentage is a universal recovery standard.
Why pumice instead of perlite?
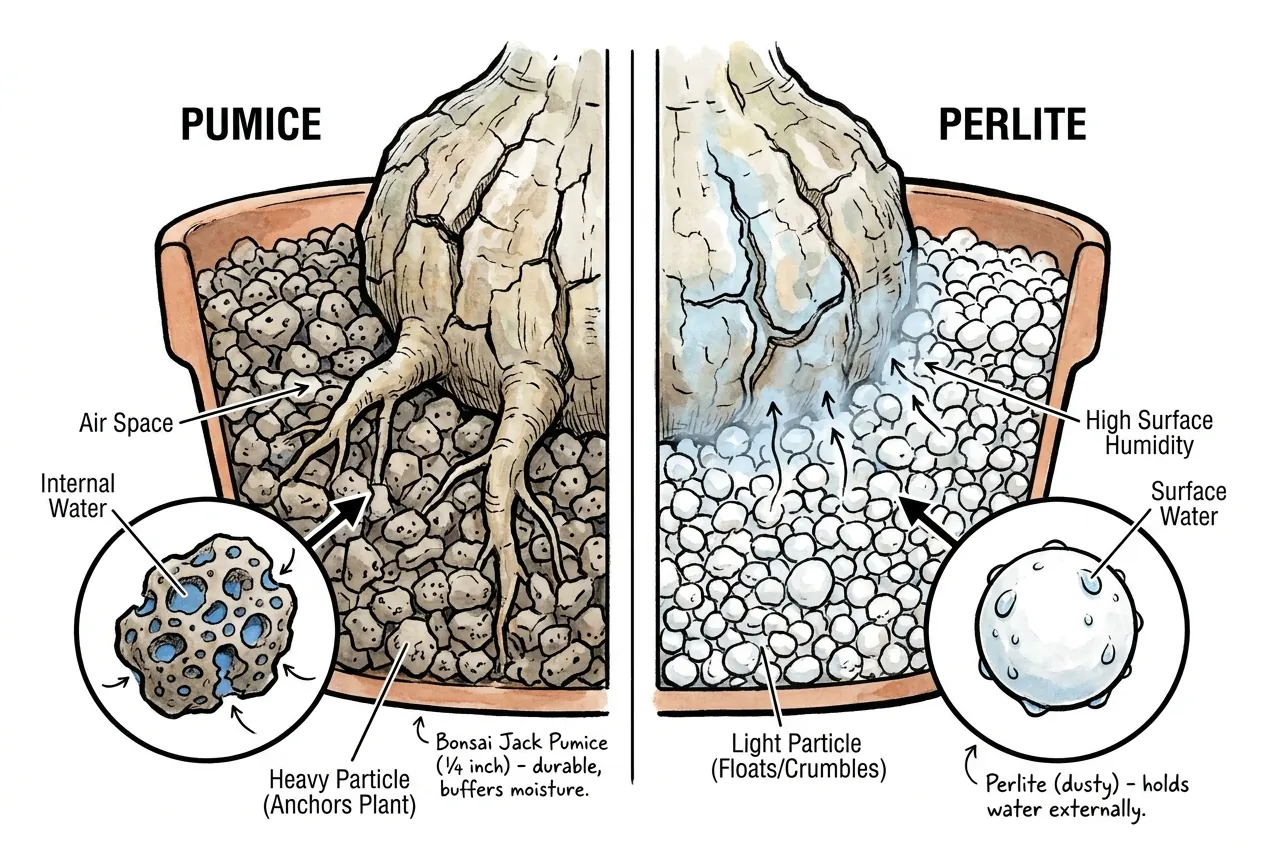
Pumice is often heavier and more structurally stable than perlite, and its internal porosity can buffer moisture while preserving air gaps.
Perlite can float or break down in some mixes. Performance depends on grade and handling.
Pumice can hold some water inside its particles while leaving particle-to-particle gaps as drained air space.
How much reaches roots or the wound interface depends on the finished mix, pot, and dry-down.
Perlite may retain water differently and can change the surface moisture pattern, so test the actual mix rather than assuming one aggregate behaves the same in every pot.
Test the finished substrate
Bonsai Jack pumice is one current listing to compare for particle size, washing, package size, and price.
Test the resulting mix in the actual pot rather than treating a product grade as a guarantee.
What is the pumice tradeoff?
Compare convenience with cost. A bulk mineral source may suit a collection better than a small retail bag.
Why does air-filled porosity matter for pathogen suppression?
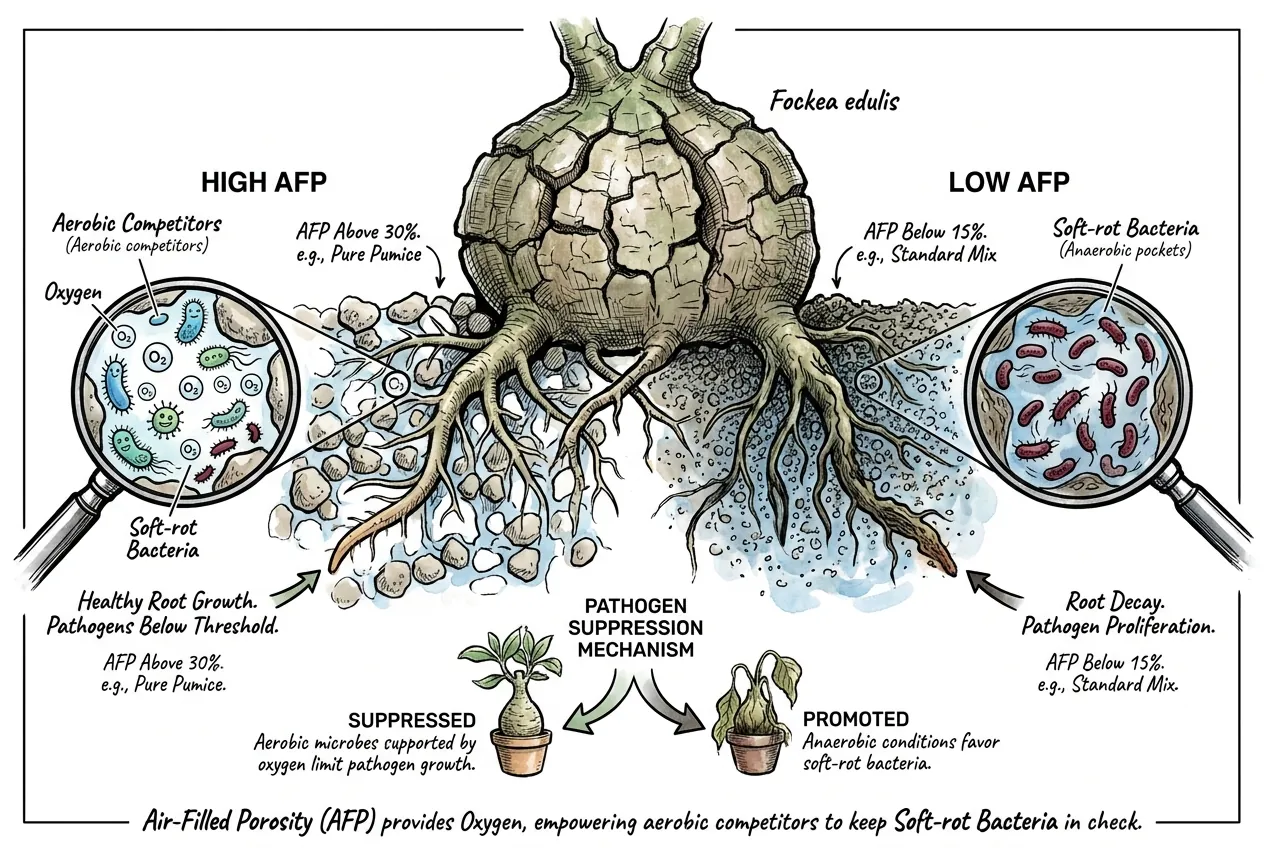
Soft-rot bacteria are facultative anaerobes, and disease can be especially severe in waterlogged, low-oxygen conditions, as Wisconsin Horticulture extension notes.
Facultative means they can grow with or without oxygen. The practical problem is that soggy, airless substrate stresses roots and favors these organisms.
What does air-filled porosity change?
A well-aerated, fast-draining substrate that does not stay saturated can reduce risk, while airless wet pockets can favor root and soft-rot problems.
A high-air mineral mix may suit a recovery pot, while a dense water-retentive houseplant mix may dry too slowly.
Specific air-filled-porosity percentages depend on particle size, pot, and how you mix and pack it. Treat any reference percentage as a guide rather than a guarantee for a particular bag.
What pot do I use?
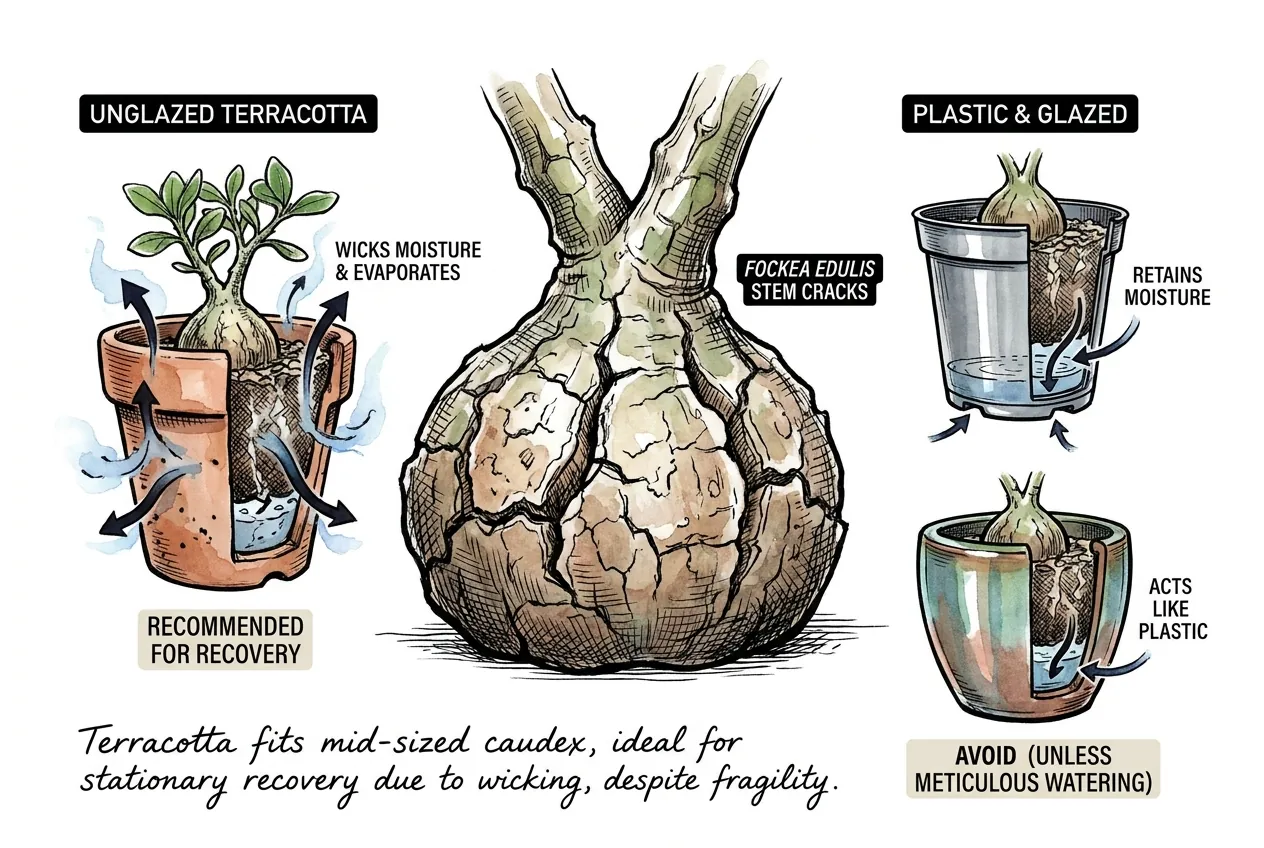
A terracotta pot transports water through the porous clay wall and evaporates it from the outer surface.
The result is a measurably drier substrate compared to a plastic pot of the same dimensions.
Unglazed terracotta can help a recovery pot dry faster, but the result depends on wall thickness, airflow, mix, and climate. Glazed pottery behaves more like a non-wicking container.
Plastic can also work when you can monitor moisture and adjust watering to the actual dry-down. No pot material is universally safest.
INGOFIN terracotta pots are one current option to compare for drainage, size, weight, and handling.
Terracotta may dry faster than plastic, but the effect depends on wall thickness, airflow, and the mix. It is not automatically safer for every plant.
When can I start watering again?
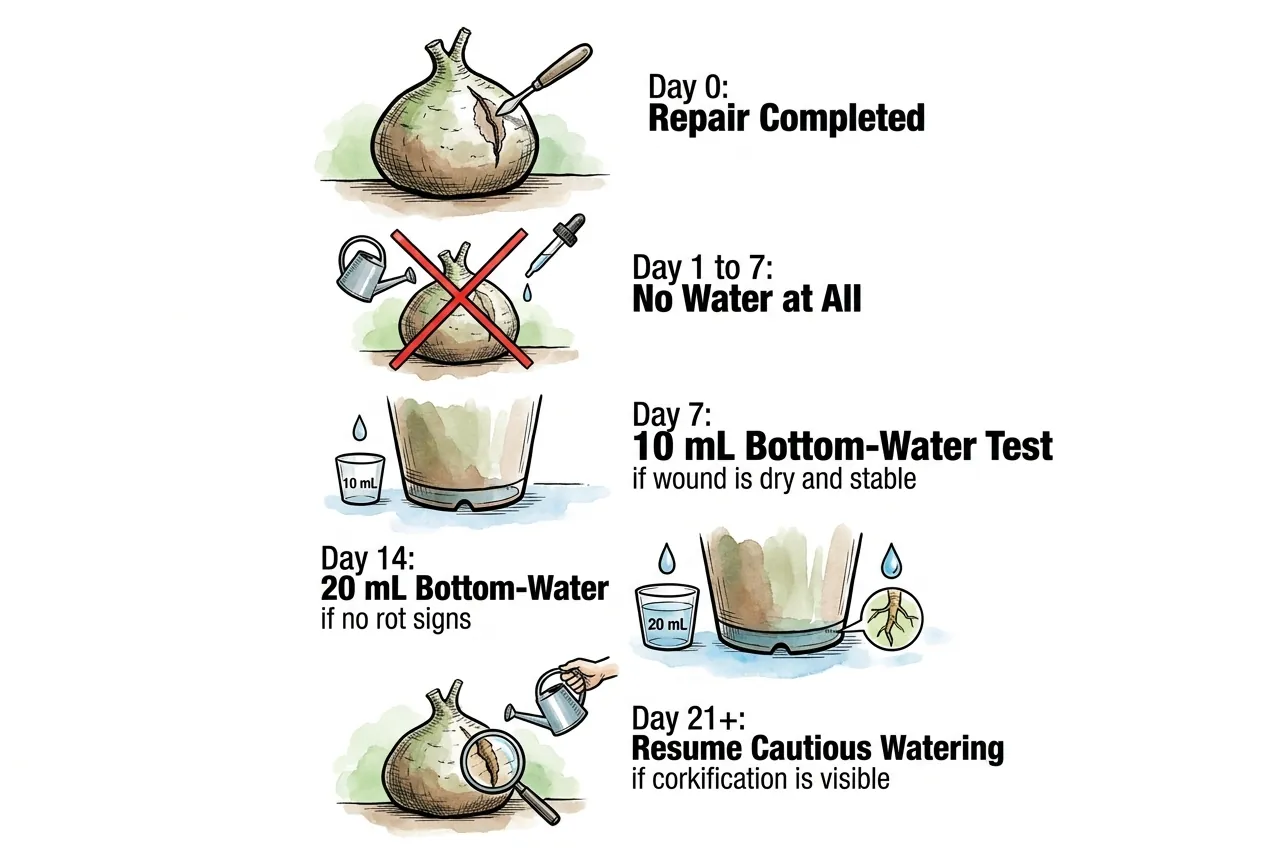
Resume water only after the wound surface is dry and stable, the root zone is not persistently wet, and the plant is ready to use water.
Healing time varies with wound size and conditions.
Start with a small, localized test, let the mix re-aerate, and increase only if the tissue and roots remain stable.
A calendar or fixed volume is not a validated Fockea protocol.
| Condition | Action |
|---|---|
| Fresh wound | Keep clean, airy, and protected from standing moisture |
| Wound still wet, soft, or changing | Do not water. Inspect and seek advice |
| Dry, stable wound and appropriate root-zone condition | Small test watering, then observe |
| Stable response after test | Increase cautiously only as the plant uses water |
| Active recovery | Return toward the plant's normal routine gradually |
When and how do I excise necrotic tissue?
Cutting rot out may be warranted when soft, dark, foul-smelling tissue is present because soft rot can spread faster than a topical treatment can stop it. This is real surgery, so weigh it against the plant's value and your confidence. Reach firm, healthy tissue with a modest margin past obvious rot because the damaged zone can extend beyond visible discoloration. Remove as little healthy tissue as possible while clearing the softening, using firmness rather than a fixed number of millimeters.
How deep do I cut?
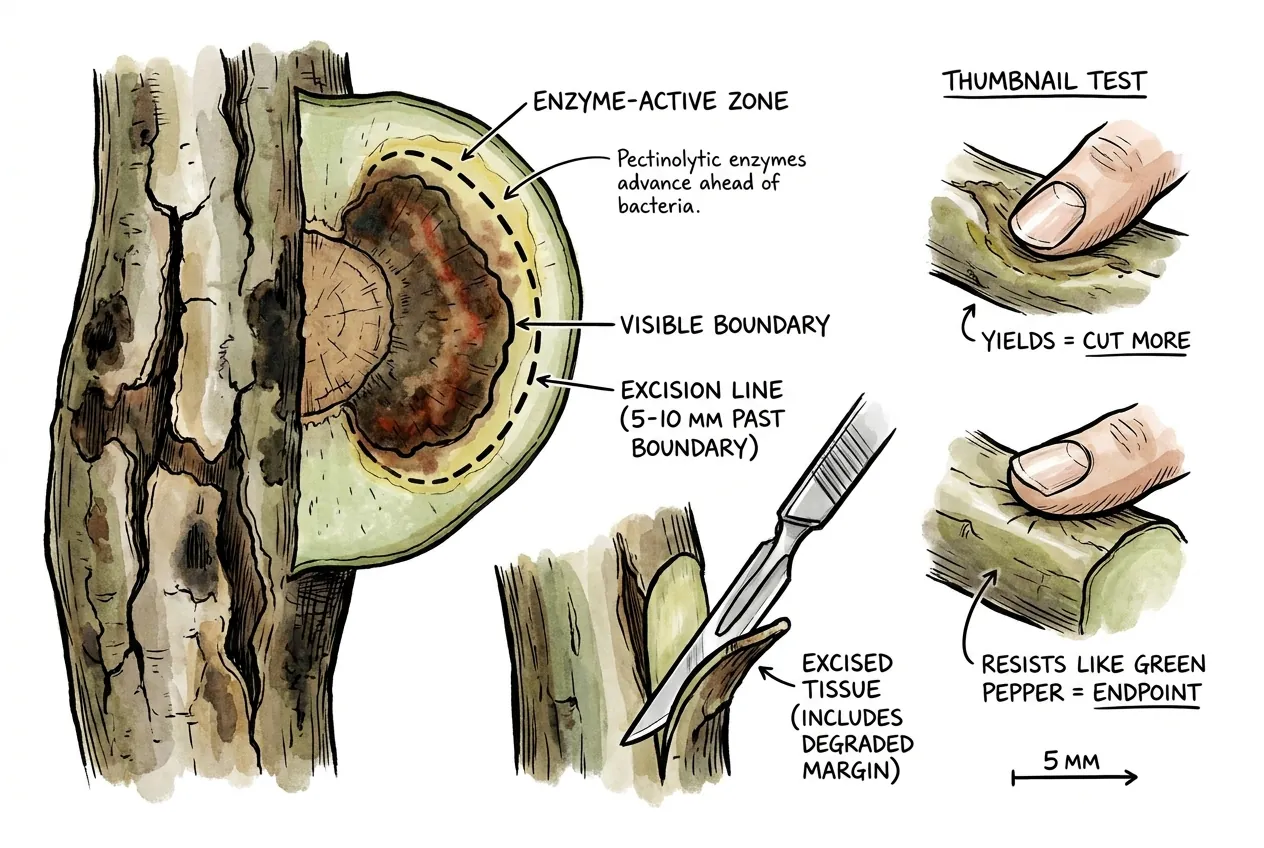
Pectinolytic enzymes can be secreted ahead of the bacterial cell front, so the enzyme-active zone may extend past visible discoloration. Excision that stops at the visible margin can leave tissue that continues to soften and recolonize. Cut a little past the boundary while checking firmness. If tissue still gives, cut a bit more and stop once it resists firmly. The aim is the smallest healthy margin that clears the soft zone, not a fixed depth.
Why sterilize the blade between every cut?
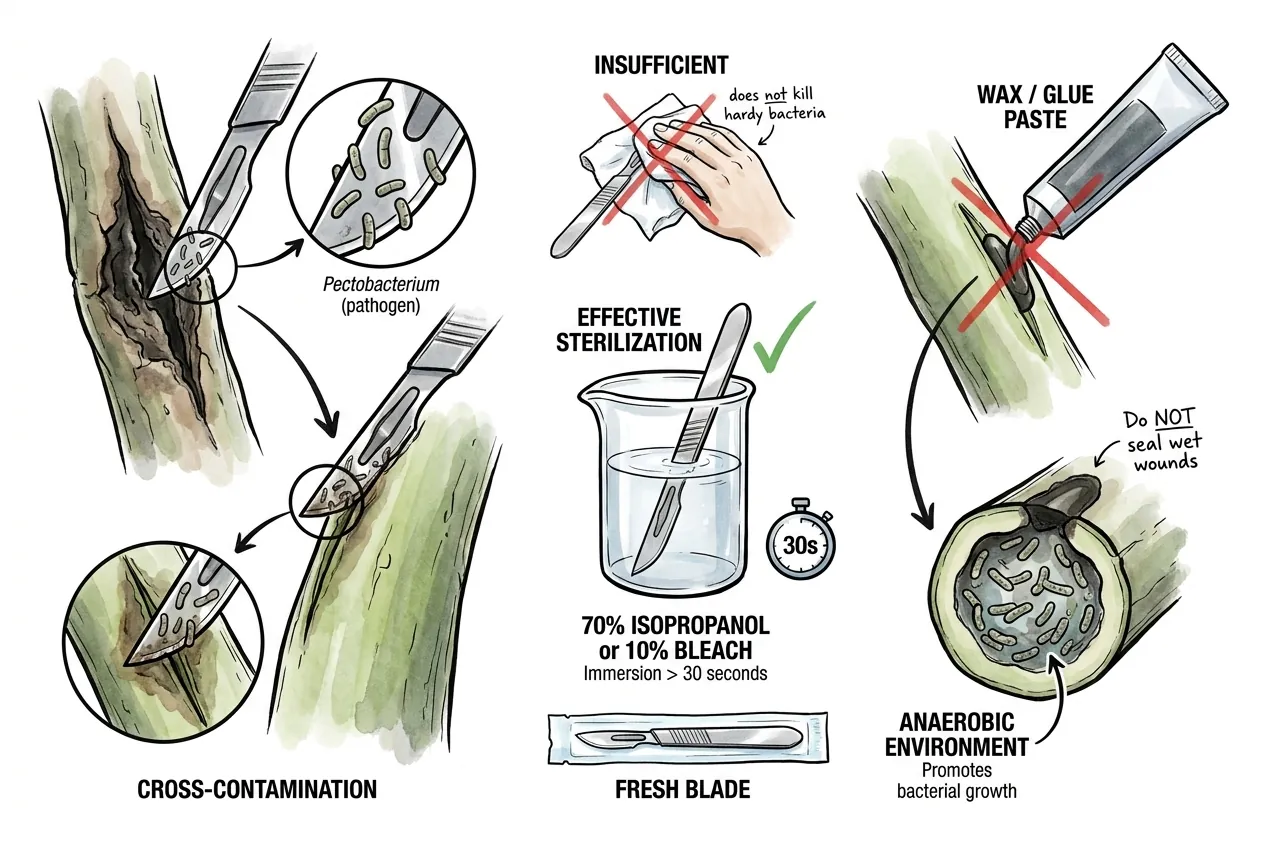
A cut can contaminate the blade with pectinolytic bacteria, and the next cut can transfer that contamination into apparently healthy tissue. Strictly speaking, this is disinfection rather than true sterilization. Remove visible debris, then use a disinfectant effective for the suspected pathogen and safe for the tool, following current safety directions without improvising concentrations or soak times. Alcohol is flammable, so use a small closed container away from heat and cap it when not in use. A fresh disposable blade per procedure is another clean option.
Why is sealing a wound harmful?
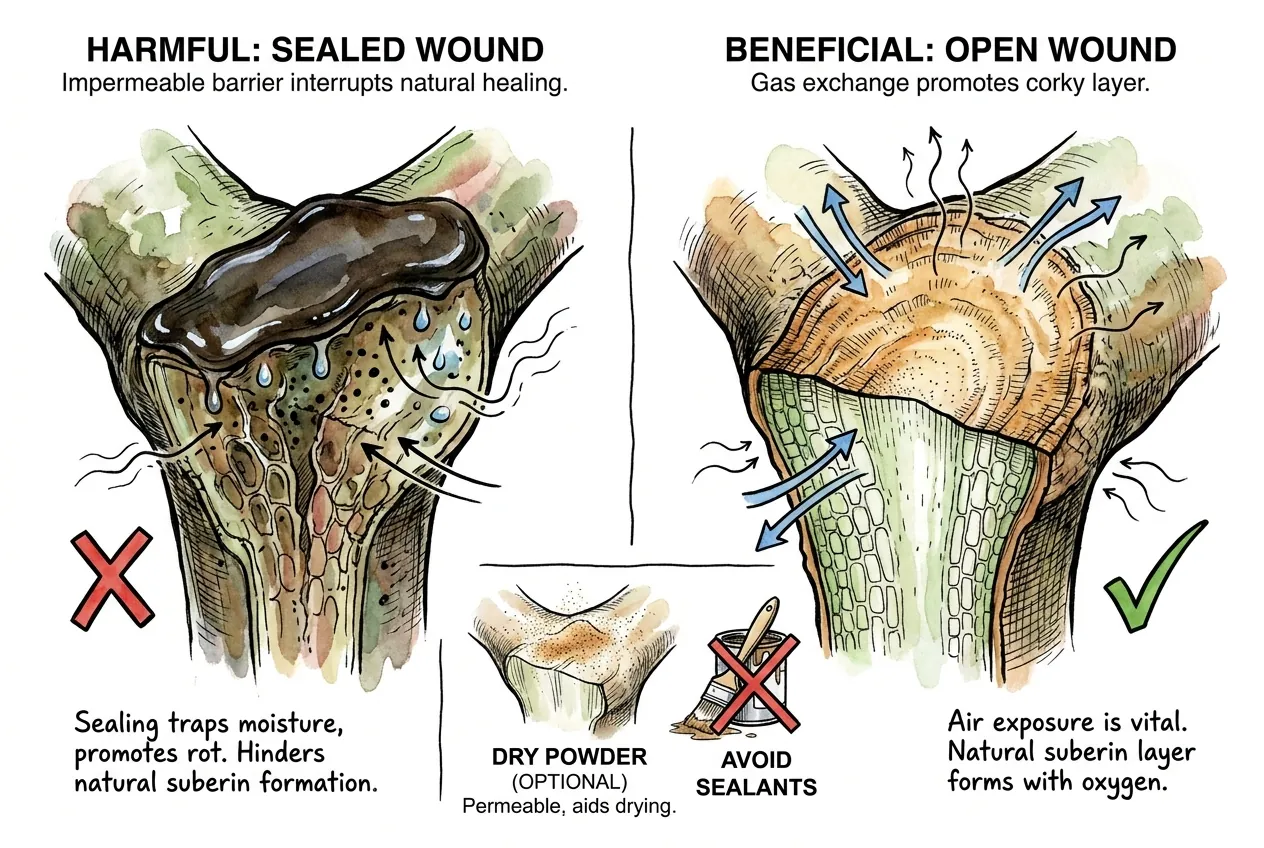
Why should a wet wound stay unsealed?
Do not seal a wet wound with wax, glue, or commercial pruning paste. A sealed pocket can retain heat and moisture and favor soft-rot organisms. The plant’s natural wound response requires gas exchange because the suberin sealing layer and new phellogen need oxygen. Sealing therefore interrupts the process you want to support. Modern arboricultural guidance finds that pruning paint does not improve wound healing and may harm it, a principle that also applies to caudex excisions. If a covering is considered at all, a dry-applied powder that does not form an impermeable film is a lower-risk option than sealing moisture in, subject to the label and tissue compatibility.
How long does the post-excision dry-down need to be?
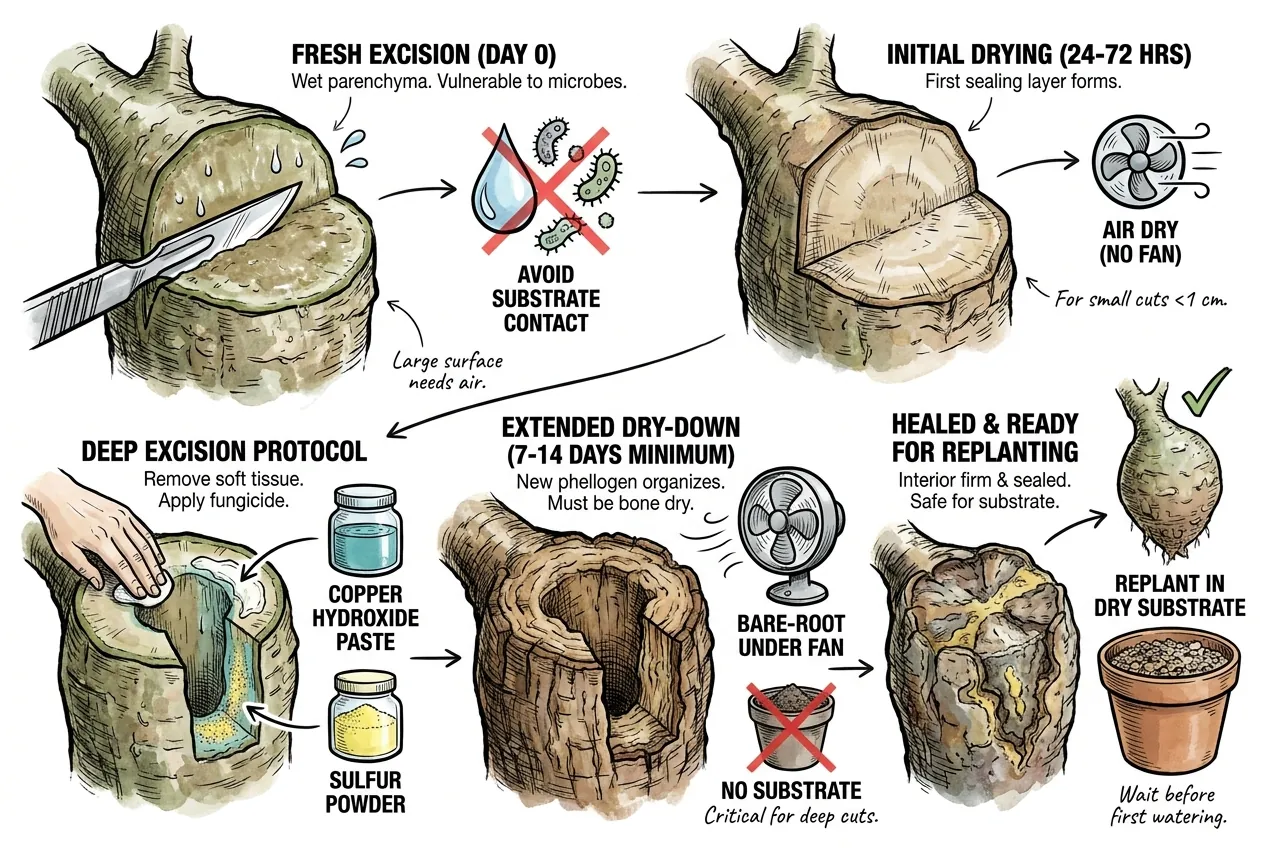
A freshly excised wound needs time for an initial seal, but the interval depends on wound size, tissue, temperature, airflow, and root condition. A small surface excision may stabilize sooner than a large cavity. Do not keep living roots dry indefinitely to satisfy a calendar. Watch the plant and seek help for major surgery.
What should I consider before deep excision?
Deep excision is major surgery on a plant, usually attempted only when the alternative is losing it.
It carries a real risk of removing salvageable tissue or spreading infection, and it exposes you to sap and to the chemicals above.
For a valuable or uncertain specimen, consider a plant diagnostic service or an experienced grower before cutting deep.
If you proceed, protect yourself and stop if things look worse rather than better.
Step-by-step deep excision (an experimental, last-resort approach)
- Wear gloves and eye protection. Fockea exudes a milky latex you do not want on skin or in eyes. Work on a cleanable surface.
- Bare-root the plant and remove all substrate.
- With a clean, disinfected blade, cut into the soft tissue, disinfecting the blade between cuts.
- Continue only until the interior is uniformly firm and healthy. No further into sound tissue than you must.
- Do not rinse with a chemical unless a current label or specialist guidance specifically supports that tissue and use.
- Do not use copper or sulfur as an improvised wound treatment. Their registered uses do not establish efficacy on an open Fockea wound.
- Let the wound dry in a shaded, airy spot until it firms over, without over-drying the roots.
- Replant in dry, fast-draining mineral mix and reintroduce water gradually, watching for renewed softening or odor.
When is the plant past saving?
Not every cracked Fockea can be saved. Concern rises when rot may have disrupted conductive tissue around much of the caudex, when softness is widespread rather than localized, or when growing tips wilt despite a hydrated caudex. The vascular cambium produces xylem and phloem, so extensive damage can disrupt water movement between root and shoot. No exact percentage decides the outcome. A wilting apex can also reflect dehydration, root failure, heat, or salt stress, so weigh it with the other signs rather than treating it as proof.
When is whole-plant recovery unlikely?
When two or three of these signals point the same way, the plant may be beyond whole-plant recovery. A salvage cutting from healthy apical growth is one option to consider.
If the plant is clearly gone, removing and disposing of it protects the rest of your collection.
How do I take a salvage cutting?
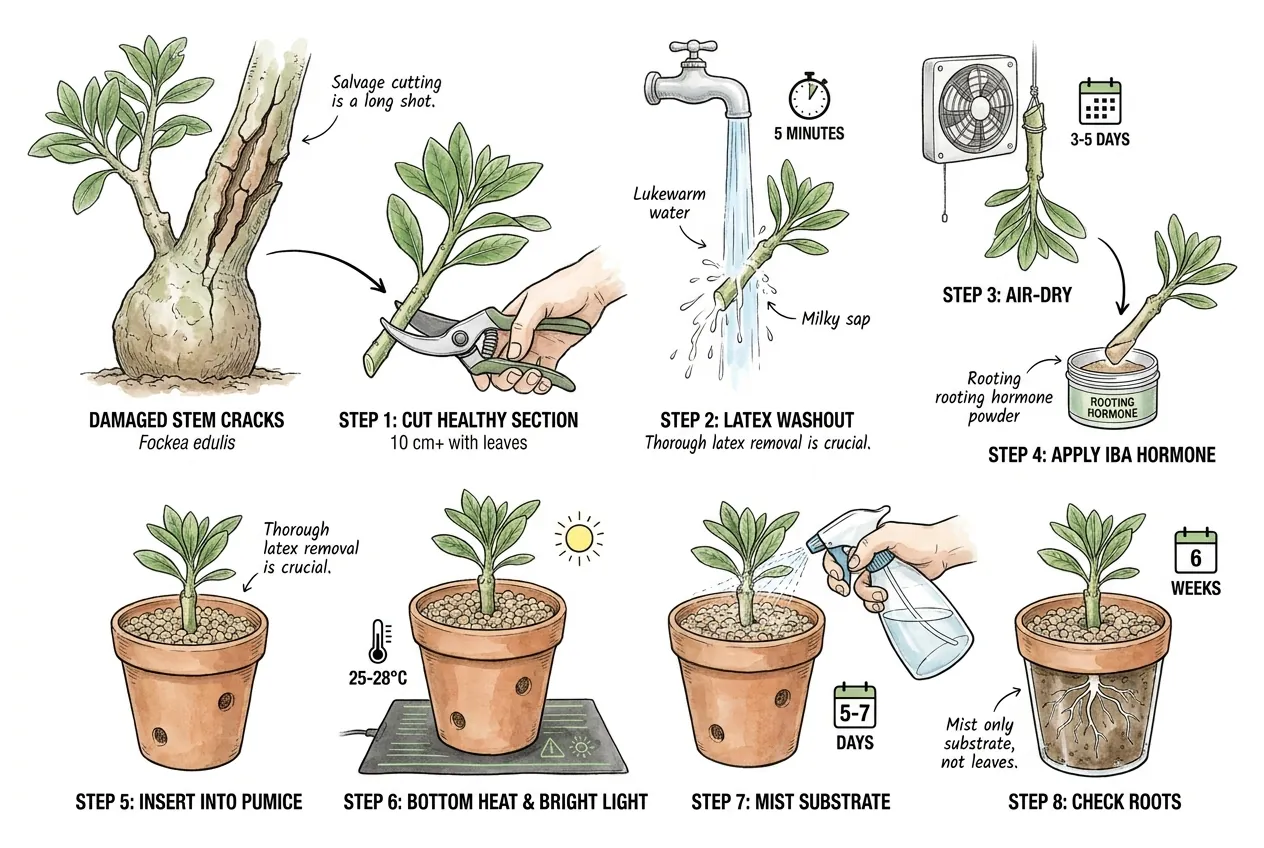
Fockea is often propagated commercially from seed because cuttings can root slowly or inconsistently.
A salvage cutting is a long shot but a real option when the alternative is total loss.
Apocynaceae cuttings often bleed milky latex, which can seal the cut and slow water uptake, so wash the latex out thoroughly before any rooting attempt.
The family name comes from the genus Apocynum, while many members of the family do have latex.
Wear gloves and eye protection while cutting and washing.
Step-by-step salvage cutting
- Cut a healthy apical stem section of a size suited to the species and remaining material, with viable leaves.
- Rinse the cut end thoroughly with clean lukewarm water to remove visible latex, following safe handling guidance.
- Let the cut surface stabilize in a clean, airy setting without forcing a fixed drying period.
- Use rooting hormone only if a current label and species-specific guidance support it.
- Insert into a stable, open medium and container suited to the cutting and local conditions.
- Provide gentle warmth and bright filtered light only if the plant remains stable. Avoid heat on active rot.
- Water sparingly after the medium and cut surface are ready, then assess new growth and roots over time.
How do I dispose safely?
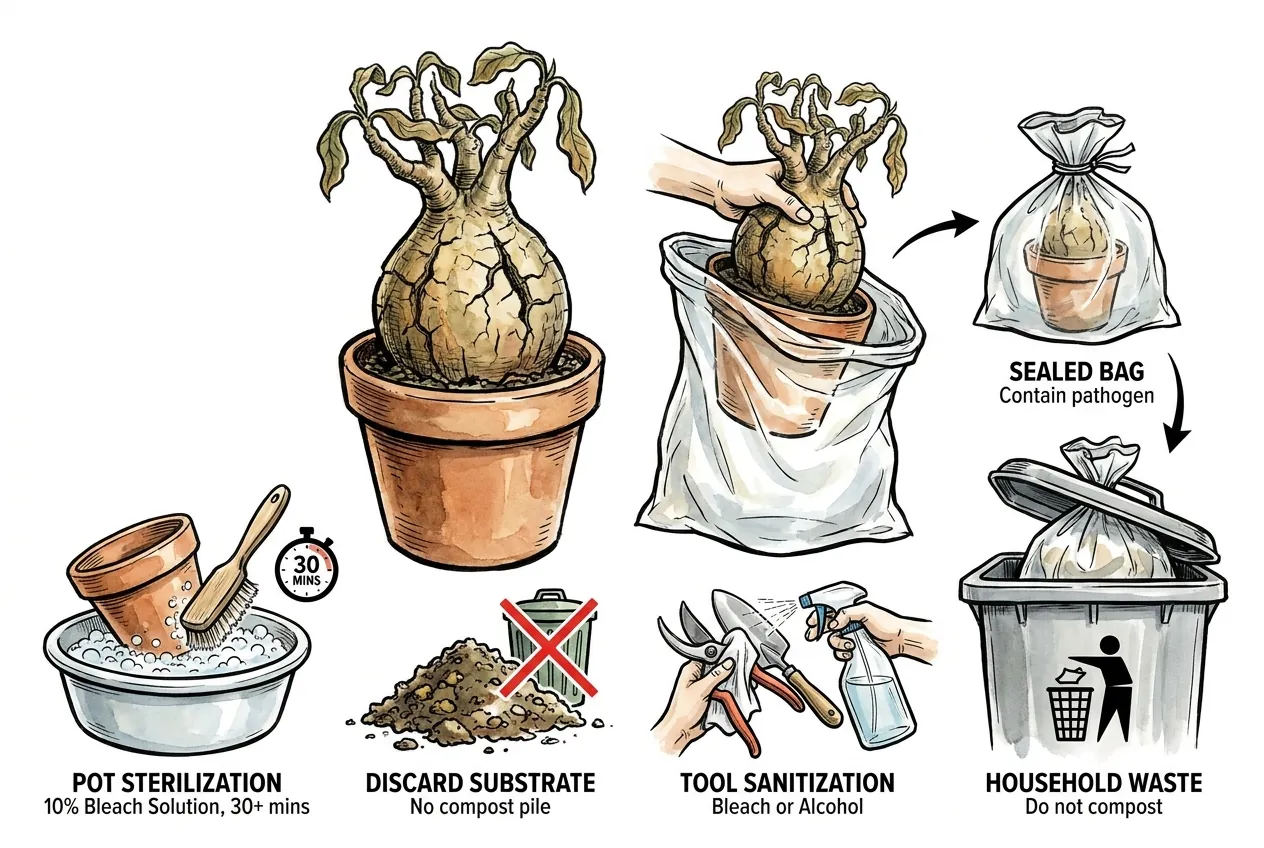
Soft-rot bacteria can persist in plant debris, and home compost may not reliably destroy them, so household waste is safer for a confirmed rotting plant. Reusing substrate or pots without appropriate cleaning can reintroduce pathogens. Bag the infected plant and contaminated substrate for household waste rather than compost. Clean reusable pots and tools with a disinfectant appropriate to the material and local safety guidance, and do not mix chemicals or assume a concentration or contact time without the product label.
How do I prevent cracks from happening at all?
Which prevention practices matter most?
- Ramped rehydration after dormancy.
- Nitrogen restraint during active growth.
- Winter dormancy management.
How do I ramp rehydration after dormancy?
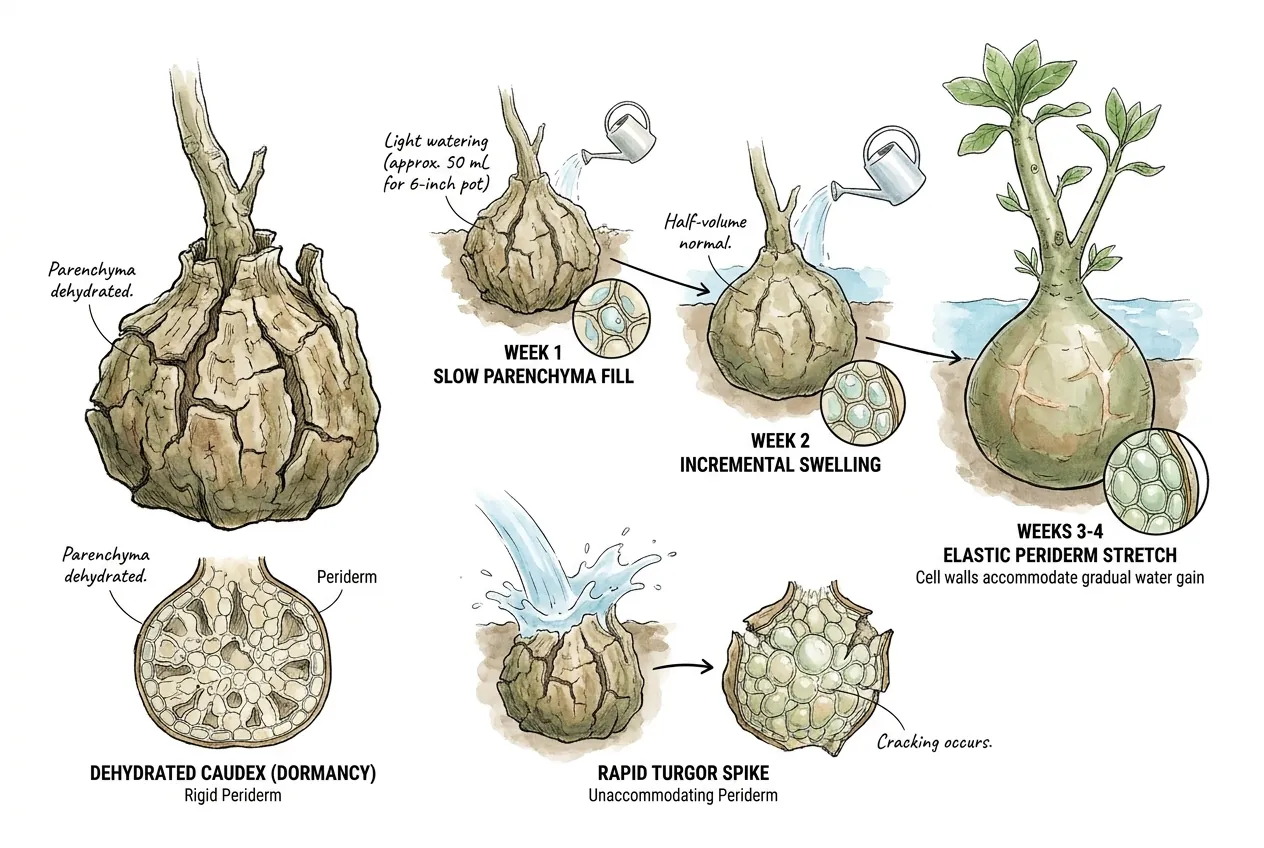
After a prolonged dry rest, storage tissue and roots may be less ready for a sudden soak. A large watering can add hydraulic stress and leave a weak root zone wet. Resume with a small test once the plant shows activity and the mix is ready, then increase only as the pot drains and the plant uses water. There is no fixed volume or week-by-week schedule. Gradual rehydration gives tissue and roots time to respond while showing whether the mix drains evenly.
Why does nitrogen matter?
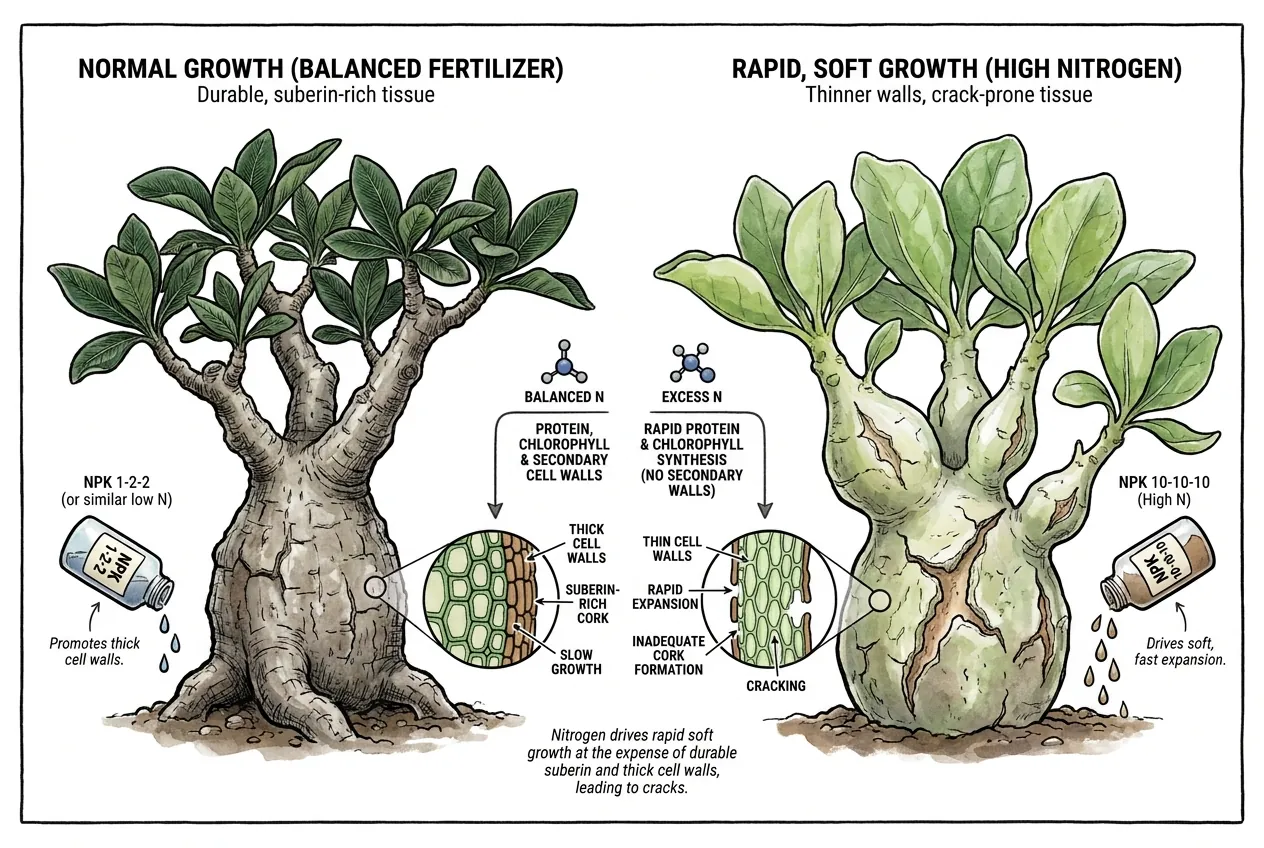
High-nitrogen fertilizer drives rapid soft growth with thinner cell walls and less suberin than slow-grown tissue. The caudex surface and new shoots may become more crack-prone when expansion outpaces secondary strengthening. Nitrogen allocates resources to protein and chlorophyll production, while phellem or cork may not thicken quickly enough to keep pace. Avoid forcing soft growth with excessive nitrogen. Choose fertilizer from active growth, water quality, and the current label rather than a fixed ratio.
Feed only during active growth
Espoma Cactus! is one low-nitrogen product to compare. Follow its current label and stop if the plant reacts.
What is the fertilizer tradeoff?
Organic fertilizers can develop microbial film in the dilution bottle if stored long-term. Mix only what you need for one season.
How do I manage winter dormancy?
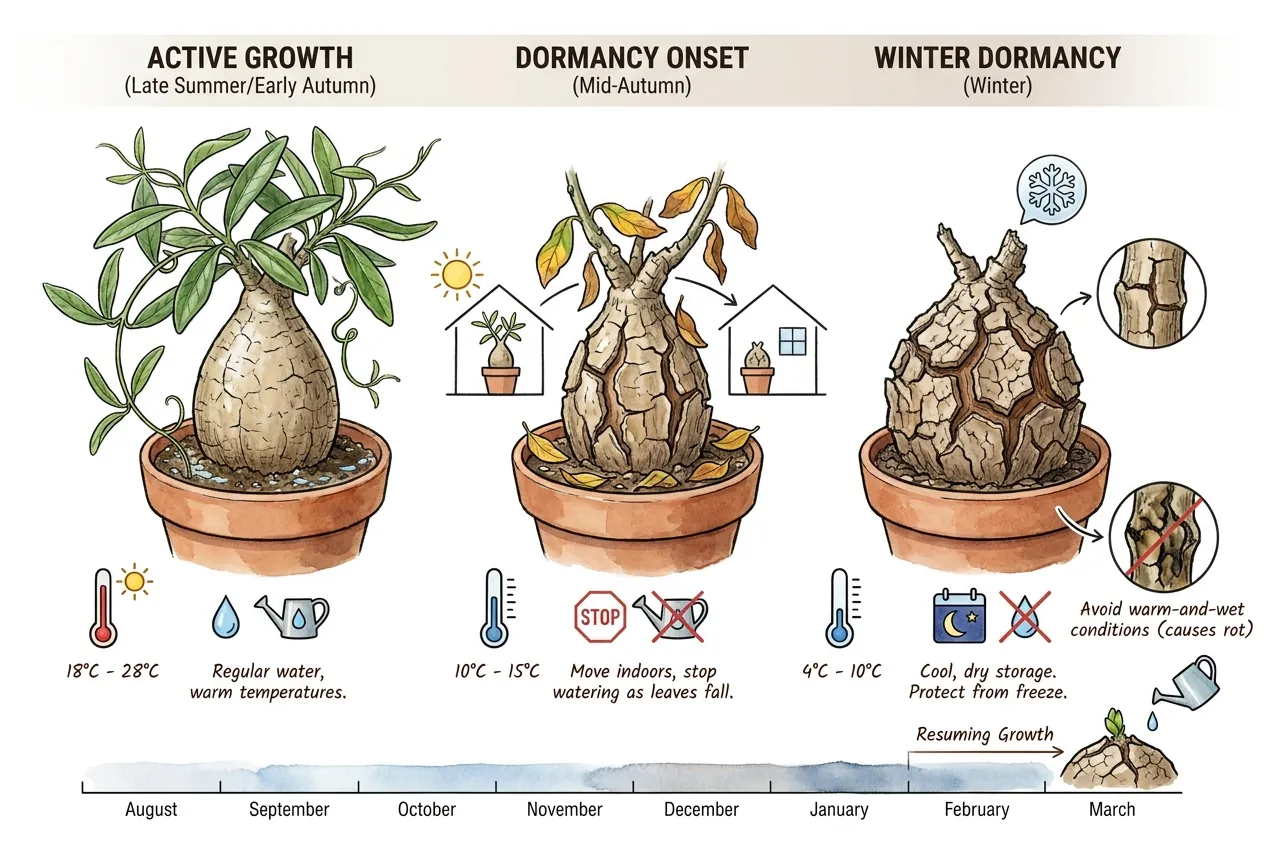
Fockea is semi-deciduous and rests in winter, but some plants hold a few leaves and need just enough water to keep the caudex from shriveling. Cool, frost-free, largely dry conditions help avoid freeze damage and cold-and-wet rot. Keep the plant above freezing and out of wet substrate while inactive. Timing depends on climate and setup rather than a fixed calendar, so ease off water as growth slows and leaves drop, then resume gradually as it wakes.
How does temperature control help in summer too?
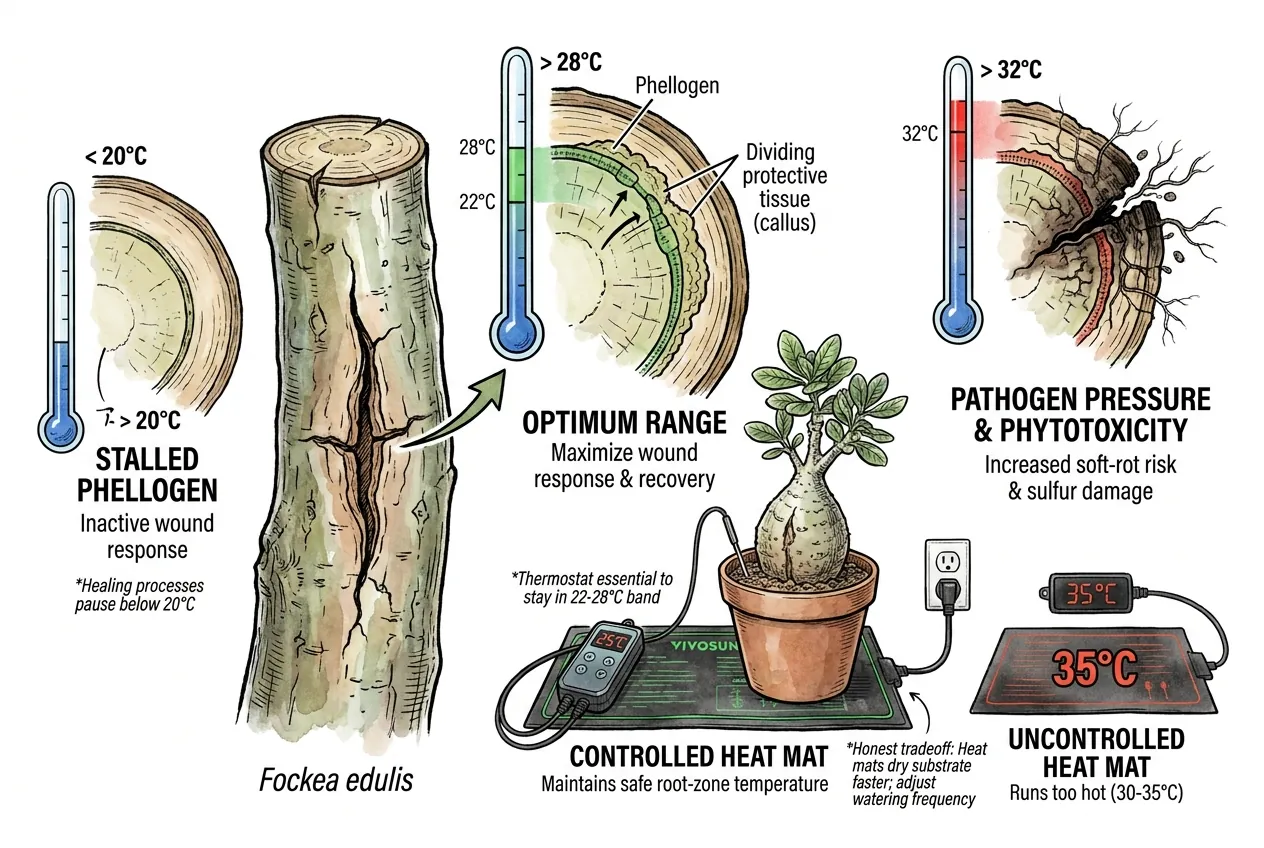
Moderate warmth can support growth and wound response, but excessive heat can speed pathogens and dry the mix.
Use a thermostat and stop bottom heat if rot is active. No fixed temperature band or recovery duration is universal.
Control warmth by measurement
A BN-LINK heat mat is one controlled-heating option to compare. Check current specifications, thermostat behavior, and the actual root-zone temperature.
Heat mats add energy use and can change dry-down, so treat them as conditional equipment rather than a default.
Affiliate Disclosure
This article contains Amazon affiliate links. As an Amazon Associate I earn from qualifying purchases. If you use these links, the site may earn a commission at no extra cost to you. Product availability, price, and specifications can change. Check the current listing before buying.