
Heat Mat for Caudex Rooting: Soil-Temp Tool Chooser
How to decide whether a caudex rooting setup needs bottom heat, a thermostat, and independent root-zone checks, with species and safety limits kept explicit.
Derek Kim · 2026-06-17 · Updated 2026-08-10 · 19 min read
Key Takeaways
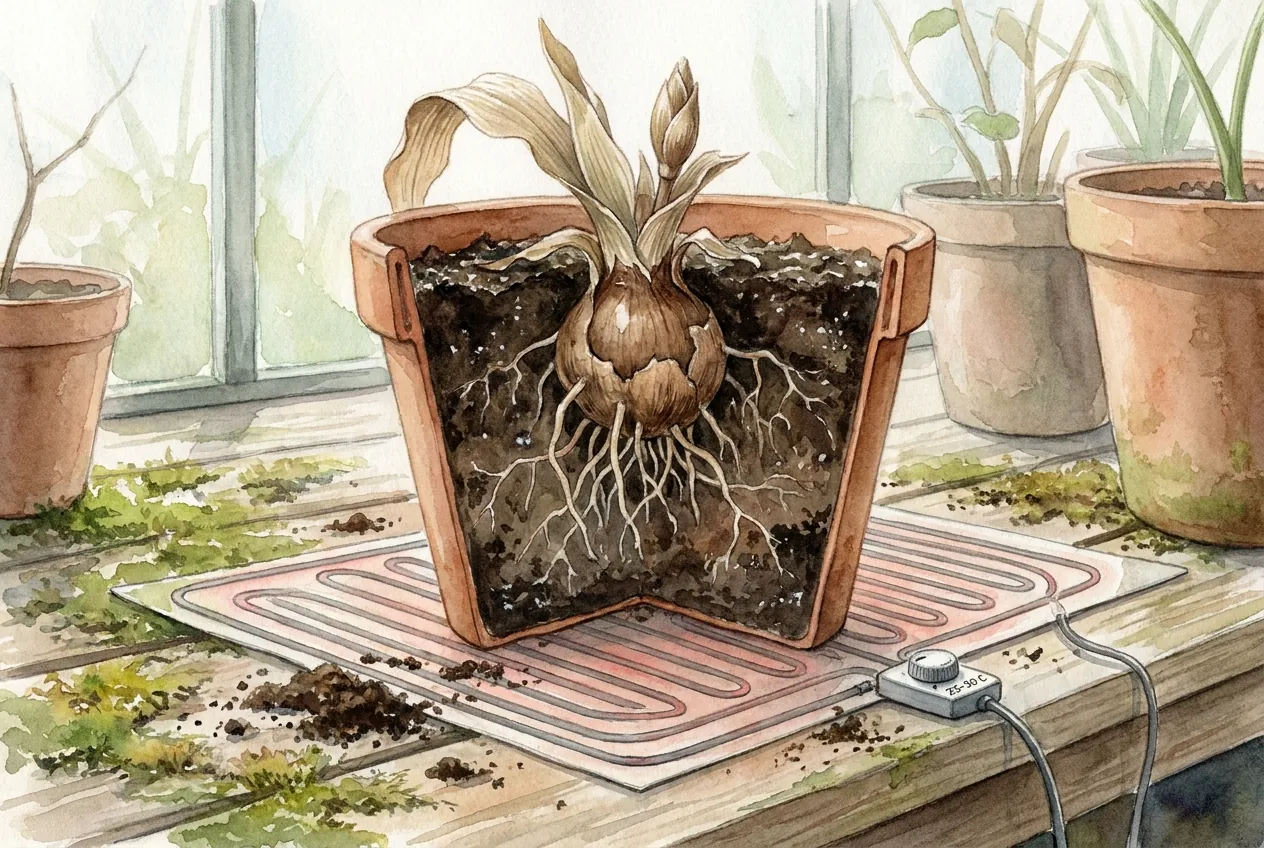
- A bare heat mat can rise well above its intended temperature and overheat a resting import. Use a thermostat, keep plugs dry and elevated, and put the setup on a GFCI-protected circuit.
- Gentle warmth can support rooting in warm-growing species, but the useful range and the damage risk vary by species and setup. Measure the root zone instead of trusting one number.
- Control the substrate at root depth, not the air. Sun, a dark pot, or a grow light can make the surface behave very differently from the surrounding room.
- Cross-check the controller probe with an independent soil thermometer to catch drift. No controller is fail-safe.
- An infrared gun finds surface hot spots but never reads root-depth temperature. It complements the buried probe rather than replacing it.
A rootless caudex may benefit from gentle warmth, but the same heat can harm a dormant or wet plant when it is uncontrolled. A useful setup combines a heat source, a controller, a root-depth probe, and basic electrical safety, and whether you need all four depends on the species, season, room conditions, and current root zone.
Do you actually need a heat mat to root a caudex import?
Often, but not always. The answer depends on your conditions rather than a blanket rule.
Caudiciforms span many families, climates, and growth seasons, and a recently imported plant may be rootless, dormant, or already growing.
Measure the current root-zone temperature first. If it is already within the warm range documented for the species, a mat may add little.
If you add heat, pair the mat with a thermostat and a way to check the soil at root depth because an uncontrolled resistive mat can heat enclosed substrate far beyond the intended range.
Think of the equipment as separate jobs.
A mat supplies heat, a controller limits it, a buried probe verifies the number, and an infrared tool looks for surface hot spots that the buried probe cannot see.
Use the plant's documented or observed warm-growth range as a starting point and measure at root depth.
There is no universal caudex target or upper safety limit. Avoid sustained hot, wet media and adjust from the plant's tissue response.
Why does bottom heat speed rooting, and how hot is too hot?
Keep Warmth Inside the Usable Range
Warmth can support adventitious-root formation through temperature-sensitive growth, but added heat can become harmful when oxygen, moisture, or tissue condition are limiting.
The useful range therefore has to be measured and adjusted for the species and setup.
What does root-zone evidence show about rooting?
Use propagation studies as bounded context
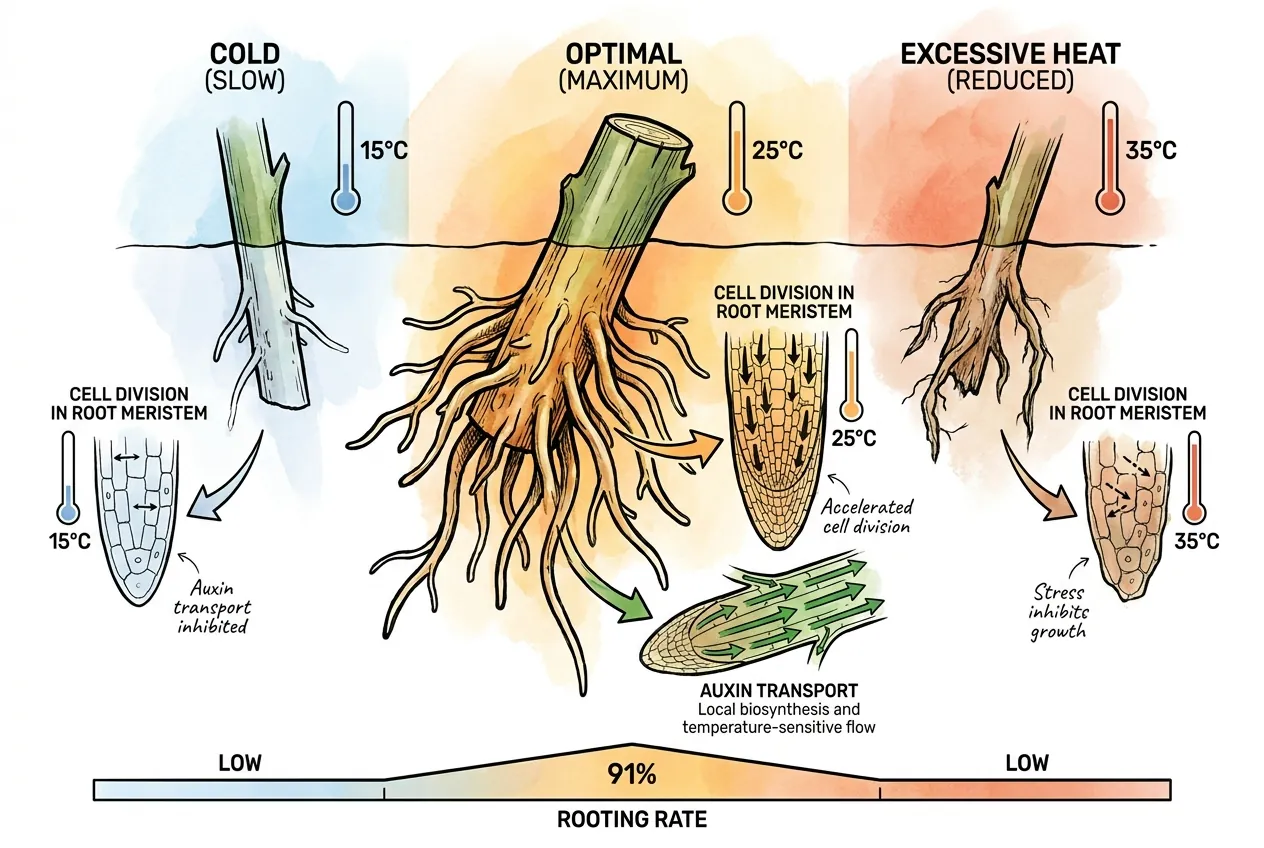
Adventitious rooting generally climbs with substrate temperature to a warm optimum and then falls off. The optimum is species- and genotype-specific.
In a controlled trial on peach and almond rootstock hardwood cuttings that were all IBA-treated, 25 °C gave the highest rooting at 91 percent. That result belongs to the tested genotype, hormone treatment, and medium rather than to caudiciforms as a group.
Cannabis-cutting trials found the best rooting within a 20 to 30 °C range, with results varying by cultivar.
Standard propagation references for foliage plants and cuttings often sit lower, near 21 to 25 °C, so treat warmth as a range to test rather than a fixed rule.
What does the mechanism evidence show?
Warmth can support the cell division behind root formation, and auxin is central to that process.
The cited thermomorphogenesis study examined primary-root growth in seedlings that already had root meristems. It helps explain why warmth can support growth, but it does not establish an exact rooting optimum for a rootless cutting.
For an imported caudex, gentle warmth may help a warm-growing species root faster than a cold room would. The result still depends on how cool the room is and whether the substrate is already in the species' working range.
Measure before assuming that a mat will help.
When can high soil temperature damage roots?
Heat damage depends on species and moisture
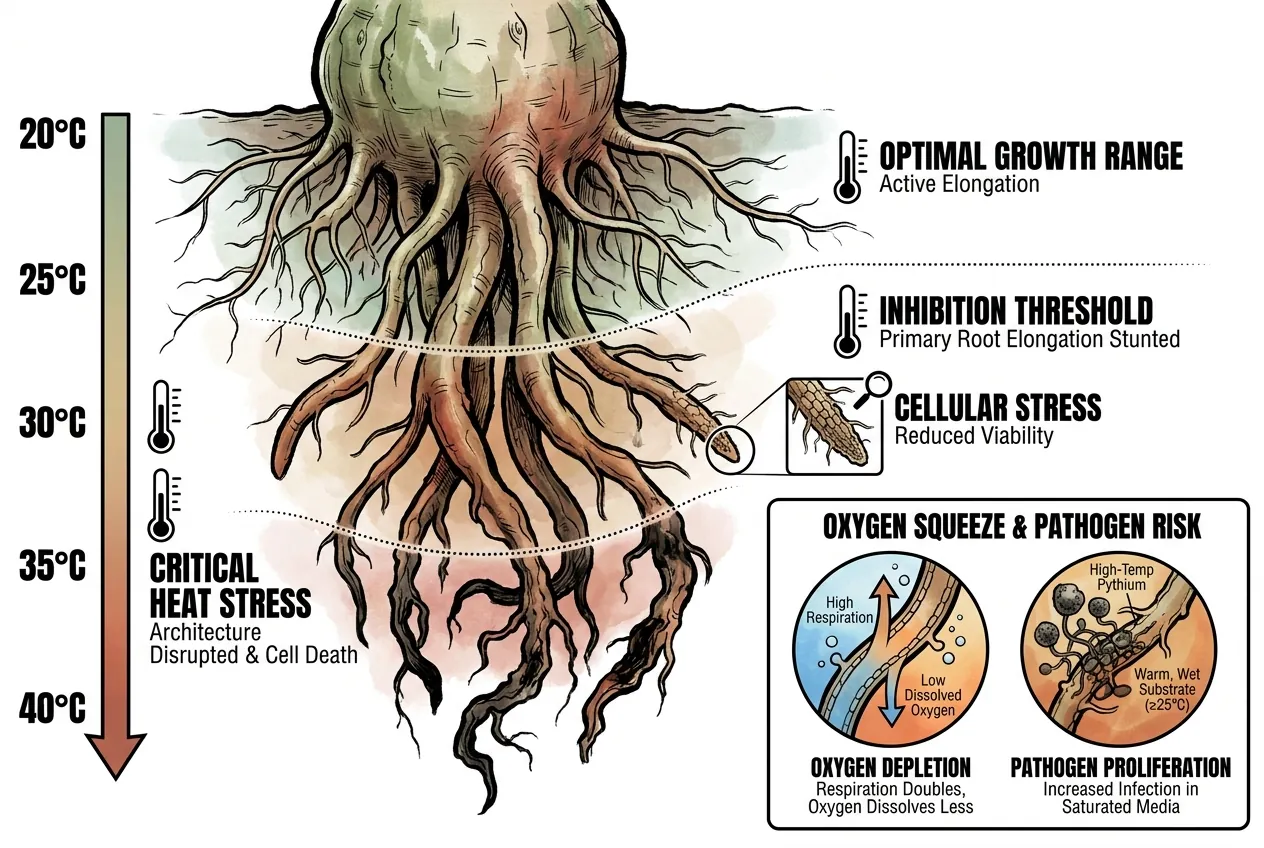
High soil temperatures can harm roots, but the damaging point is species-dependent rather than a single mid-30s line.
A review of belowground heat responses reports examples such as garden pea with primary-root elongation inhibited around 32 °C and Agastache with root architecture disrupted around 36 °C over several weeks. The same review reports much wider root-development optima across crops, including 14 to 18 °C for wheat, 22 to 25 °C for tomato, and 25 to 35 °C for maize.
A report of strawberries wilting within two months near 30 °C came from deep-flow hydroponics, not potted caudex plants. The defensible generalization is to avoid sustained hot, wet root zones and to treat species tolerance as a question for species-specific evidence.
Warm roots can respire faster while oxygen dissolves less readily in warm water.
That risk is greatest in saturated or waterlogged media. In a well-drained, airy mix, air-filled pores are the main oxygen path, so a warm but drying mix is generally less risky than a warm and soggy one.
A freshly imported, rootless caudex has little reserve to ride out stress, which is a reason to be conservative with both heat and water.
Warm, wet substrate can also favor root-rot pathogens.
University guidance notes that some Pythium species (e.g. P. aphanidermatum) become pathogenic mainly above about 25 °C, while others prefer cooler soil, and that media held above roughly 70 percent of its available water capacity is more conducive to infection.
Temperature alone doesn't cause rot (inoculum, host stress, drainage, and sanitation all matter).
What does the propagation literature say the target band should be?
Control the Media, Not the Room
Extension and greenhouse sources cluster the rooting media target in the low-to-mid 70s °F, measured at root depth rather than in the air.
Texas A&M horticulture puts ideal root-zone temperature near 70 to 75 °F and notes cuttings root best around 75 °F media.
Greenhouse propagation guidance gives a common rooting target of 73 to 77 °F with the air held a few degrees cooler than the root zone.
Control the media and account for the air gap
Control to the media with the sensor pushed into the substrate at root depth, not laid on the surface. Expect a large gap between air and soil, since soil can sit 10 to 20 °F below air, which is the whole reason bottom heat exists.
For a heat-loving caudiciform, the warm end of these ranges may be a starting point when species-level evidence supports it. The 30 °C figure from the Pachypodium gracilius rooting protocol sits just above general-propagation guidance.
The important point is that a target is hard to defend when it is not measured at root depth.
How do you choose each tool by the numbers?
Match Each Tool to a Measurement
Choose each piece by the measurement it can provide and the failure it is meant to prevent.
Species-specific targets belong to the plant, not to a universal table.
| Role | Spec that decides it | Target to look for | Failure it prevents |
|---|---|---|---|
| Heat mat | Footprint and measured gradient | Coverage suits the pot or tray and the measured temperature is reasonably even | Cold edges and uneven warming |
| Temperature controller | Setpoint range and control accuracy | Adjustable range and probe placement suit the species. Verify actual accuracy | Mat overshoot and wet-media stress |
| Substrate probe thermometer | Accuracy and probe length | Probe reaches root depth and gives repeatable readings | Trusting a drifting or surface number |
| Infrared thermometer | Emissivity and distance-to-spot | Emissivity and distance-to-spot suit the surface being checked | Missing a surface or pot-wall hot spot |
The controller is a key safety component, while the mat is only the heat source it governs.
Independent measurement still matters because no controller is fail-safe.
Which products fill each role, and what are the tradeoffs?
Read Product Specifications as Starting Data
The products below are examples of the roles described above.
Use the specifications as a starting point, then check the current listing and verify the result in your own setup. A product specification does not replace a species-specific temperature target or an independent measurement.
Which heat mat fits a caudex pot?
Choose a mat that broadly covers the base of the pot or tray. A much smaller mat can leave cooler edges and an uneven gradient, although heat still spreads through the tray and medium.
The VIVOSUN 10x20 heat mat is listed at 18 W and sized for a standard 1020 tray. Its maker reports that an uncontrolled mat can reach about 40 °C at room ambient. Treat that as a reason to use a controller and an independent check rather than as a universal reading for every setup.
For a single small pot
A smaller mat can waste less heat when the footprint is limited.
The Hydrofarm Jump Start MT10006 is listed at 17 W and 8.875 by 19.5 inches. It suits one pot or a short row, but its smaller footprint is a poor match for a wide caudex pan.
Both mats share the same limitation by design.
They are uncontrolled resistive heaters with no feedback loop, and the temperature rise depends on ambient conditions, insulation, pot, and contact.
Use a separate controller and verify the root-zone result rather than assuming a fixed lift.
Which temperature controller should you buy first?
Prioritize the controller before the mat because it is the part that limits overshoot when correctly installed.
The Inkbird ITC-308 is a plug-in thermostat whose official specification states ±1 °C measuring accuracy. Verify the current specification and choose a setpoint appropriate to the species rather than a universal window.
Its probe must be buried at root depth, and its second cooling outlet is wasted if you only ever heat.
If you never need cooling, a simpler heat-only unit may be easier to set correctly.
The VIVOSUN temperature controller listing describes a 40 to 108 °F setpoint range and a 6.4 foot probe lead. Model versions and current specifications can change, so verify the listing before relying on any accuracy claim. It can only switch a heater on and off, so it is not a substitute for active cooling.
What does the controller protect against?
Either controller can make the mat a closed loop. The probe reads the substrate and the relay cuts power at the setpoint.
This reduces runaway heating when correctly installed, but it is not a guaranteed fail-safe. A probe can slip out of the substrate or fail, a relay can stick, and heat lag or placement can create local hot spots.
A thermostat is important risk control, not a reason to stop checking. Cross-check it with an independent probe and treat it as a safeguard rather than a set-and-forget guarantee.
How do you verify the temperature at root depth?
Use the probe for a quick cross-check
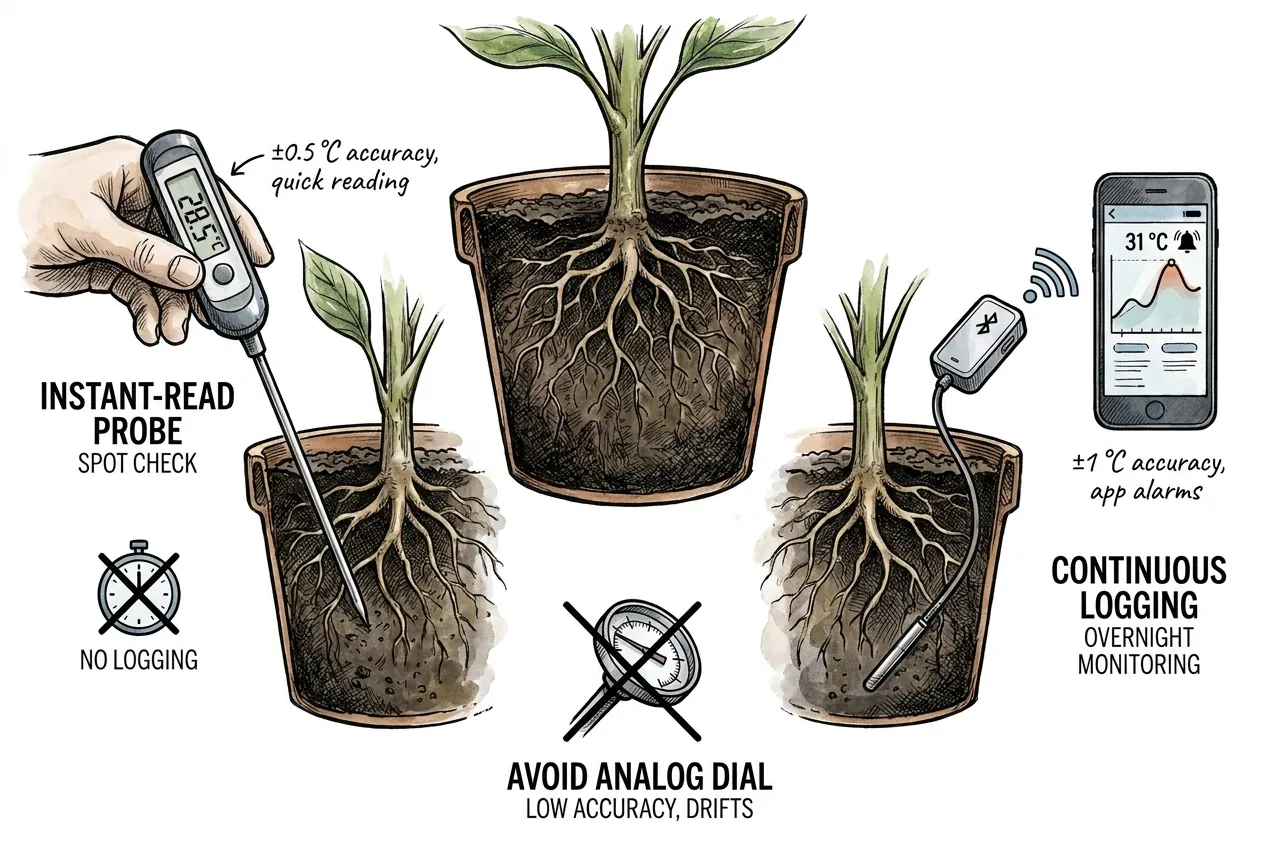
Verify the buried number with an independent probe because a controller can only act on what its own sensor reports.
The ThermoPro TP19 is an instant-read cooking thermometer with a stainless stem that can be used for a quick root-depth spot check.
It is designed for food rather than permanent burial in damp substrate, so use it for periodic checks rather than as a leave-in probe.
For continuous logging
Continuous logging can reveal an overnight overshoot that a daytime spot check misses.
The Govee H5055 is a leave-in meat thermometer with app alarms that some growers repurpose to watch a buried probe. This is off-label use. It is a cooking product and is not validated for long-term burial in wet media, so connector corrosion and material compatibility are unknown.
Treat it as a convenience monitor, confirm readings against a suitable instrument, and never make it the sole guardian of a valuable plant.
Avoid the cheap analog dial soil thermometers for this job.
They carry no stated accuracy, drift over time, and are hard to read precisely at the narrow 25 to 30 °C band you are defending.
They are fine for a rough field check and wrong for confirming a rooting setpoint.
When is an infrared thermometer worth it?
Use infrared only for surface hot spots
Add an infrared thermometer when light or sun can heat the surface above what a buried probe reports.
Under a window or grow light, the top of the substrate and a dark pot wall can run far hotter than the air, and only a surface scan catches it.
The Etekcity Lasergrip 1080 offers adjustable emissivity from 0.1 to 1.0 and a 12 to 1 distance-to-spot ratio.
Use the setting appropriate to the surface, but do not assume that changing emissivity makes a reflective pot reliable.
A matte tape or known non-reflective patch can provide a more defensible spot, followed by contact verification when the reading matters.
For a fixed-emissivity tool
The Klein Tools IR1 has a fixed 0.95 emissivity, a 10 to 1 distance-to-spot ratio, and a rated accuracy of about ±2 °C above freezing.
That is useful for finding hot spots on soil and organic surfaces, but it is not precise enough to defend a narrow five-degree band by itself.
Metallic or glazed pots need a matte reference patch or a contact measurement instead.
Every infrared unit shares one hard limit.
It measures surface temperature only and tells you nothing about root depth, where the controller probe still has to live.
Treat it as a fast way to find hot spots, never as a replacement for the buried number.
How do you wire and set up the system?
Wire the Control Loop Before Adding Heat
Set up the system so the controller governs the mat and independent probes confirm the result.
The order matters because a mat connected directly to the wall is an uncontrolled heater.
What electrical and water safety is required?
Keep connections dry and elevated
Use a GFCI-protected outlet for the whole setup. Keep the mat, cord, and controller dry and elevated. Make a drip loop so water cannot run down the cord to a plug, and never submerge a mat or let it sit in standing water.
Follow the mat installation limits
Follow the manufacturer's manual. Mats are commonly intended for indoor use, a flat position, and a non-combustible surface.
Do not fold, overlap, puncture, or wrap a mat in insulation unless the manual explicitly permits it.
Stop using a mat or cord that is cracked or damaged, and do not overload an extension cord or power strip.
How should the probe loop be set?
Plug the mat into the controller rather than directly into the wall.
Push the controller probe into the substrate at root depth near the center of the pot, not on the surface or against the pot wall.
Set the controller to the low end of the species-specific working range and let the system stabilize before increasing warmth.
How should the result be cross-checked?
Insert the independent probe at root depth and compare it with the controller.
The two readings will have their own measurement uncertainty, so a small difference does not prove that either device is calibrated.
Use the comparison to find a meaningful mismatch and to check for a gradient across the pot.
Run a surface scan during the brightest part of the day when sun or a grow light can create a hot spot.
Before trusting a new mat, controller, tray, or insulation stack, I test the assembled system without a valuable rootless plant. A spare pot matches the intended container material, size, mix, and starting moisture. Its probes sit at the planned root depth through at least one complete light and dark cycle.
I map one position per complete controller cycle instead of moving the independent probe through a cooling pot. The probe stays at root depth until its reading stabilizes, and I record every position at the same controller switch-off point. I repeat the center last to confirm that the system did not drift.
When the real pot replaces the dummy, I repeat the map because a different pot mass, plant canopy, watering state, or distance from the light can change the gradient. I also rerun it whenever I move the tray, add insulation, change the mat, or change the light schedule.
How should moisture be managed?
Keep the substrate warm without keeping it saturated because low oxygen is most likely in wet media.
Warmth also speeds evaporation and tissue moisture loss, so a rootless cutting held too warm and too dry can desiccate.
A roughly one-week wait before heavy watering comes from a specific Pachypodium gracilius protocol.
Treat it as a species-level starting point rather than a universal wound-healing rule, and follow turgor and callus development instead of a fixed calendar.
Who should not buy each class of tool?
Not every grower needs every tool. Match the purchase to the plant and the conditions in front of you, since equipment cannot compensate for a plant that is dormant or a root zone that is already warm enough.
When should heat be skipped?
Skip the heat mat for a species in true summer dormancy unless species-specific guidance supports it.
A winter-growing caudex such as Pachypodium namaquanum rests leafless through summer and may not respond to applied warmth as a summer grower would.
Heating a resting plant can simply warm wet soil that the plant is not using.
When can surface monitoring help?
Skip the infrared thermometer if your pots do not receive direct sun or a hot lamp, because its surface-scan role may add little.
A logging probe is most useful when you cannot check the setup in person and need to see overnight variation.
A controller remains an important safeguard whenever a mat is used, but it still needs correct placement and independent checks.
How should failure modes be inspected?
Inspect Before Each Propagation Season
Inspect the probe placement, moisture, connections, and mat surface on a schedule that matches how often the system runs.
Manufacturer replacement intervals vary, so use visible damage, drift, corrosion, or uneven heating as the decision points.
How should probe drift be checked?
Compare the controller probe periodically with an independent instant-read. Recalibrate or replace a sensor when the mismatch is meaningful for the species-specific setpoint, because a controller acting on a wrong number can be worse than no controller.
How should mat condition be checked?
Keep liquid off the connections and inspect the surface for hot spots, cracking, or uneven heating before each propagation season and after moving the setup. Retire a damaged mat. Replace a buried probe that has corroded because a compromised tip can read slowly or inaccurately.
What counts as rooting evidence?
Use rooting evidence that does not disturb the plant
Leaf flush is not proof of rooting. New leaves can appear before new roots, so a green push is not a signal to resume heavy watering.
Prefer non-destructive evidence such as sustained turgor, a stable moisture response, and species-appropriate growth over pulling on the plant or treating the canopy as a root test.
Frequently asked questions
Can I use a reptile or seedling mat I already own?
Yes, if you pair it with a separate controller and a probe.
The important checks are footprint coverage, safe construction, and whether the controller rather than the mat determines the temperature.
Is a mat-and-thermostat combo good enough on its own?
It can be, but verify it with an independent probe before relying on it.
A stock combo thermostat may read at the mat surface rather than at root depth, which is a different number and can be higher.
The independent probe shows whether the setpoint is close to what the roots actually experience.
What temperature should I set for an imported caudex?
Start near the warm propagation range documented for the species and measure it at root depth. Avoid sustained hot, wet media. Begin conservatively and adjust only if rooting or tissue response supports it.
Do I really need both a probe thermometer and an infrared unit?
Not always, since they answer different questions. The buried probe tells you the root-zone temperature that drives rooting.
The infrared unit finds surface hot spots from light or sun, so skip it if your setup never sees direct radiant heat.
Affiliate Disclosure
This article contains Amazon affiliate links. As an Amazon Associate I earn from qualifying purchases. If you use these links, the site may earn a commission at no extra cost to you. Product availability, price, and specifications can change. Check the current listing before buying.