
Scale vs Corking on Caudex? A Safe One-Bump Check
Inspect one bump without gouging the caudex, distinguish a scale cover from living tissue, and track new insects or lesions with repeatable photographs.
Nathan Brooks · 2026-08-25 · Updated 2026-10-24 · 6 min read
Key Takeaways
- Inspect one bump under magnification. Stop if the surface resists, dents, or tears.
- An armored scale's cover can lift while its body remains on the plant. Removing the cover alone is not removal of the insect.
- No honeydew does not rule out scale. Armored scales do not produce it.
- Old corky marks may persist after the cause is corrected. Count new changes in the same photographed area.
- A spreading soft or water-soaked patch needs prompt assessment, not a week of scraping and observation.
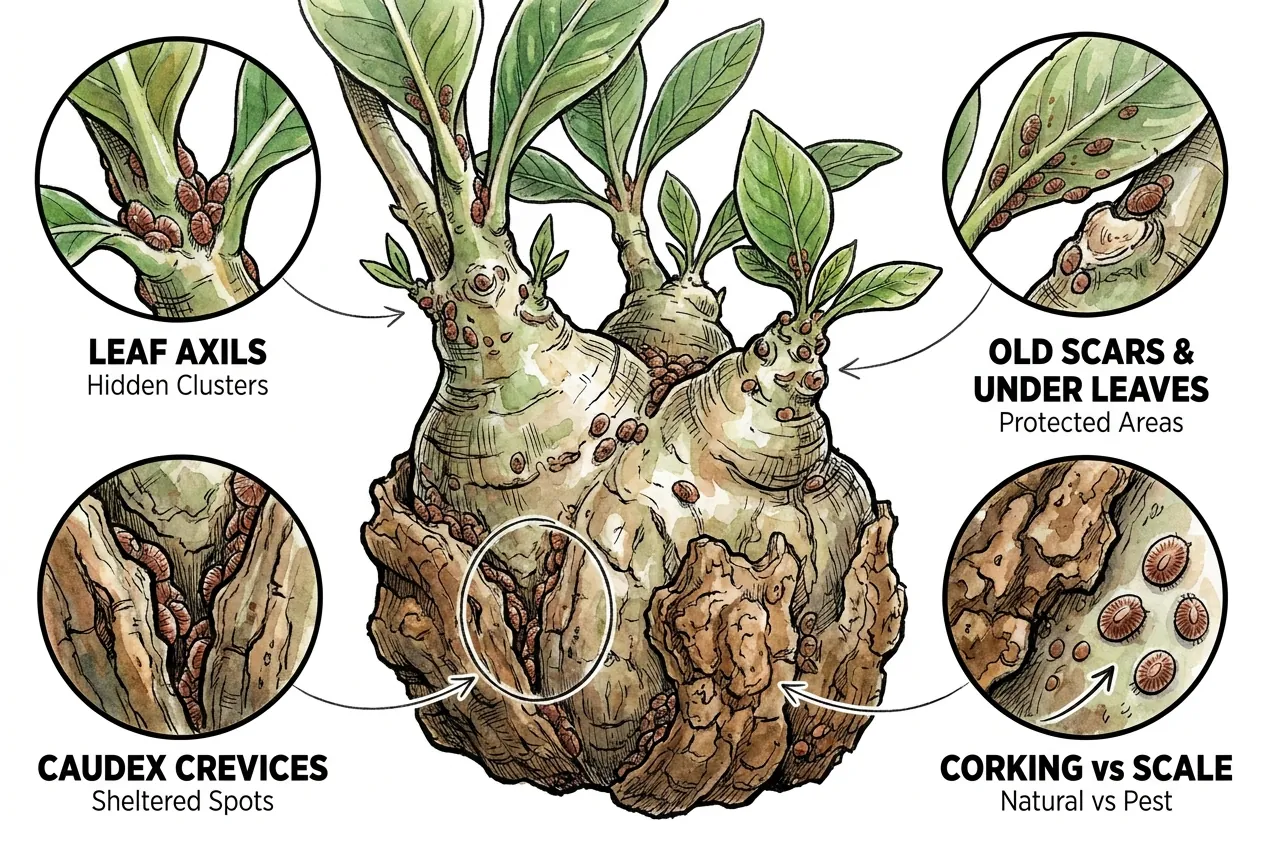
Brown bumps can be insects sitting on the surface, protective plant tissue, or old injury. Use one careful inspection to choose the next step. Repeated fingernail scraping can turn a harmless mark into a wound without making the diagnosis clearer.
Simple check on one accessible bump
- Move a plant with suspected pests away from plants whose leaves touch it. Photograph the whole caudex and one suspect patch in good light. Keep the pot label visible.
- Use a 10× loupe and a clean wooden toothpick. Choose one dry, accessible bump on firm tissue. Approach its edge nearly parallel to the surface and make one gentle attempt to lift it.
- If a separate cover lifts, look underneath before discarding it. A soft insect body left on the plant supports armored scale. If the entire soft body lifts, soft scale is possible.
- If the bump is fused, resists, or makes the caudex dimple, stop. An inconclusive lift does not prove corking or edema. Do not pry a second hole to settle the question.
Do not perform this check on a soft patch, a fresh crack, or a species whose epidermis tears at the first touch. Photograph those areas instead. Never probe into the plant to find a presumed insect.
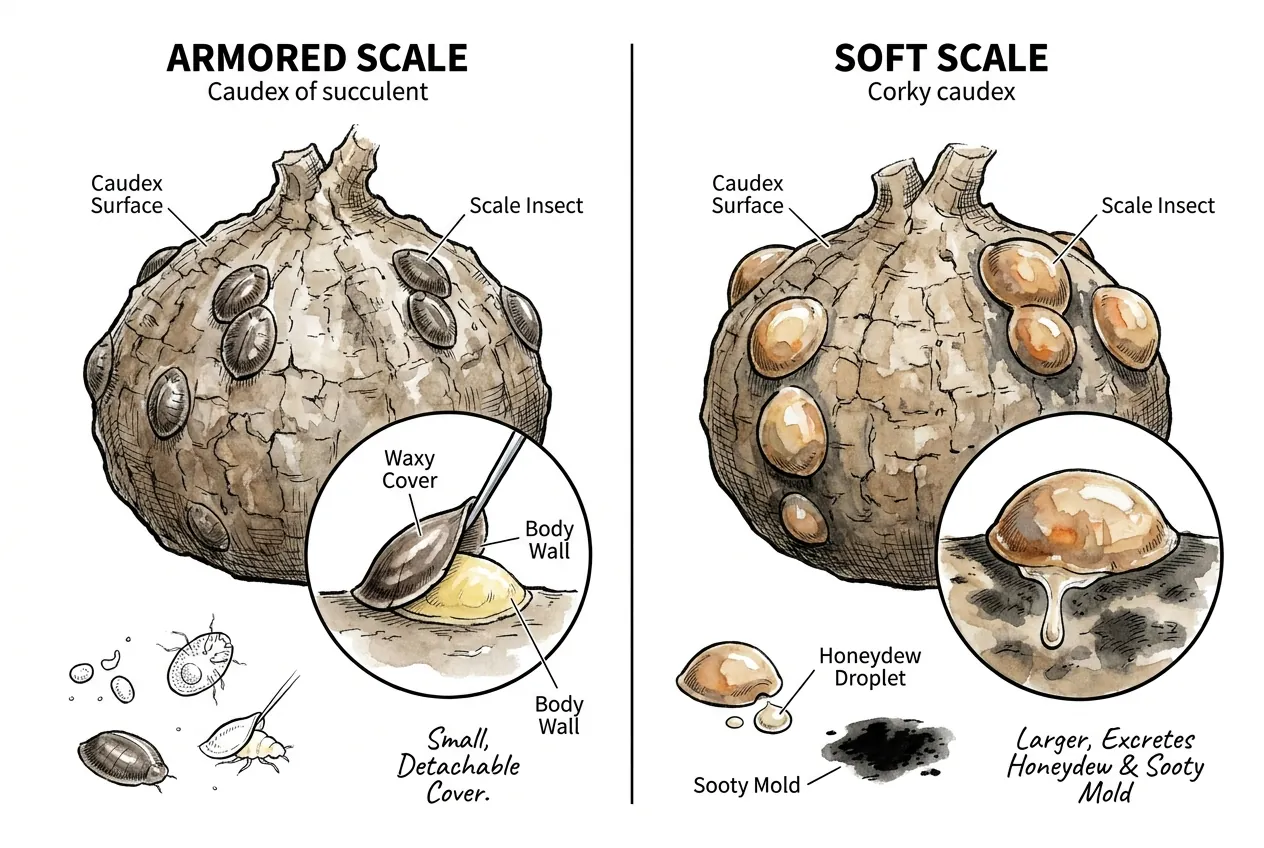
The detachable-cover distinction comes from UC IPM's scale identification guidance. Soft scales can produce honeydew, while armored scales do not. Sticky residue also occurs with other sap-feeding pests, so it is a reason to inspect nearby leaves and stems rather than a scale identification by itself.
Separate a surface insect from a lasting scar
| Finding | What it supports | Next action |
|---|---|---|
| A removable cover with a body underneath | Armored scale | Remove the confirmed insect carefully and inspect crevices |
| A raised soft body with sticky residue nearby | Soft scale or another sap-feeding pest | Identify the body under magnification |
| Firm, continuous barklike tissue that stays stable | Corking or a healed injury | Photograph and leave the tissue intact |
| New leaf blisters that later become corky | Possible edema | Review water balance and compare new growth |
| An enlarging soft, dark, or wet-looking area | Possible active tissue damage or rot | Stop scraping and assess promptly |
Corking often begins on older tissue near the base, but position alone is not a diagnosis. A healed wound can also develop corky tissue higher on a stem. Leave a firm, stable patch intact rather than peeling it back to reveal green tissue. A caudex can have genuine corking and insects at the same time.
Scale covers can remain after the insects die, so a brown shell is not proof of a living pest. Maryland Extension's scale guide explains the protective wax and the importance of crawler timing. A fresh insect or newly occupied spot is more useful for tracking an infestation than the number of old shells still visible.
Measured check using fixed photo areas
Use this when the first inspection is inconclusive, or when you need to know whether removal is working. Start with three small reference areas, one leaf axil, one bark crevice, and the original suspect patch. If the plant has no leaves, choose three distinct stem or caudex areas. Three keeps the record manageable while sampling different hiding places.
- Mark the camera direction on the pot rim with removable tape. Put a ruler beside the plant and photograph each area at the same distance. Do not mark or tape the epidermis.
- In a copy of each photograph, circle existing bumps and number them. Keep the original image unchanged. Record a confirmed live insect, an empty cover, and an unidentified bump as different findings.
- After removing a confirmed insect, photograph its former position. At the next check, count newly occupied positions separately from marks that were already there. This avoids counting the same dead cover as repeated treatment failure.
- Repeat on days 7, 14, 21, and 28, plus a brief whole-plant inspection for new damage between those dates. The weekly interval and four-week record are practical tracking choices, not a pest-free certificate or a pesticide schedule.
- If living pests recur, keep the plant isolated and adjust control to the identified pest and product label. A rapidly spreading patch, loss of firmness, or sudden decline overrides the weekly timetable.
Compare new insects and new lesions, not whether the old brown marks disappear. For example, eight unchanged scars and no newly occupied spots is a different result from eight scars plus three fresh bodies. Record those as separate counts, even if the overall photograph still looks brown.
Four clear weekly checks justify reviewing progress, but they do not prove eradication of an unidentified scale. Colorado State notes that soft-scale generations can take months. Continue follow-up according to the identified pest and keep a plant with unresolved evidence apart. Its houseplant pest guide also supports hand removal and quarantine of incoming plants.
If the bumps are confirmed scale
Remove accessible confirmed insects with a soft brush or swab without abrading the skin. With armored scale, check that the body beneath the cover was removed too. Dispose of the material and clean the tool before moving to another plant. Inspect leaf undersides, axils, old scars, and supports.
For persistent infestation, choose a product labeled for the pest, plant, and growing location. Follow its dilution, coverage, repeat interval, temperature limits, and spot-test directions. Horticultural oils can control some scale stages when applied appropriately. The presence of a cover does not mean every contact treatment is useless.
Do not assume that halving rubbing-alcohol strength makes it safe on a waxy caudex. Alcohol, oils, and soaps can injure sensitive tissue. If a small test area discolors or softens, stop using that treatment on the plant. Avoid stacking several treatments while trying to diagnose new damage.
Photograph the treatment test area first
Before a label-directed sensitivity test, photograph the chosen area and mark its position on the pot diagram. Recheck at the label’s stated interval before treating more tissue. Keep the product, dilution, time, and any recent oil or soap use in the record.
Discoloration confined to the tested patch without newly identified insects calls for a treatment-injury check. Do not cover the same patch with a second product to see whether it improves. The comparison preserves the difference between a persistent pest and damage caused while trying to remove it.
If the pattern fits edema
Edema can begin as water-soaked leaf blisters and leave hard corky marks, especially underneath leaves. It reflects a water-balance problem, not an insect living under a shell. Stem lesions are possible, but a soft caudex patch alone is not enough to diagnose it. See Utah State's edema description.
Check drainage and moisture deeper in the pot before adding water. Keep the plant's species and active growth stage in mind, rather than using a dry top centimeter as permission to water. Improve gentle air movement and maintain appropriate light without abruptly increasing direct sun.
If a humidity logger is available, place it at leaf height away from wet soil and record overnight maxima for three nights. Repeated readings around or above 70% are a prompt to investigate ventilation, drawing on Utah State's greenhouse guidance. They do not diagnose edema or establish a safe boundary for every species. Keep light and watering unchanged while first testing a modest airflow change, unless waterlogging needs immediate correction.
Count new blisters on the same leaves and inspect newly expanded leaves through the next two necessary watering cycles. Two cycles provide a manageable before-and-after check, not a recovery deadline. Do not water just to complete the comparison. Old corky scars may remain, so improvement means fewer new lesions and healthy growth. The RHS recommends improving conditions and retaining affected leaves rather than stripping useful foliage.
If new lesions keep appearing, reassess the identification instead of repeatedly drying the plant harder. If damage becomes locally soft, dark, wet, or visibly larger, investigate rot or injury promptly. An old scar and an expanding lesion need different responses.