
Winter Sunburn on Caudex at a Cold South Window
Winter sunburn hits caudex at a cold south window. Learn why chilled tissue scorches, how to tell scald from rot, and how to place plants safely.
Nathan Brooks · 2026-09-30 · Updated 2026-10-24 · 10 min read
Key Takeaways
- A clear south window can expose chilled leaves to a strong direct beam even when the room looks dim.
- Sudden bright exposure and low tissue temperature can combine to cause bleaching.
- Scald tracks the sunlit face and stays dry, while rot is soft and spreads and dormancy drop is slow.
- Set plants back off the cold glass film and diffuse the beam instead of pressing them to the pane.
- Leave firm dry scars alone. An expanding soft margin needs a rot assessment.
You brought the caudex in before the first hard freeze. You set it in the brightest spot you own. Now a pale bleached patch is spreading across the leaves facing the glass.
The room feels dim and the heater is running. Sunburn is the last thing you would suspect. That instinct is exactly what gets these plants scorched.
A low winter sun can reach deep through a south-facing window. If the tissue is chilled or recently moved from shade, that direct beam can cause bleaching. Check the pattern of injury, the coldest temperature at the plant, and how abruptly its light changed.
Why cold and bright exposure can combine
Cold can limit carbon fixation while a leaf continues absorbing light. Protective energy dissipation and repair may then fail to keep up. Research on chilling-sensitive and chilling-resistant plants supports this interaction, but does not establish a safe temperature or light dose for every caudex species.
The photoinhibition study compares low-temperature responses in other plants. Use it to understand the risk, not to assign a universal 10°C burn threshold.
Winter south-window light is stronger than it looks
This catches people out because the room looks dim while the beam on the plant is intense.
Your eyes adjust to the average brightness of the whole scene. The plant pressed to the glass sits in concentrated direct radiation, not in the room average.
The winter sun sits low in the sky. Its beam strikes a south pane at a more head-on angle and drives deep into the room.
South windows still deliver plenty of direct light in winter, and the low angle simply throws it farther onto anything near the glass.
Passive-solar house design relies on exactly this effect to heat rooms through the cold months. That tells you how much energy the low beam actually carries. So the intuition that indoor winter light is too feeble to hurt anything fails in the one spot where growers most often park their plants.
A clear south window in midwinter can put a hard direct beam onto a chilled plant even while the rest of the room looks gloomy.
Telling winter-glass scald apart from rot, cold shock, corking, and dormancy drop
Location, texture, timing, and change over time help separate the possibilities. Light injury and cold injury can overlap, and a damaged patch can later become infected.
The scald pattern tracks the beam
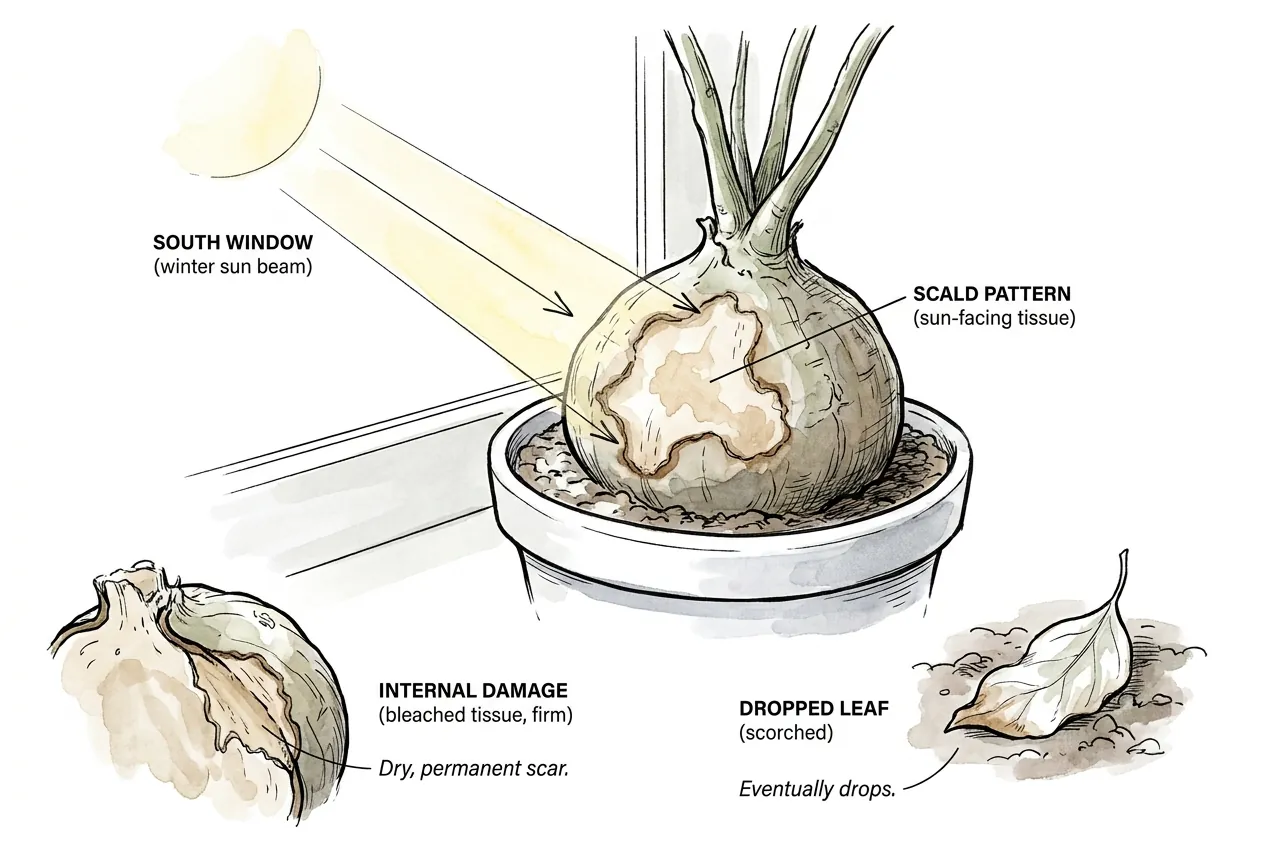
Light scald appears on the sun-facing surface, the exact tissue the beam hits. It starts pale, whitish, or bleached from lost pigment. It can dry to a tan or brown patch that is firm, not wet.
The dead area does not turn green again. Scorched leaves often drop eventually, and damaged stem or caudex tissue calluses into a permanent scar. This one-directional, dry, sun-facing pattern is the signature of light damage.
Rot tracks water and spreads
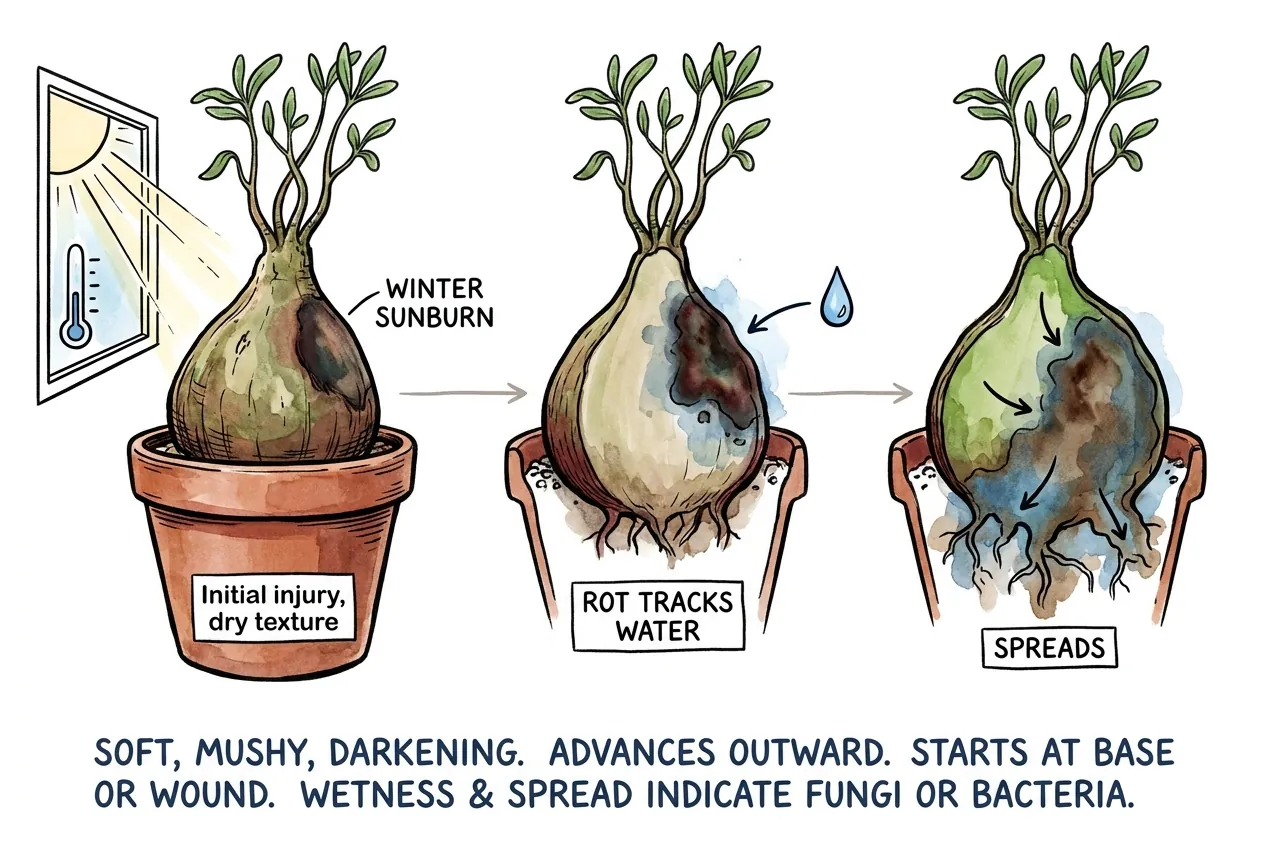
Rot is soft, mushy, and darkening, and it advances outward over days. It usually starts at the base, the roots, or a wound rather than only on the lit face. The tell is wetness and spread.
An expanding soft margin is a reason to isolate the plant and assess rot. Appearance alone cannot identify a fungus or bacterium.
Cold shock, corking, and dormancy drop each have their own tell
Cold-shock damage lands on the coldest tissue, the leaves and tips nearest the glass and in the draft. It is not confined to the lit face. Corking is normal dry brown roughened bark that builds slowly with age and is tied to no recent event.
Acclimation leaf drop after the move is whole intact leaves yellowing and falling over weeks. The plant is adjusting to lower total light and dormancy cues. It is not a bleached patch on one face.
Compare the lit face with the shaded face before treating a dry patch. Photograph both sides with a ruler beside the lesion, then repeat after 48 hours. An enlarging soft margin needs prompt attention even if the first damage followed sun exposure.
How chilled roots affect water supply
Cold roots can also restrict water delivery to leaves. In a spinach root-temperature experiment, the initial fall in water flux after cooling was followed by recovery. That response cannot be reduced to a permanent halving of water flow in a caudex. Keep root temperature and leaf exposure as separate checks.
Which plants burn first at cold bright glass
Cold tolerance and prior light exposure both affect risk. Plants sharing a windowsill can respond differently, so check the named species and its acclimation history.
Place tropical Adenium and other cold-sensitive plants away from the coldest glass. Check the named species rather than borrowing a Sedum or Sempervivum hardiness rating. Newly rooted or recently repotted plants also need gradual exposure because their water supply is still limited.
Placing a plant so it stays bright without getting chilled
Start by separating the plant from the pane and reducing sudden direct exposure. The safe distance varies with glazing, drafts, curtains, and outdoor weather.
The cold air film sits right against the glass
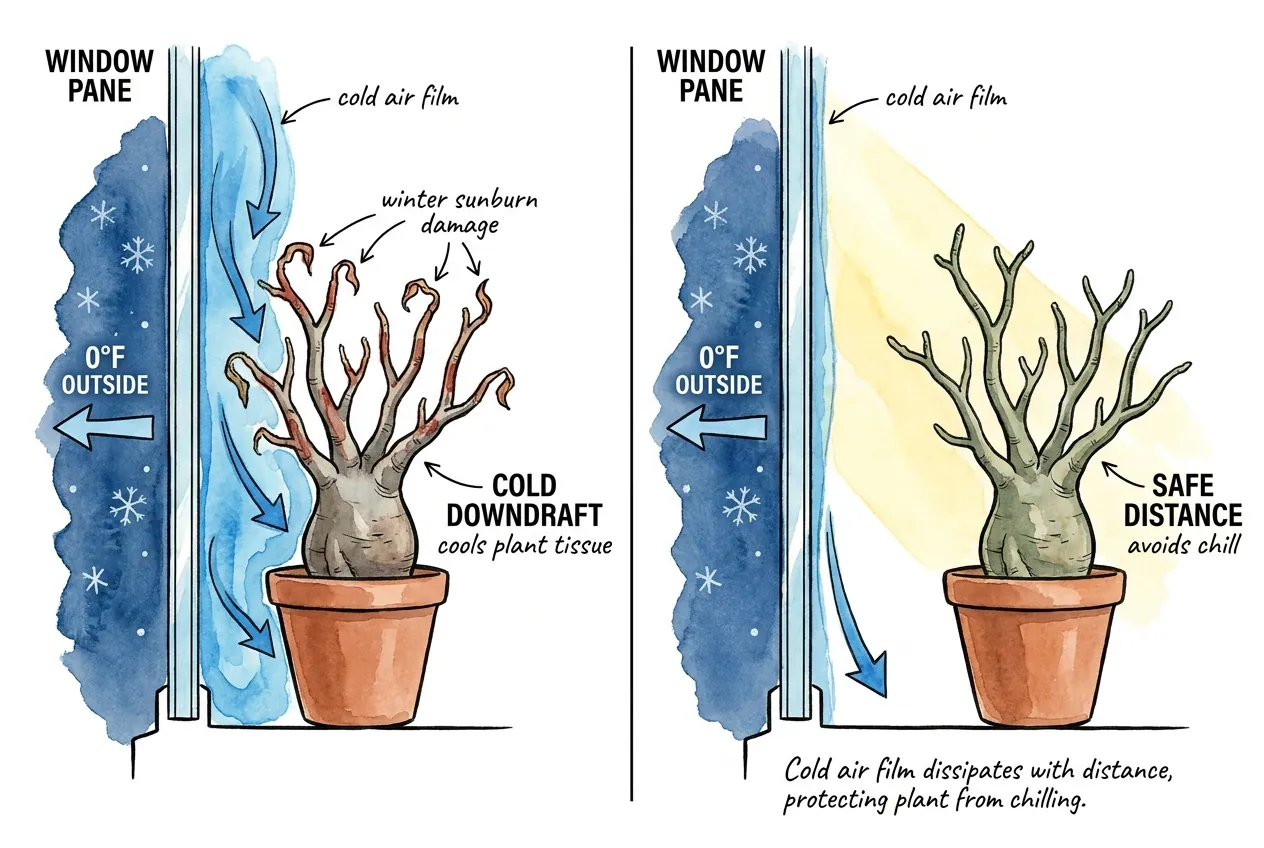
Cold glass can cool nearby air and plant surfaces. Leaves touching it are especially exposed, and an air thermometer does not measure the leaf surface itself.
Simple check with a movable spacer
Start with a 30 cm gap between the nearest leaf and the glass, keep the plant on the room side of any closed night curtain, and use a sheer curtain during direct sun. The 30 cm gap is a convenient trial position, not a safe-distance guarantee. Check the glass-facing leaves daily for the first week and after a clear, cold night.
Measured check with two temperature probes
Compare two probes side by side for 30 minutes first. If their disagreement exceeds their combined stated accuracy, resolve that before comparing positions. Put one at the nearest leaf tip and the other at the same height 30 cm farther into the room, shaded from direct sun.
Record simultaneous pre-dawn readings for three mornings, including a clear cold night. A near-glass deficit greater than both 2°C and the probes’ combined stated error is a reason to test a position another 15 cm inward. This is a working relocation trigger chosen to reveal a persistent local cold pocket. Require both the smaller gap and the species-specific minimum plus the meter’s error allowance. A warm comparison point cannot make an absolutely cold shelf safe.
Check the thermometer target
If checking leaf temperature with an infrared thermometer, read its distance-to-spot specification first. With a nominal 12-to-1 ratio at 24 cm, the measured spot is about 2 cm wide. A 1 cm leaf cannot fill that spot, so the glass or shelf behind it can distort the reading.
Use the specified working distance with a target larger than the spot, or a suitable gentle-contact surface probe. The aiming laser is not the measuring area. Fluke explains the target-size requirement. Keep air and surface readings in separate columns because they answer different questions.
Diffuse, buffer, and time the move
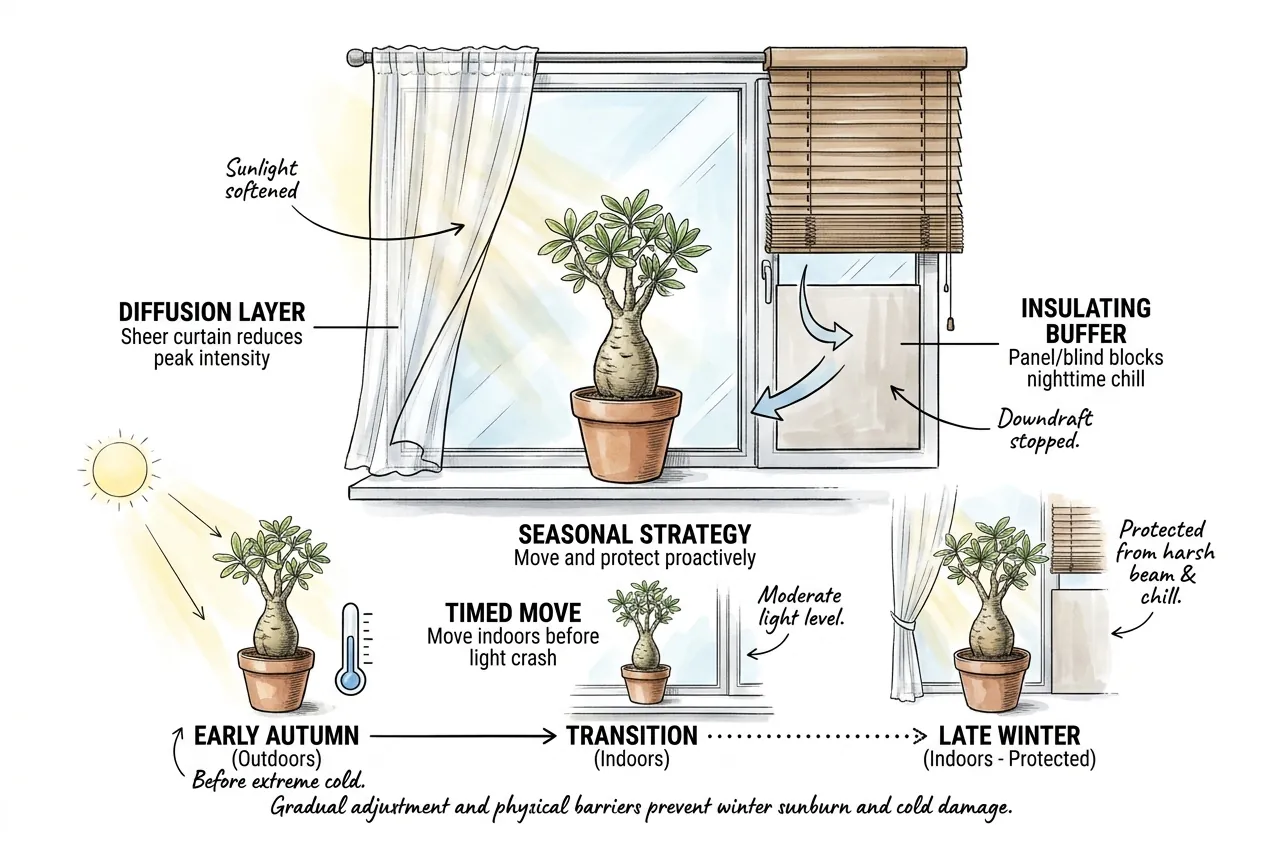
Two more moves cut the risk. A sheer layer over the pane during the risky first weeks trims peak direct intensity without darkening the room much. That is exactly what a chilled plant rebuilding its defenses needs.
A closed night curtain can separate plants from the pane only when the plants remain on the room side. Do not trap them between the curtain and cold glass.
Timing matters too. Move plants indoors before outdoor light and cold have fully crashed. The plant then steps between two moderate light levels instead of slamming from collapsed autumn light into a hard winter beam.
If the window remains too cold, move the plant inward and provide suitable supplemental light. Use the winter grow-light and overwintering setup guide to check the new location.
Acclimating a plant to a bright cold window without scorching it
Keep the sheer curtain in place for the first three days. If no new pale patches appear, uncover the plant for 20 minutes of the gentlest available direct beam, then add 20 minutes no more often than every three days. Keep the remainder diffused. This is a cautious trial ramp to limit each increase and allow delayed injury to show, not a species-specific acclimation schedule.
Pause increases during cold spells. At any new bleaching, restore diffusion and reassess the temperature and placement. Do not continue to a predetermined full-sun target just because two weeks have passed.
A checking cadence for the first weeks indoors
Take the same glass-facing photograph each morning during the ramp. Keep the plant’s orientation fixed so a fresh patch can be compared with the previous image. Once the final exposure has produced no new damage for two weeks, a weekly check is a practical routine. Repeat the closer checks after moving the pot, changing curtains, or a sharp weather change.
What to do with tissue that already scorched
The first instinct after finding scald is to cut it off. Resist it. If the damaged area is dry and firm, leave it in place.
It will never green up again. Dry scald tissue acts as a protective barrier while the plant walls off the injury and grows around it.
Cutting it opens a fresh wound in cold, low-transpiration conditions that heal slowly, and partially damaged firm leaves should stay because they keep funding the recovery.
A darkening, soft, expanding margin needs a separate rot assessment. Move the plant out of the beam and isolate it while checking the roots and affected tissue. Do not cut solely because a dry scar is brown.
Match your response to what the tissue is. A leaf with a firm bleached patch but a still-green base keeps photosynthesizing on its healthy area, so leave the whole leaf attached.
A leaf that has gone fully crisp and papery has stopped contributing, so let it abscise on its own rather than tearing it and opening the stem.
Caudex or stem scald is the case where patience pays most. The chilled, low-transpiration plant seals a dry lesion into corky scar tissue slowly, and every cut you make competes with that same slow healing budget.
Leave a firm dry stem lesion alone and let it callus, and reserve the blade for tissue that has already turned soft.
When you do have to cut into soft rot, cut in dry conditions and stop at clean firm tissue with no discoloration in the exposed face.
Let the cut dry and callus before the plant meets water or the cold beam again.
A fresh wet cut in cold mix is the exact setup that invites the next round of rot.
Move the plant out of the cold beam so surviving tissue can recover. Keep it in gentler light while it rebuilds pigment, and resist the urge to overwater into cold mix. Recovery is limited and one-directional, so the real win is preventing the next patch rather than fixing the last one.
Iowa State Extension describes permanent sun-scald scars and advises gradual changes in exposure. The goal is to protect the remaining healthy tissue and prevent the next patch.