
Spider Mites on Caudex Plants Indoors: The Week-One Surge
Why spider mites explode the first week after caudex plants move under lights, how to scout the surge early, and how to stop it without rotting the caudex.
Maya Ellison · 2026-10-04 · Updated 2026-10-24 · 12 min read
Key Takeaways
- A warm indoor shelf can favor mites already on a plant. Measure conditions rather than assuming every move changes them equally.
- Some mite populations develop within about a week in warm conditions. Begin inspections on entry, before webbing appears.
- Scout soft index plants with a hand lens and a white-paper tap test. Webbing is a late sign.
- Confirm first. Thrips, broad mite, edema, and mineral spotting all mimic mite stippling.
- Isolate confirmed cases and rinse the foliage while shielding the caudex and mix. Do not group infested plants to raise humidity.
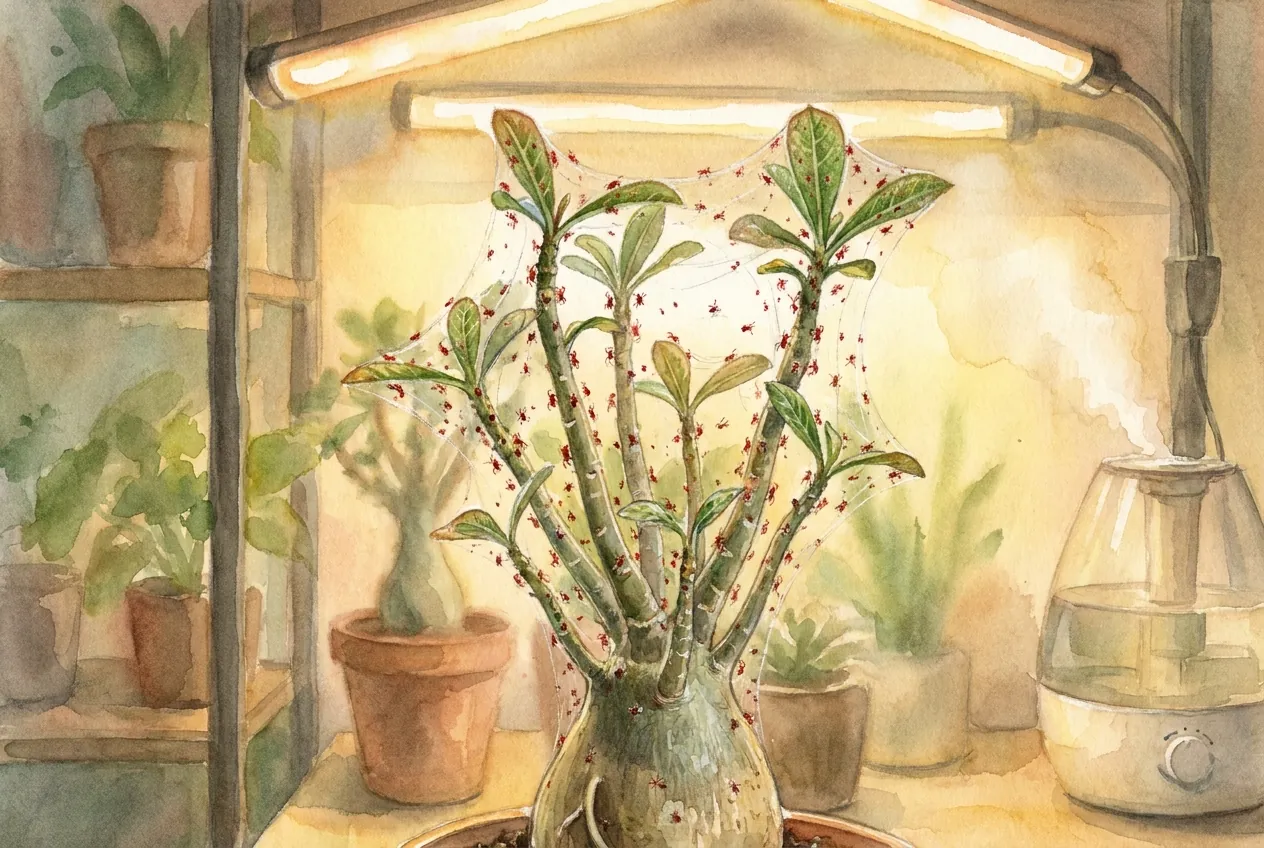
A collection that looked clean outdoors can develop visible mite damage after moving inside. Small populations may have been missed, and mites may also spread from existing indoor plants. Inspect arrivals and neighbors before assuming the source.
Begin inspection on entry. Warm conditions can shorten mite development, so waiting for obvious webbing gives a small infestation more time to spread.
Simple check with white paper
Inspect one affected leaf underside with a 10× lens and tap the shoot over clean white paper. Moving dots justify closer identification, not immediate chemical treatment. Predatory mites and thrips can also land on the paper.
Keep a suspect plant separate while identifying it. Do not wait for webbing, and do not move it beside healthy plants to create a more humid group.
Why the surge hits in week one, not at the move
Mites may arrive on the plant or spread from a nearby indoor plant. Warm conditions can shorten development, and indoor leaves no longer receive outdoor rain. Inspect both the arrival and its neighbors instead of assuming where the infestation started.
The cited twospotted-mite guidance reports development around 28 days at 60°F and eight days at 82°F. These are examples of temperature-dependent development, not a timetable for every mite species or indoor shelf.
Measure the actual leaf-zone temperature rather than assuming every grow light holds a canopy at 25 to 30°C. A warm shelf can speed development, but fixture type, distance, and room conditions vary.
Warm, dry conditions often favor spider-mite problems. Record humidity beside the foliage and check for beneficial mites rather than assuming the room has no predators. Do not try to control mites by keeping a caudex pot wet.
Damage appearing in the first two weeks is consistent with a previously small infestation becoming visible. It does not date the introduction or prove one completed generation. Begin scouting on arrival and keep the same sampling method as conditions change.
What the move indoors actually changes
Compare the old and new positions for temperature, humidity, rain exposure, and natural enemies. The direction of change depends on the actual garden, greenhouse, and indoor shelf.
Four conditions to compare after the move
Humidity may drop when heating begins, but compare measurements at plant height. A humid enclosure and a heated open shelf do not share the same conditions.
Natural enemies may be less effective indoors, although predatory mites can arrive on the plant too. Their survival depends on species, food, humidity, and pesticide history. Do not count every moving mite as a pest.
Indoor foliage loses outdoor rain washing. Air movement changes too, but directing a fan from infested plants toward clean ones can spread mites instead of controlling them.
Indoor temperatures may remain warm overnight while autumn outdoor conditions cool. Log the leaf-zone minimum and maximum before attributing faster development to that change.
Check the grow-light shelf directly
A fixture may warm the canopy, but its effect depends on distance, output, ventilation, and room conditions. Measure beside the foliage. A grow-light shelf is not automatically the warmest or driest location in the house.
Why caudex plants hide the surge longer
Fat-stemmed and thick-leaved plants mask the early surge and punish careless water control. Two features make them different from a thin-leaved houseplant.
Where the mites actually sit
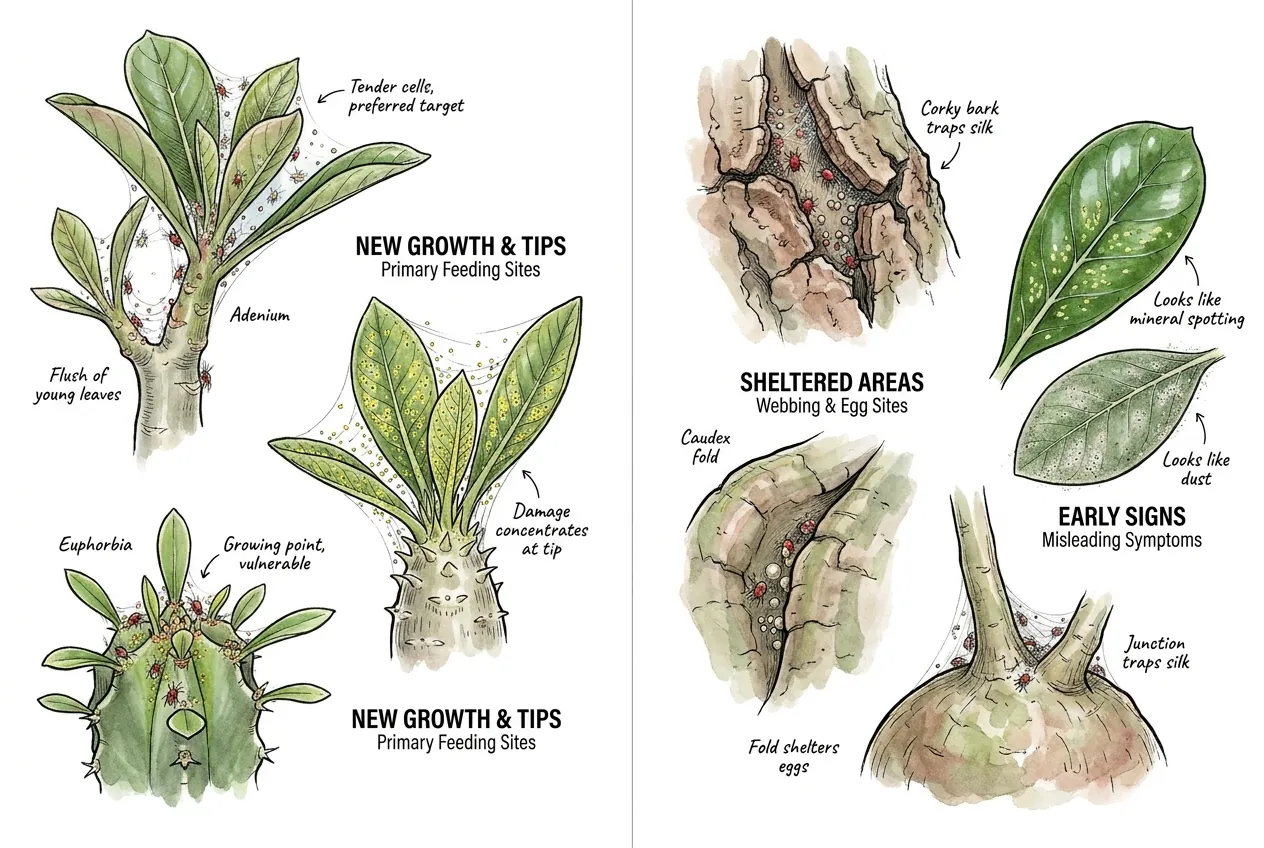
Inspect new growth and mature leaf undersides on leafy adenium, pachypodium, euphorbia, cyphostemma, dioscorea, and fockea. Thick or glossy leaves do not clear a plant of mites, and different mites favor different feeding locations.
Webbing hides in structure a smooth-leaved plant does not have. Corky bark seams, caudex folds, and the junction where stem meets caudex all trap fine silk and shelter eggs.
A quick glance at a leaf underside walks right past these spots.
Stippling also reads as something else on a thick cuticle. On a glossy adenium or a dusty pachypodium, early flecking looks like mineral spotting or dust.
Slow succulent growth means the plant does not deform for a while, so the population outruns the visible symptom.
The rot tradeoff that changes the playbook
Foliar washing can remove exposed mites where the plant tolerates it. Shield the mix and avoid letting runoff pool around a vulnerable caudex or wound. Repeated washing should not become an extra root-zone watering schedule.
Direct the rinse at affected foliage, support the plant, and let runoff leave the treatment area. Remove any protective cover afterward so it does not trap moisture.
How to catch it with a hand lens and a sheet of paper
The reliable early detector is a hand lens plus a white-paper tap test, not the naked eye.
Extension IPM programs scout by tapping foliage over paper because mites look like dirt specks until webbing appears, and webbing is already a late sign.
The tap test and what you are looking at
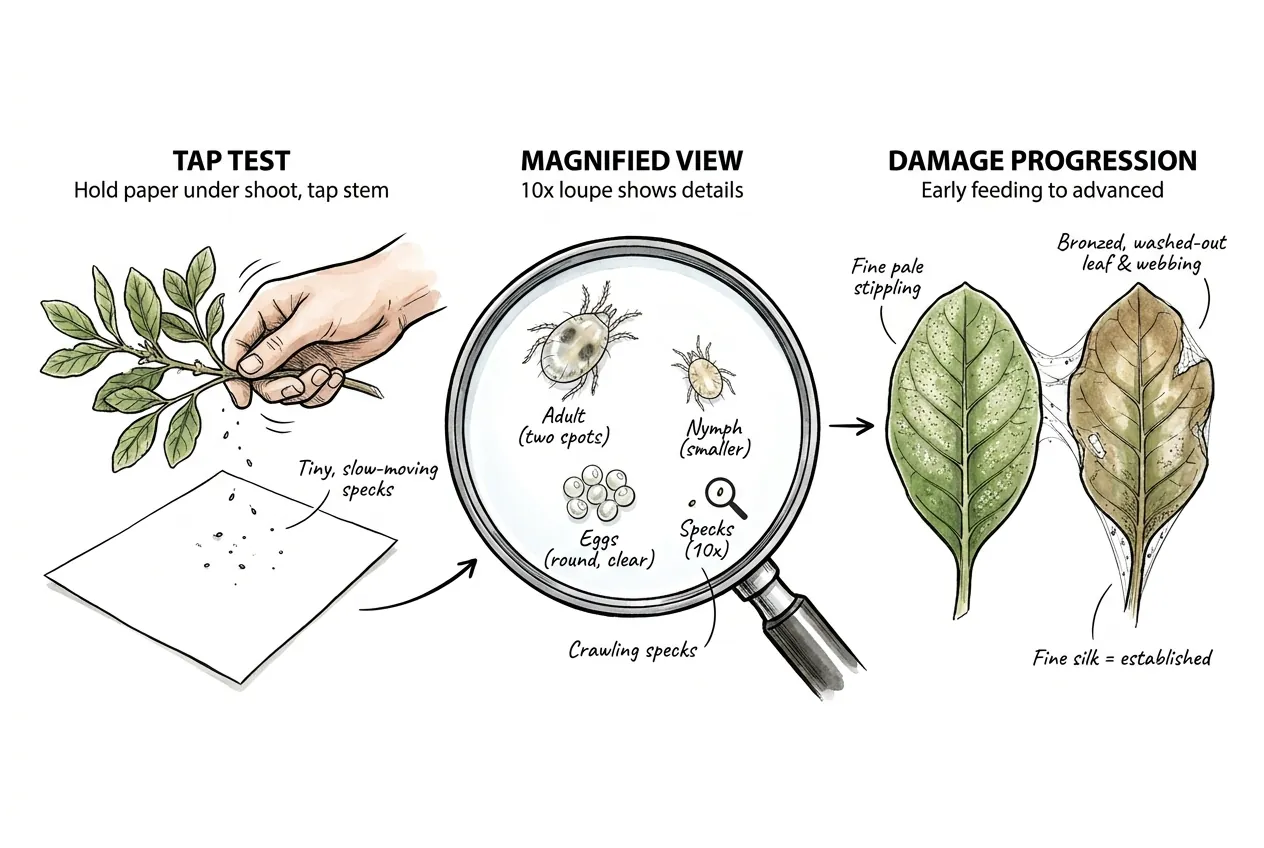
Hold a sheet of white paper under a shoot, tap or shake the stem against it, and watch for tiny slow-moving specks that crawl. A 10x loupe then shows the detail. Adults are translucent ovals with two dark spots, nymphs are smaller, and eggs are round and clear on the leaf underside and along veins.
Early feeding shows as fine pale stippling where mites emptied single leaf cells of chlorophyll. It progresses from scattered dots to a bronzed, washed-out leaf. Fine silk on leaf edges, undersides, and in axils means an established colony, so if you see webbing you are already behind.
On a caudex, scout in order. Start at the growing tips and new leaves, move to leaf undersides, then probe the caudex folds, bark seams, and the stem-caudex junction where webbing shelters.
Measured check with the same shoots each time
Inspect every arrival on day zero. Then choose two or three soft-leaved plants as early-warning indicators, while continuing a weekly check of every plant. Clean indicators cannot clear an unexamined neighbor.
- Mark three shoot positions per indicator plant on its pot label. Hold fresh white paper under each, tap three times with similar force, and count moving specks after ten seconds.
- Use a 10× lens to identify mites and inspect leaf undersides for eggs and feeding. Record unidentified moving specks separately. Keep paper and tools separate between plants.
- Repeat on days 0, 3, 6, 9, 12, and 15. Compare the same plant and shoots, noting any leaf loss or washing that changed the sample.
The three-day interval samples several times within a rapid indoor generation. It is a scouting rule, not a treatment interval. A rising count prompts action, but does not by itself prove reproduction rather than movement or sampling variation.
Isolate a confirmed plant-feeding mite case and begin control. Photograph uncertain specimens through the lens or seek identification rather than treating every crawling speck as a pest.
Keep the count before washing
Tap and photograph the marked shoots before a scheduled rinse or treatment. Record the date of the previous treatment beside the count. Comparing an unwashed plant with one sampled immediately after rinsing overstates the change in the surviving population.
Keep one photo of a previously undamaged leaf beside the older damaged leaf. At the next three-day inspection, look for new stippling on that clean reference. Old scars persist after control, so their continued visibility alone is not a reason to spray again.
Make sure it is actually spider mites
Confirm plant-feeding mites with a lens and the feeding pattern before selecting treatment. Webbing helps when present, but an early infestation may have none.
The look-alike table
| Cause | Damage look | Webbing | Confirm by |
|---|---|---|---|
| Two-spotted spider mite | Fine pale stippling, later bronzing | Yes, fine silk late | Hand lens plus moving specks on tap test |
| Thrips | Silvery bleached scars with black frass dots | No | Black frass dots, elongated insects, silvering not stippling |
| Broad or cyclamen mite | Distorted, cupped, hardened new growth | No | Damage on newest growth only, invisible without a microscope |
| Edema | Corky raised bumps on leaf underside | No | Follows overwatering or cold wet roots, not feeding |
| Hard-water spotting | White or tan flecks in a spray pattern | No | Specks do not move, wipe off, align with misting |
| Dust or sun stipple | Diffuse dullness or fleck | No | No mites on tap, pattern follows exposure not veins |
Reading the table on a succulent
Thrips typically leave silvering and dark frass and have elongated bodies. Broad or cyclamen mites can distort new growth without webbing, but a clean 10× inspection does not diagnose them. Persistent unexplained distortion needs closer identification.
Edema can leave corky bumps without mites, and mineral deposits or dust may wipe away. These conditions can coexist with pests. A negative tap test alone does not establish a noninfectious cause, so inspect several leaf undersides and new growth.
If a tap test finds no moving specks and there is no fine webbing, do not reach for a miticide.
Interrupting the surge in week one without rotting the caudex
Start with isolation and physical removal for a manageable confirmed infestation. On a caudiciform, a foliar rinse must drain away from the storage organ and mix.
The physical controls that work
A directed water rinse removes many exposed mites but may leave eggs. Support the pot, shield the mix and caudex with a temporary cover, and angle the foliage so runoff drains away. Remove the cover immediately afterward and let the canopy dry with gentle circulation.
Check treated leaves the next day and again at the three-day scouting visit. Repeat removal when live mites remain and the plant tolerates it. Do not wait two weeks while counts rise, and stop water-based control if tissue remains wet or damaged.
Keep the treatment area separate
Do not group infested plants with clean ones or seal them in a humid enclosure. A nearby tray may barely change leaf-zone humidity, and a fan aimed from an infested plant toward neighbors can aid dispersal.
Use leaf-zone humidity as a record of conditions, not proof of mite control. The useful endpoints are live-mite observations, fresh injury, and whether treated tissue dries without wetting the caudex.
When physical control is not enough
Escalate if live-mite counts keep rising over two standardized checks despite removal, new injury spreads, or foliage cannot be rinsed without staying wet. Severe infestations need a treatment decision promptly rather than completing a fixed number of rinse cycles.
Use only a product labeled for the plant and indoor setting. Follow its dilution, repeat interval, and plant-sensitivity precautions. A universal 10-to-14-day spray schedule can conflict with the actual label or the pest’s development rate.
Inspect after treatment and distinguish old stippling from new damage on previously photographed leaves. Damaged leaf cells will not turn green merely because control succeeded.
At that point, product choice, mode-of-action rotation, and repeat timing become a buying decision, and that is covered in the spider mite treatment chooser for caudex.
The first two weeks, start to finish
Inspect repeatedly through the first two weeks to catch a previously small population. Development speed varies, and a fixed fortnight does not prove that the full life cycle or every introduced pest has been detected.
Inspect before entry, then quarantine arrivals separately for at least three weeks, following Colorado State Extension guidance. Keep affected plants separate through control and renewed observation. A place on the same crowded shelf is not effective separation.
The fortnight decision tree
| Step | Day | Action | Decision |
|---|---|---|---|
| 1 | Before move | Pre-move pest gate, rinse and inspect | Reject heavily infested plants to a treatment area |
| 2 | Day 0 | Isolate arrivals, pick 2-3 soft index plants | Quarantine zone away from the collection |
| 3 | Days 0-14 | Tap-test index plants every third day, log counts | Clean taps continue the watch |
| 4 | Day 21 or later | Inspect every arrival again, including leaf undersides | End quarantine only with no detected pests or new injury |
| 5 | Suspect moving specks | Keep separate, identify, then treat confirmed pests | Keep runoff off the caudex and mix |
| 6 | Rising counts or webbing | Escalate for worsening counts, new injury, or poor rinse tolerance | Go to the miticide chooser decision |
Continue checks every three days after day 15 while in quarantine. Release is based on examining every plant after at least three weeks, not clean indicator plants on day 14. For a confirmed infestation, restart a three-week observation period after the last live mite or fresh injury as a conservative house rule.