
How Long Does Stephania Erecta Take to Sprout? 170-Day Case
Stephania erecta can take months to sprout. Separate substrate drying from tuber decline, check without disturbing roots, and use warmth cautiously.
Derek Kim · 2026-10-20 · Updated 2026-10-24 · 14 min read
Key Takeaways
- Grower reports span weeks to months, including one 170-day case. They do not establish a normal deadline.
- Inspect surface condition weekly without lifting the tuber. Pot mass mainly tracks water in the whole setup.
- A 25°C root-zone target is an extrapolated starting point, not a tested Stephania optimum.
- Keep water off the caudex and avoid a sealed, wet enclosure.
- Investigate deterioration at any date. A firm tuber does not become dead when a month-count expires.
You potted a Stephania erecta bulb months ago. The shop said a few weeks. The bulb just sits there, smooth and silent, and every forum thread you open says either be patient or it is dead.
Grower reports range from weeks to many months, including a reported 170-day wait. These individual accounts do not establish a typical sprouting time. Judge a waiting tuber by changes in condition rather than a promised date.
Check for visible deterioration without disturbing new roots. Firmness, smell, and surface change are useful warning signs, while pot weight helps track watering. None alone proves that a silent tuber is alive or dead.
Simple check with one weekly photograph
Mark the pot rim beside one visible bud and photograph that side each week with a ruler beside it. Keep the camera angle and light similar. This catches bud swelling or an enlarging lesion without repeatedly digging up the plant.
A firm, unchanged tuber gets another week of observation, not another soak. A new wet patch, collapsing base, or foul odor gets prompt inspection instead. Weekly checks shorten the time a developing problem can go unnoticed.
How Long Does a Fresh Stephania Erecta Bulb Take to Sprout?
Care guides promise sprouting within two weeks to three months. One mainstream reference also reports bulbs that sat dormant for 12 months before waking.
A documented grower case ran 170 days from rootless bulb to first sprout. That is about five and a half months of nothing, followed by a normal, vigorous vine.
| Expectation source | Window |
|---|---|
| Typical care guides | 2 weeks to 3 months |
| Documented grower timeline on video | 170 days |
| Reported long outliers | Up to 12 months |
A firm tuber with no expanding lesion can still sprout after several silent months. The 170-day video is one grower’s result, not a survival rate or a deadline for your plant.
At day 30, continue observing surface condition. At day 90, review the temperature log and drainage rather than increasing water automatically. At day 170, judge the plant by deterioration or new growth rather than the matching date.
Why a Healthy Bulb Ignores a Perfect Setup
The bulb sold as Stephania erecta is botanically Stephania pierrei, a deciduous vine from Cambodia, Laos, Thailand, and Vietnam.
Its caudex is a swollen stem that carries the plant’s entire reserve budget. Two mechanisms let that organ ignore your perfect warmth and humidity for months.
Endodormancy Means the Bud Is Not Listening Yet
Tuber physiology splits not-growing into two different states. An ecodormant bud is merely waiting for better conditions and responds as soon as they arrive. An endodormant bud does not grow even under growth-promoting conditions.
Potato, the best-studied tuber, maps the control loop. The hormone ABA holds the bud locked, and cytokinins rise only immediately before sprouting. Even cultivated potato dormancy spans 1 to 15 weeks depending on genotype.
Those hormone findings explain dormancy in potato. They suggest why a storage organ may remain inactive in favorable conditions, but they do not demonstrate Stephania’s hormonal state or a way to force its bud open.
Your Bulb’s Calendar Did Not Reset at Checkout
Imported bulbs are collected in Southeast Asia, cleaned, dried, and shipped bare. Most arrive with no roots at all.
A rootless tuber may rebuild roots before a visible shoot, or push a shoot from stored reserves before it has a useful root system. Neither sequence can be inferred from the lack of a vine.
Comparable tropical tubers show how long that internal clock can run. Yam dormancy spans 50 to 210 days depending on species and genotype. Months of silence sit inside normal biology for this kind of organ.
Measured check without confusing pot drying with tuber loss
Use a weekly surface check and a monthly review of the log. The measurements identify changes worth investigating, not a pass-or-fail test of life.
| Check | Pass | Fail | Action on a fail |
|---|---|---|---|
| Whole-pot weight | Comparable to a prior dry-stage reading | Unexplained change after accounting for water and equipment | Check the setup and tissue together, never discard by percentage |
| Gentle touch at accessible shoulder and base | Similar resistance to the plant’s previous check | A newly collapsing or wet area | Prompt inspection without repeatedly pressing the lesion |
| Smell at the mix line | Earthy or nothing | Sour or foul | Isolate and inspect for decayed tissue |
| Drainage holes | White root tips, or clean mix | Dark ooze or collapsed tissue | Unpot once and inspect |
Keep the watering log separate from the health log
- At the next naturally dry stage, weigh the same pot, tuber, mix, label, and support three times on a hard surface. Record the middle reading and the range. Exclude the saucer.
- Record every later pour in milliliters and weigh after drainage. Compare health observations only at similar dry stages, never a freshly watered pot against a dry one.
- Keep the weekly photographs beside the mass readings. Investigate an unexplained mass change only alongside a new lesion, persistent wrinkling, or other visible deterioration.
For example, a fall from 1,240 g after watering to 1,100 g at the dry stage is 140 g lost from the whole setup. Much of it may be evaporated water. It does not establish that the tuber lost 11% of its reserves.
Weigh a new trellis separately before adding it and record that mass on the pot label. A 35 g support changes a 1,100 g reference to 1,135 g without changing the water supply. If mix is also replaced or lost, establish a new reference instead of correcting only for the support.
Do not use a percentage of total pot weight as a death threshold. Clay, stones, and added water can dominate the number. Leave the tuber planted unless independent symptoms justify inspection.
Compare the plant with its own earlier condition
Touch accessible shoulder and basal tissue gently without making a dent. Stop if the skin yields or looks damaged. Compare with the same points on the previous check, not a potato with a different skin and storage history.
A change from firm to wet or collapsing is a warning. A firm exterior can conceal internal damage, so neither a firm feel nor one clean photograph proves health.
Soft, water-soaked patches are the earliest surface sign of bacterial soft rot in storage tubers. Early detection matters because rot does not self-arrest in a warm pot.
Check the Drainage Holes, Never the Rootball
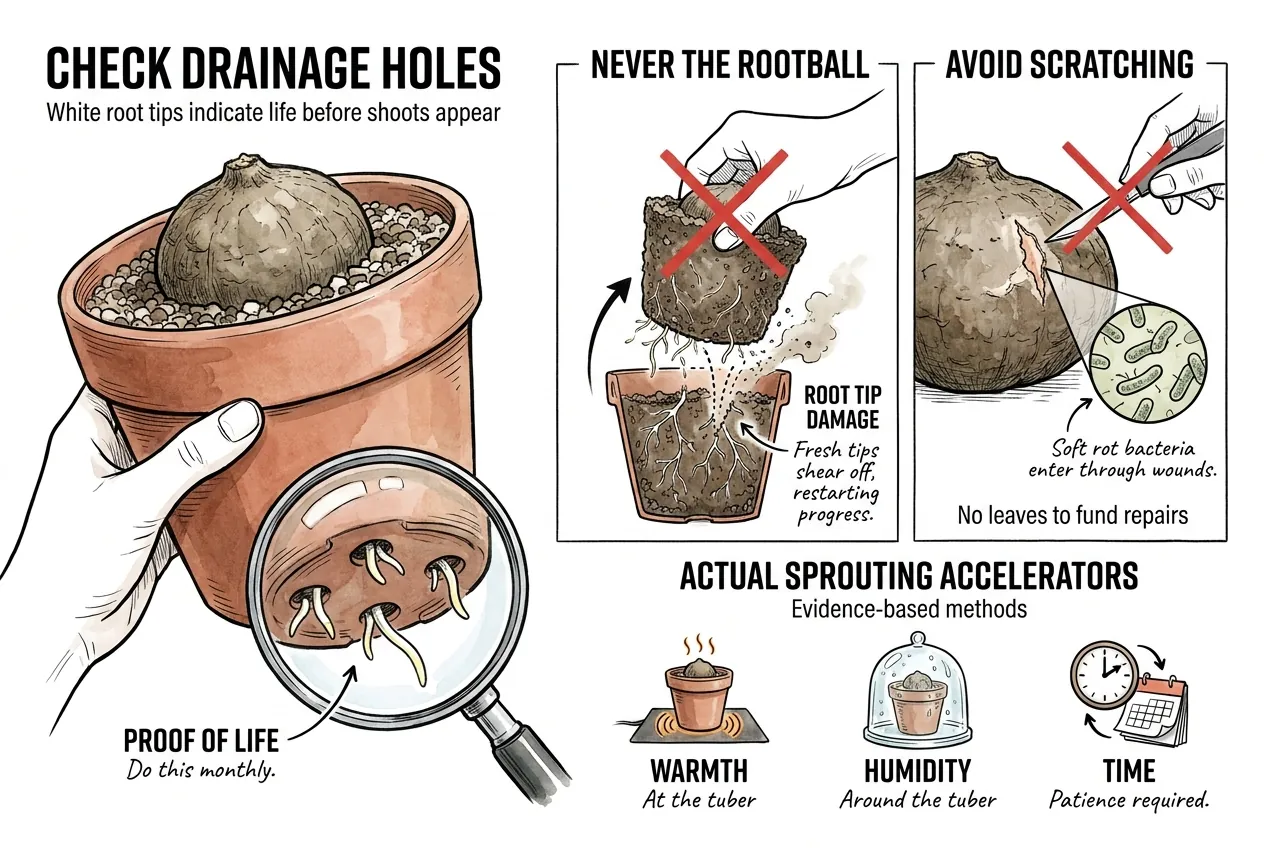
Look through drainage holes without shifting the root ball. A fresh root tip indicates root growth, but its absence tells you little because new roots may not have reached the holes.
Resist the urge to unpot. Fresh root tips shear off when the mix shifts, and every break restarts the invisible progress you are waiting on.
Skip the scratch test too. Soft rot bacteria enter storage tubers chiefly through wounds, and a scratched bulb has no leaves to fund repairs.
What Actually Speeds Up Sprouting
Stable warmth and a ventilated setup are reasonable supports while you wait. Evidence from yam and potato is indirect, so it cannot promise a shorter sprouting time for Stephania.
Warm the Substrate, Not the Room
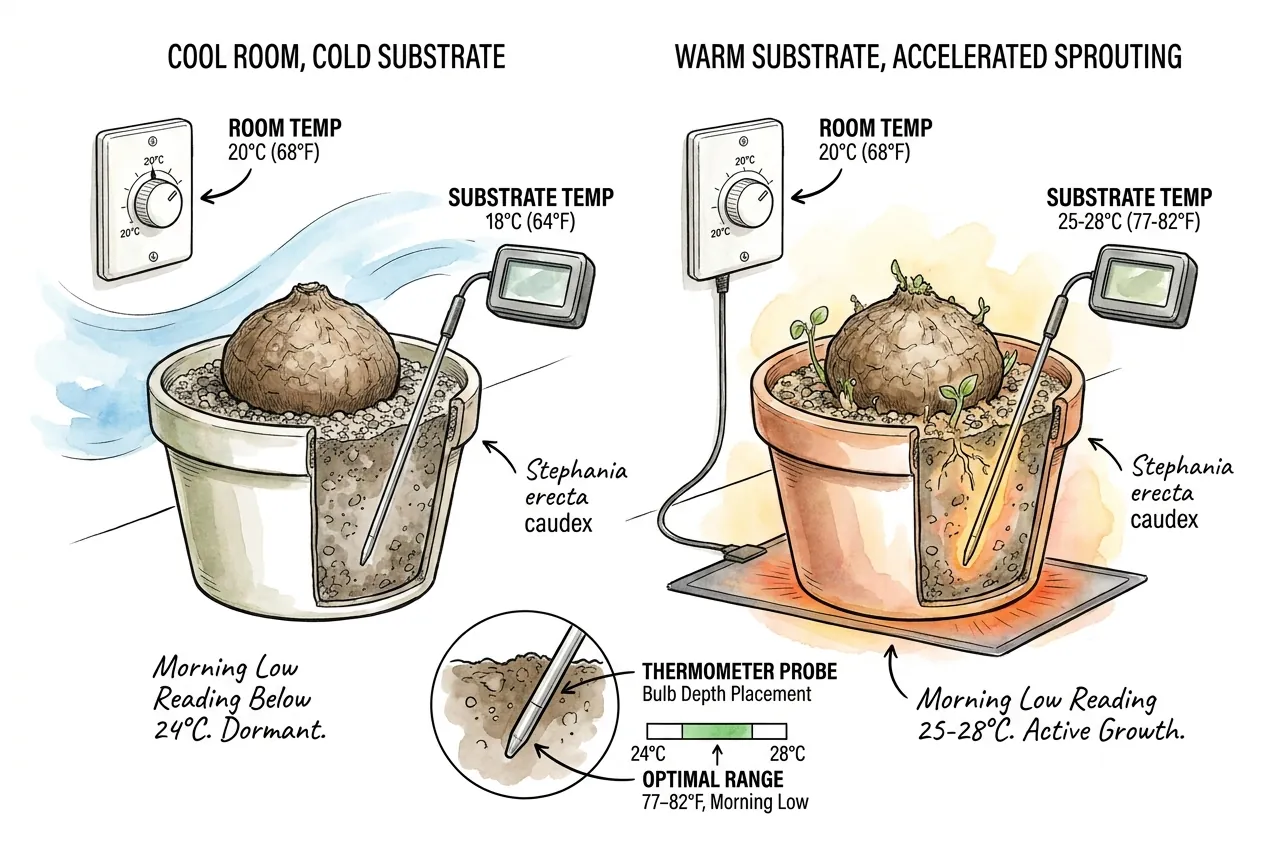
A yam review describes sprouting during ventilated storage at 24 to 28°C and 70 to 90% relative humidity. Those were Dioscorea tubers, not a controlled Stephania trial, and the humidity range is not a target for a sealed growing dome.
Start near 25°C at tuber depth if you choose bottom heat. Check with an independent probe before lights-on and late in the light period for three days. The two timings catch a cold night and daytime overheating that a morning-only check misses.
Use 28°C as a conservative adjustment point for this trial. If it is exceeded, lower or stop heating and check probe placement. This leaves a narrow operating range around the starting target without claiming a species-specific optimum or a guaranteed accelerator.
Room air overstates bulb-depth temperature, especially overnight near a window. For the gear decision, the heat mat for caudex rooting guide covers mats, controllers, and probe placement.
Humidity and the One-Time Soak
A humidity dome or loose clear bag slows the bulb’s water loss while it has no roots to replace it. Leave one side open for airflow. A sealed bag builds the standing water film that feeds rot instead of the bud.
Some retail guides recommend soaking a hard, dry tuber before potting, but that is not a validated treatment for every shipment. Skip prolonged soaking when the base is wounded, soft, or suspicious, and never soak merely because a healthy potted tuber has not sprouted.
Never re-soak a potted, waiting bulb. The failure-mode list below covers what repeated wetting does to tuber skin.
Skip the Hormone Dip
Gibberellic acid genuinely breaks tuber dormancy in agriculture. A 2025 potato study reached 98 percent sprouting in about 20 days with a calibrated dip.
The same study measured the cost. Treated tubers lost nearly double the weight of controls during sprouting, 77.66 percent against 40.12 percent, because a forced wake-up burns reserves through respiration.
No validated hormone-dip protocol for Stephania is established by that potato study. Avoid applying its concentration or timing to a single imported tuber.
What Rots a Waiting Bulb
A wet, poorly aerated setup can damage a waiting tuber. Check for trapped runoff, water against the base, and fresh wounds before increasing humidity or watering.
Storage-tuber soft-rot guidance describes rapid development in warm conditions. Keep water off wounded tissue, but do not assume that a dry outer surface rules out decay underneath.
| Habit | Why it kills | Do instead |
|---|---|---|
| Watering onto the bulb | Water pools in the crown and holds an airless film on bud tissue | Water a perimeter ring only |
| Re-soaking a potted bulb | Soaking swells lenticels, which admit soft rot bacteria | One soak at potting, never again |
| Burying the bulb fully | A buried shoulder stays wet for days after each watering | Set the bulb one fifth to one third deep |
| Sealed bag or airtight dome | Condensation with no airflow creates the low-oxygen state rot needs | Vent one side always |
| Scratch tests and hard squeezes | Wounds are the main bacterial entry route | Thumb-pad press only |
| Unpotting to check roots | Shears new root tips and restarts the wait | Audit from the outside |
Planting depth deserves its own line. Care references converge between one fifth and one third of the bulb in the mix, basal plate down. The shallow end is safer in moisture-holding mixes.
The Holding Setup for a Six-Month Wait
The waiting pot has one job, which is drying fast. A rootless bulb drinks almost nothing, so every drop you add must leave by evaporation.
Use a pot barely wider than the bulb, in terracotta if you have it, filled with a majority-mineral gritty mix.
Park it in bright shade over the warmth source, never in direct midday sun.
Check the mix weekly, but do not water on a weeks-elapsed schedule. For a firm, undamaged tuber in warm, fully dry mix, a cautious trial is 10 mL per 200 mL of mix, spread around the perimeter. Keep water off the tuber.
This 5% trial limits the water added while root uptake is uncertain. Record the drained mass, recheck after 48 hours, and add nothing while the mix remains damp. If water bypasses the mix or the base deteriorates, stop and fix that problem rather than repeating the dose.
When to Cut Your Losses
Assess deterioration at any date, but do not discard a firm tuber merely because a deadline elapsed. A long wait calls for reviewing the setup and the plant together.
| Bulb condition | Under 6 months | 6 to 9 months | Past 9 months |
|---|---|---|---|
| Firm, weight holding | Wait | Wait, verify substrate warmth | Review the setup and seller history, continue observing if unchanged |
| Firm with progressive wrinkling, no roots visible | Wait, recheck setup | Compare matched dry-stage readings and inspect visible tissue | Inspect if deterioration persists, no automatic discard date |
| New wet soft spot or foul smell | Isolate and inspect | Isolate and inspect | Isolate and inspect |
| Extensively collapsed or liquefied tissue | Discard | Discard | Discard |
The patience ceiling is high. The documented 170 day case sat silent past month five, and reports of healthy wake-ups run to a full year.
At nine to twelve months, review recorded temperatures, water additions, and photographs. That is a setup review date, not a biological expiry date. Do not cut a firm, unchanged tuber merely to settle uncertainty.
If tissue is extensively liquefied or collapsed, disposal may be appropriate. Keep a suspect plant separate while assessing it, and avoid opening healthy tissue just to check its color.
Photograph the tuber on arrival and retain the invoice and seller’s care instructions. Check the actual guarantee period promptly, because it may expire before a slow tuber sprouts.
After the Sprout
Once a shoot appears, add support and monitor leaf expansion alongside drying. Increase watering gradually as the mix dries and growth continues. A shoot by itself does not prove that a rootless tuber has established.
| Care element | Before emergence | After emergence |
|---|---|---|
| Water | Small measured trial only after the mix dries, with no deterioration | Increase only with continued leaf growth, drying mix, and evidence of root establishment |
| Light | Bright shade | Bright light, ramped over one to two weeks |
| Humidity dome | Optional and ventilated, never a sealed wet enclosure | Off within days |
| Support | None | Small hoop or trellis at first vine growth |
One warning carries the whole first season. A leaf flush is paid from tuber reserves and can happen with few working roots, so leaves prove spending, not establishment.
Keep photographs, root observations, and watering records through the first season. Whole-pot weight cannot show that the tuber rebuilt its reserves, especially after adding a trellis or producing leaves. Persistent decline after leafing calls for the year-2 Stephania diagnosis.
Expect natural leaf drop in autumn. The species is deciduous, and a yellowing vine in October is the calendar working, not a care failure.